Introduction
This is an instructional tutorial on how to operate the Sony X70. This camera is a portable high-end consumer level camera that is also used by many professionals. This means the camera includes many automatic features for novices, as well as manual overrides that allows experienced photographer to control the look of the image with an high level of granularity.
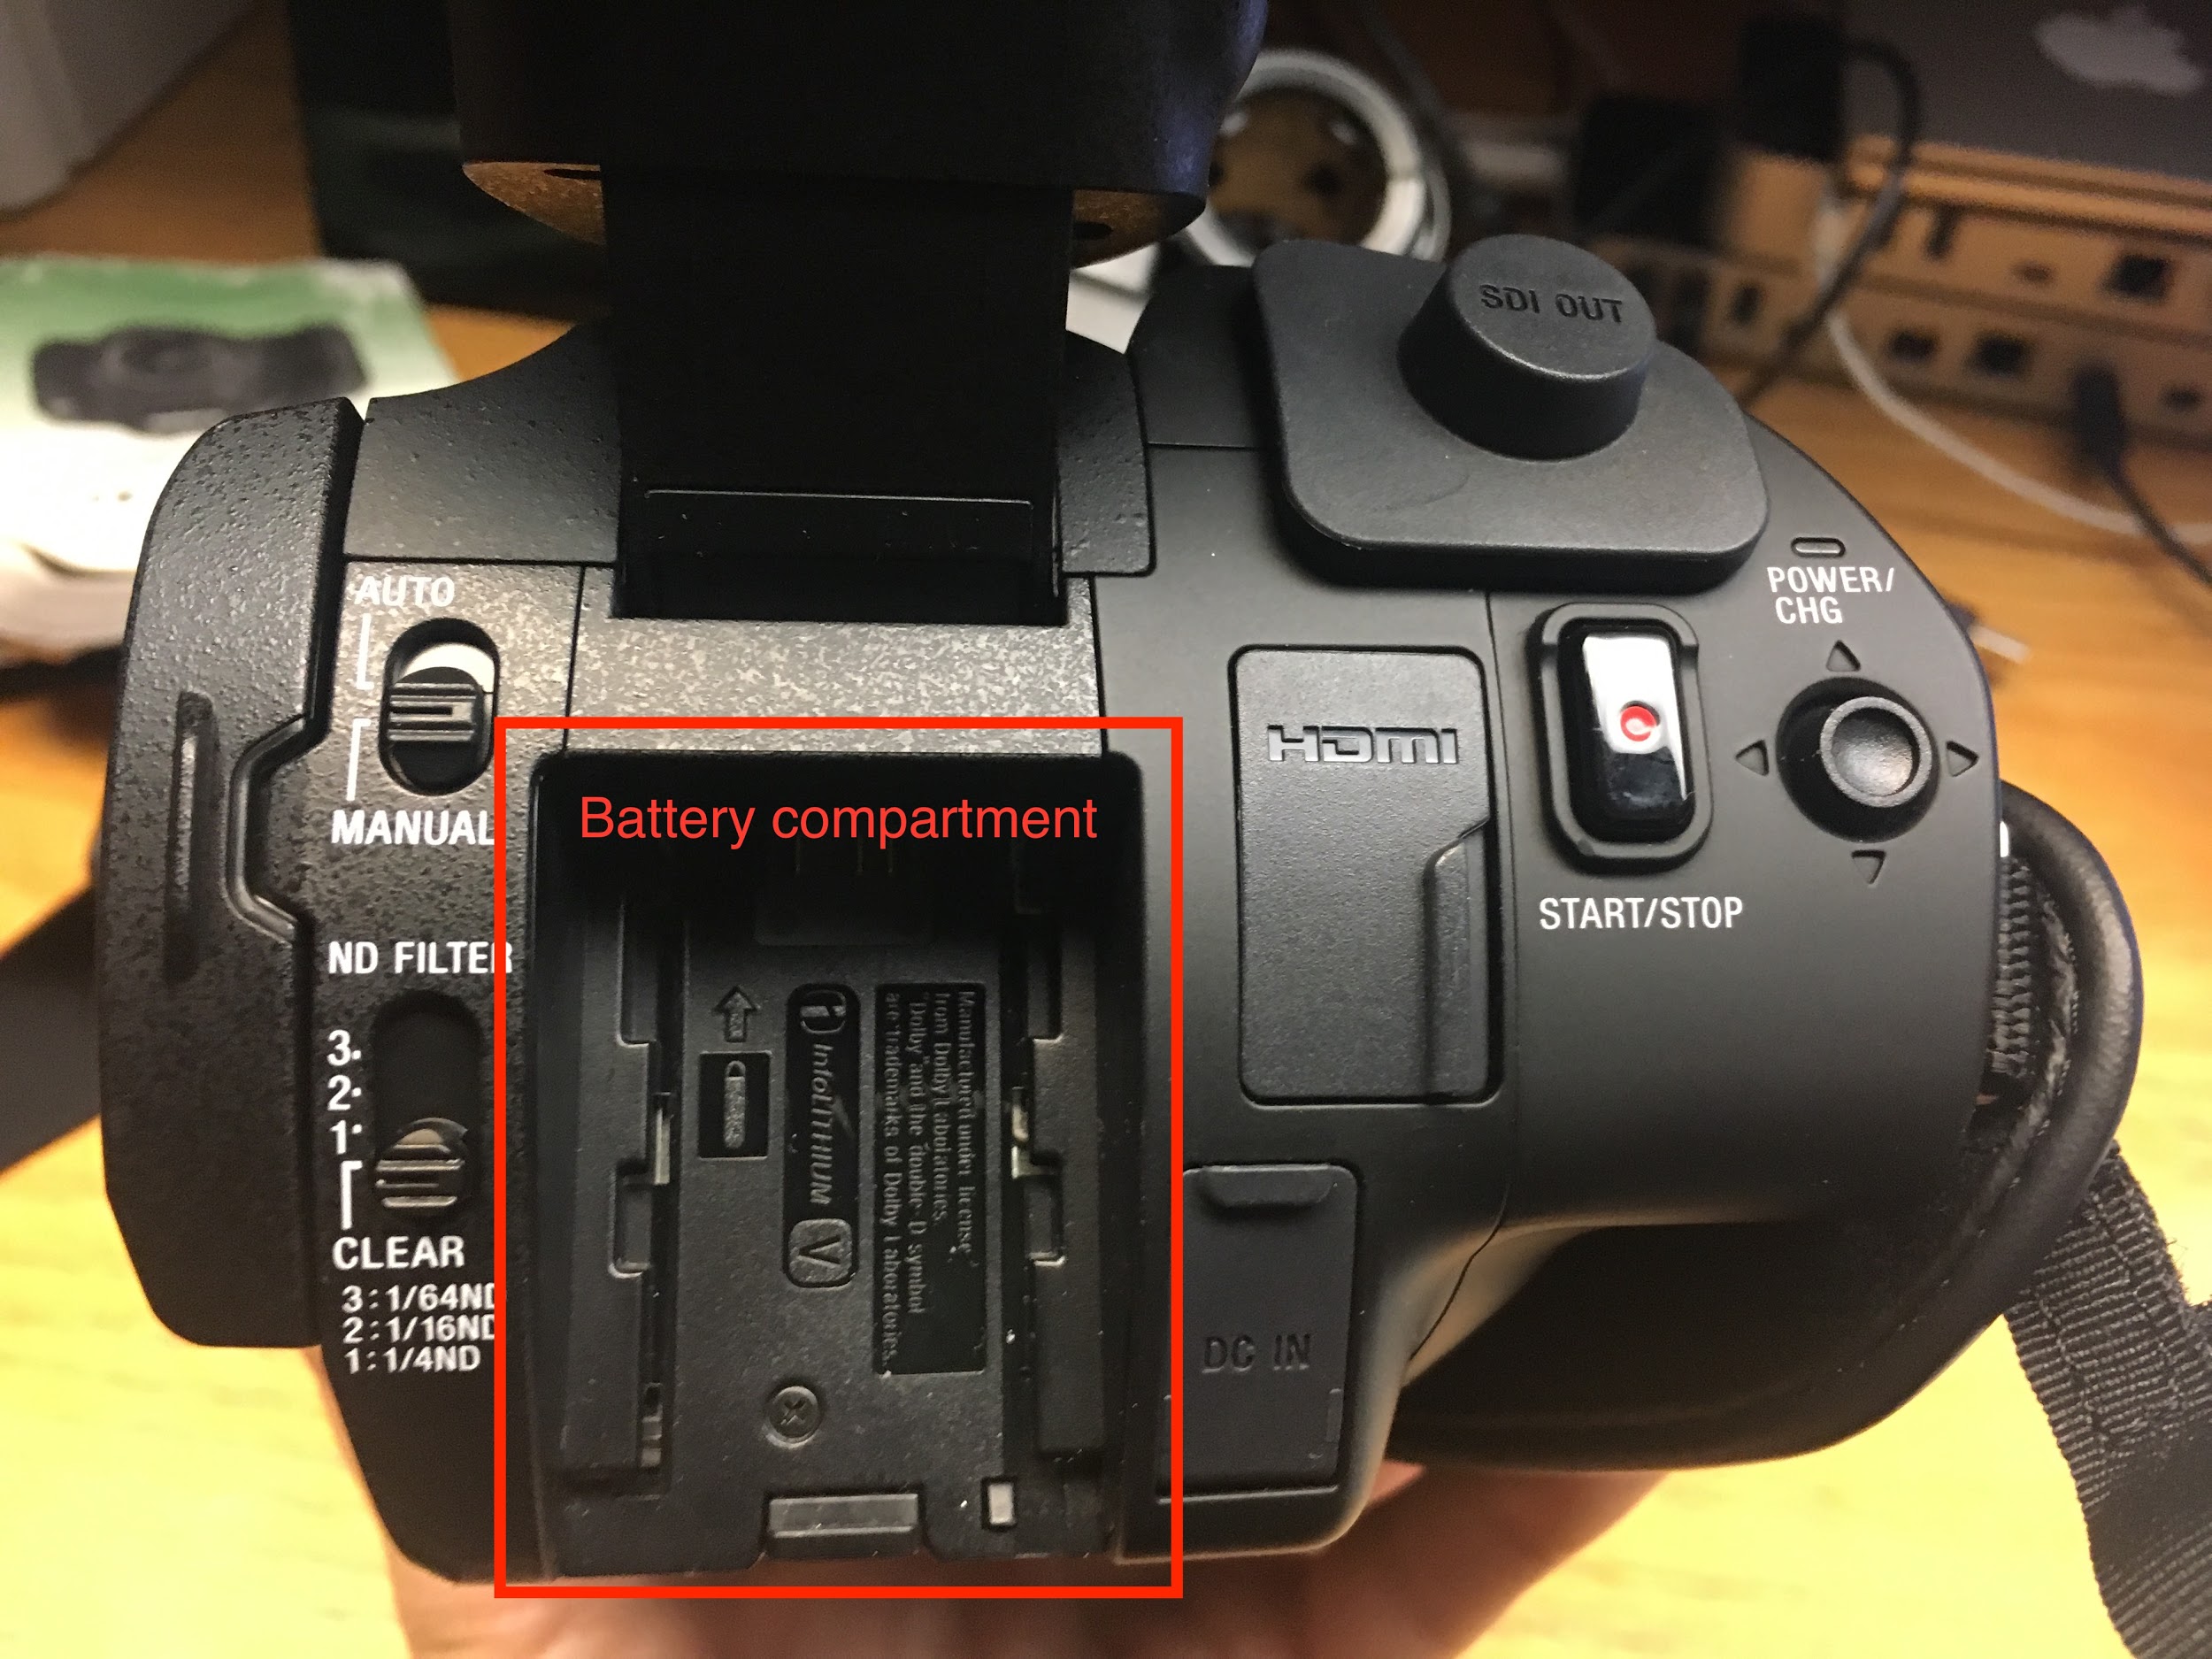
Battery
The battery for the Sony X70 camera is inserted into a compartment at the back of the camera.
Insert the battery with the arrow on the top of the battery pointing in and the metal contacts on the battery going into the metal contacts in the compartment.
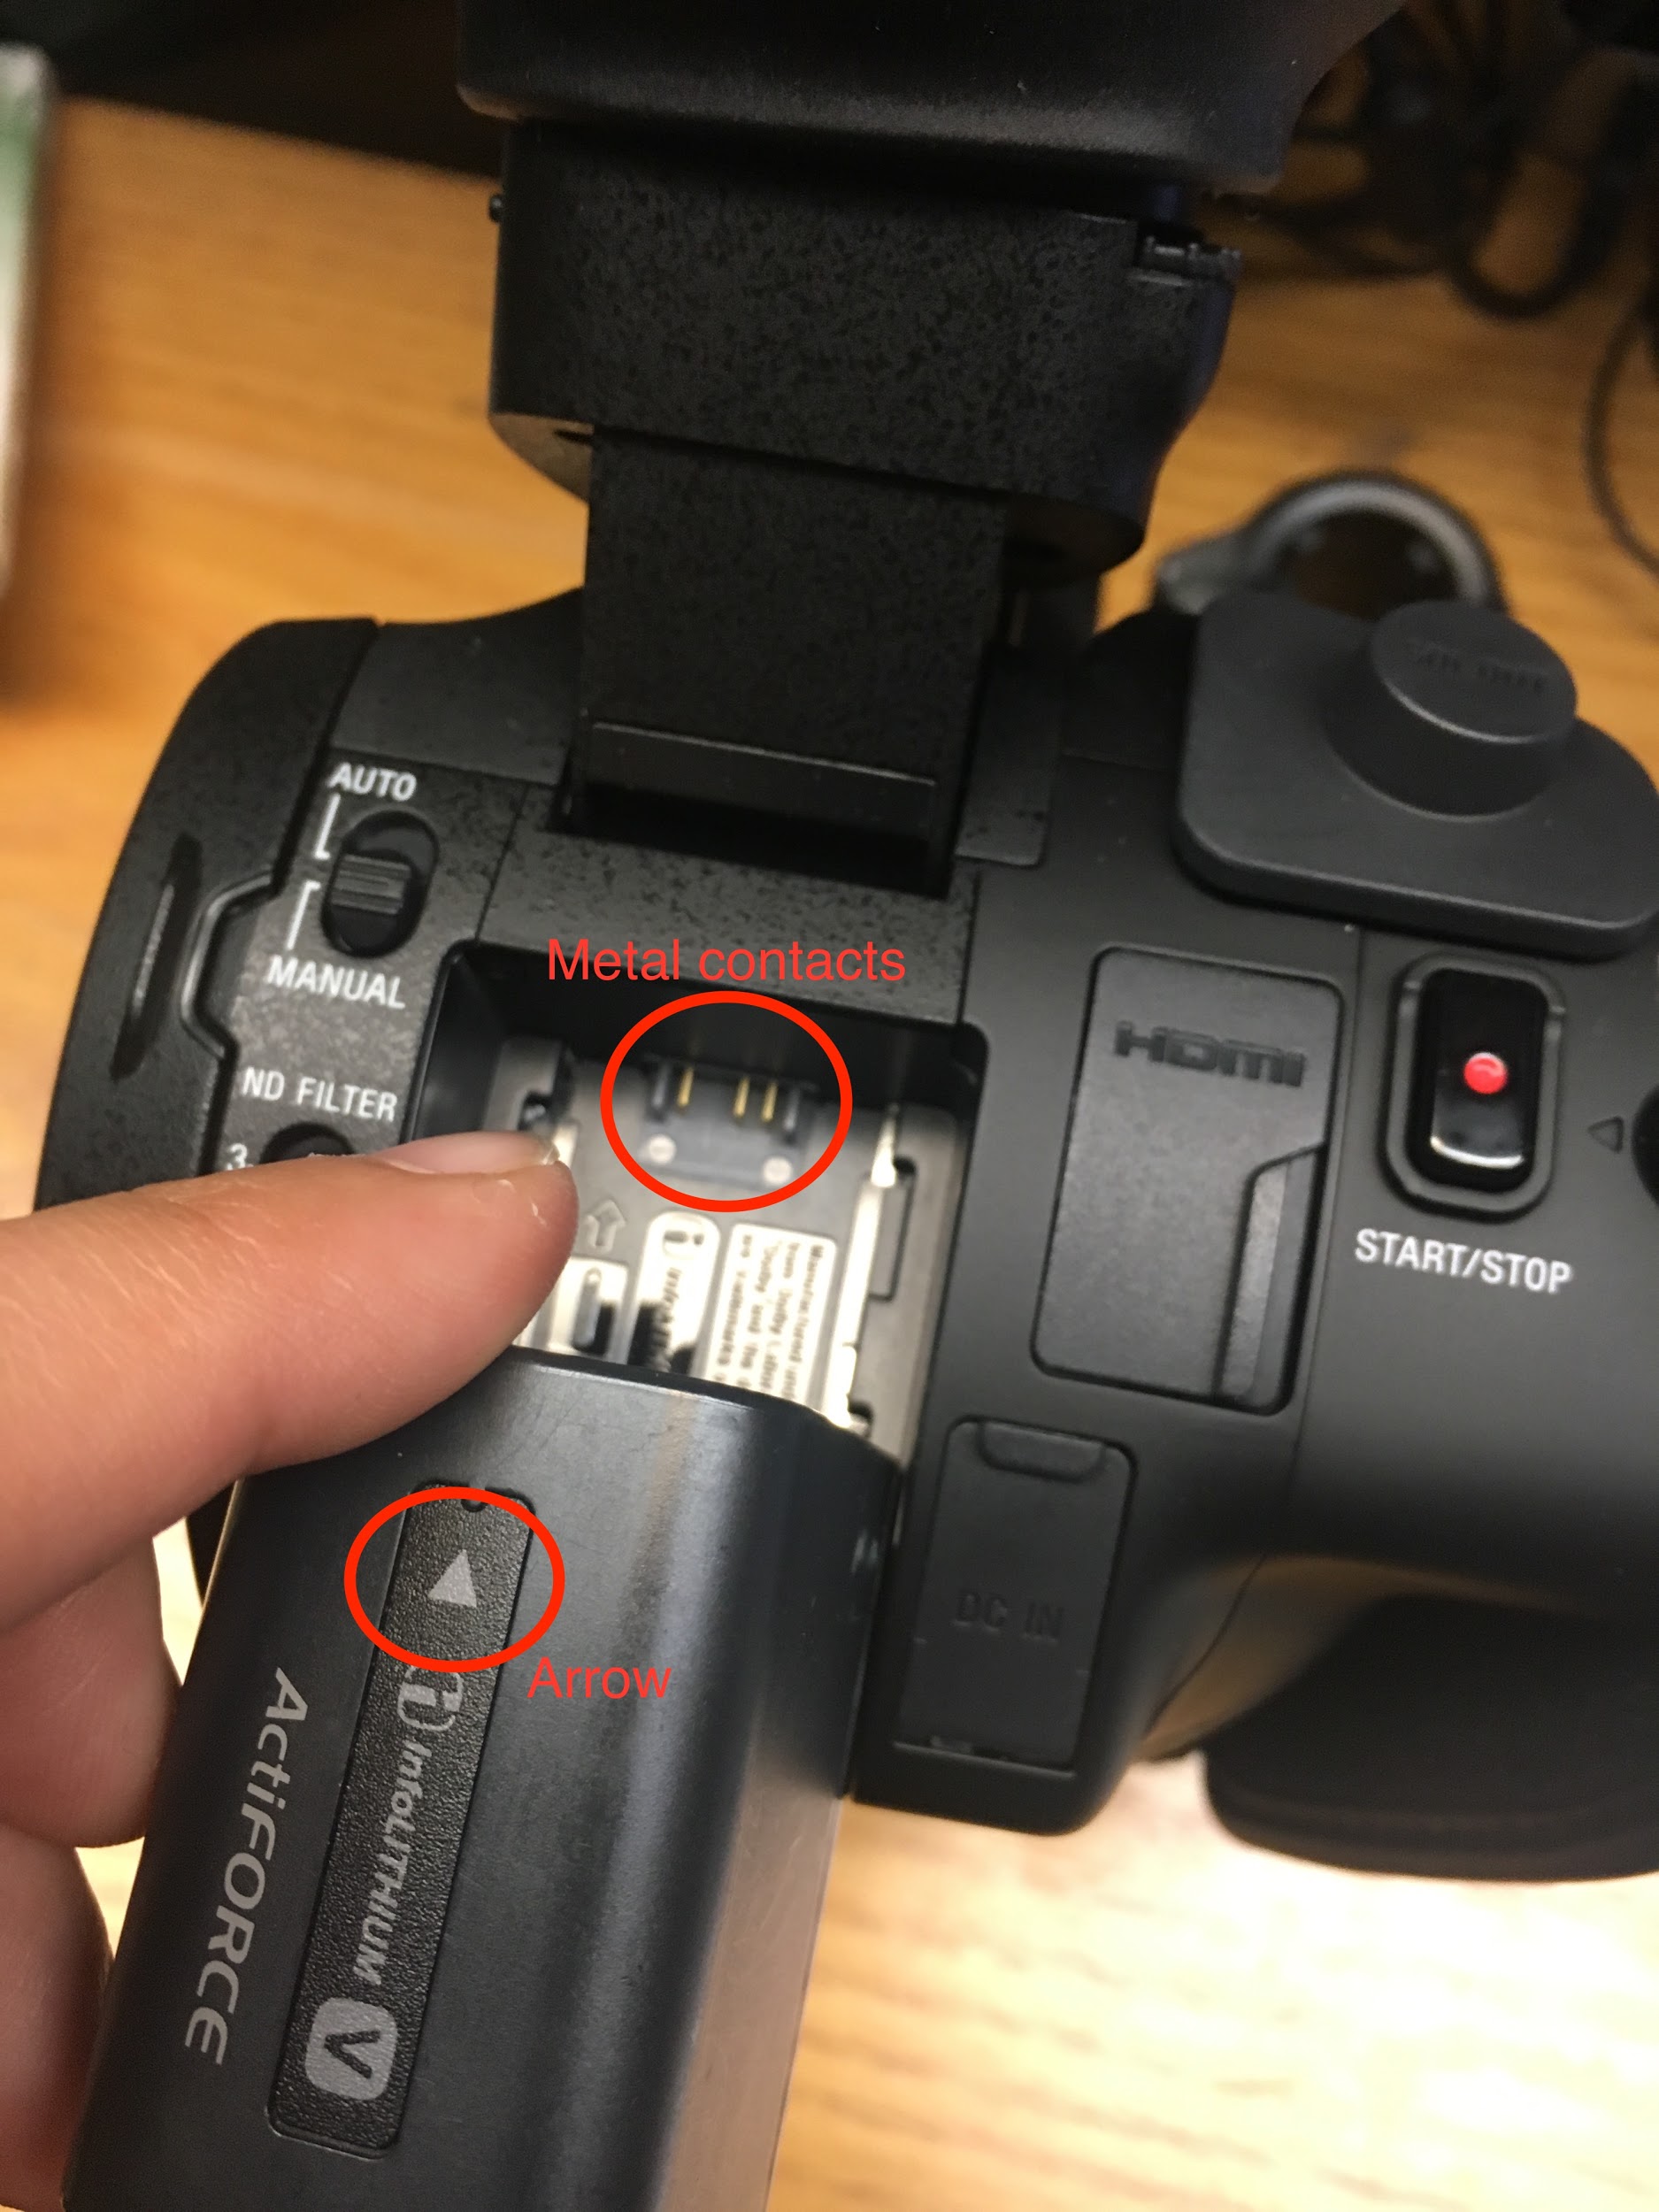
Slide in gently until the battery clicks into place.
Warning – the battery should slip into place with relatively little resistance. Don’t force the battery into the compartment. If you’re getting resistance check to make sure the battery is positioned correctly, with the arrow facing in.
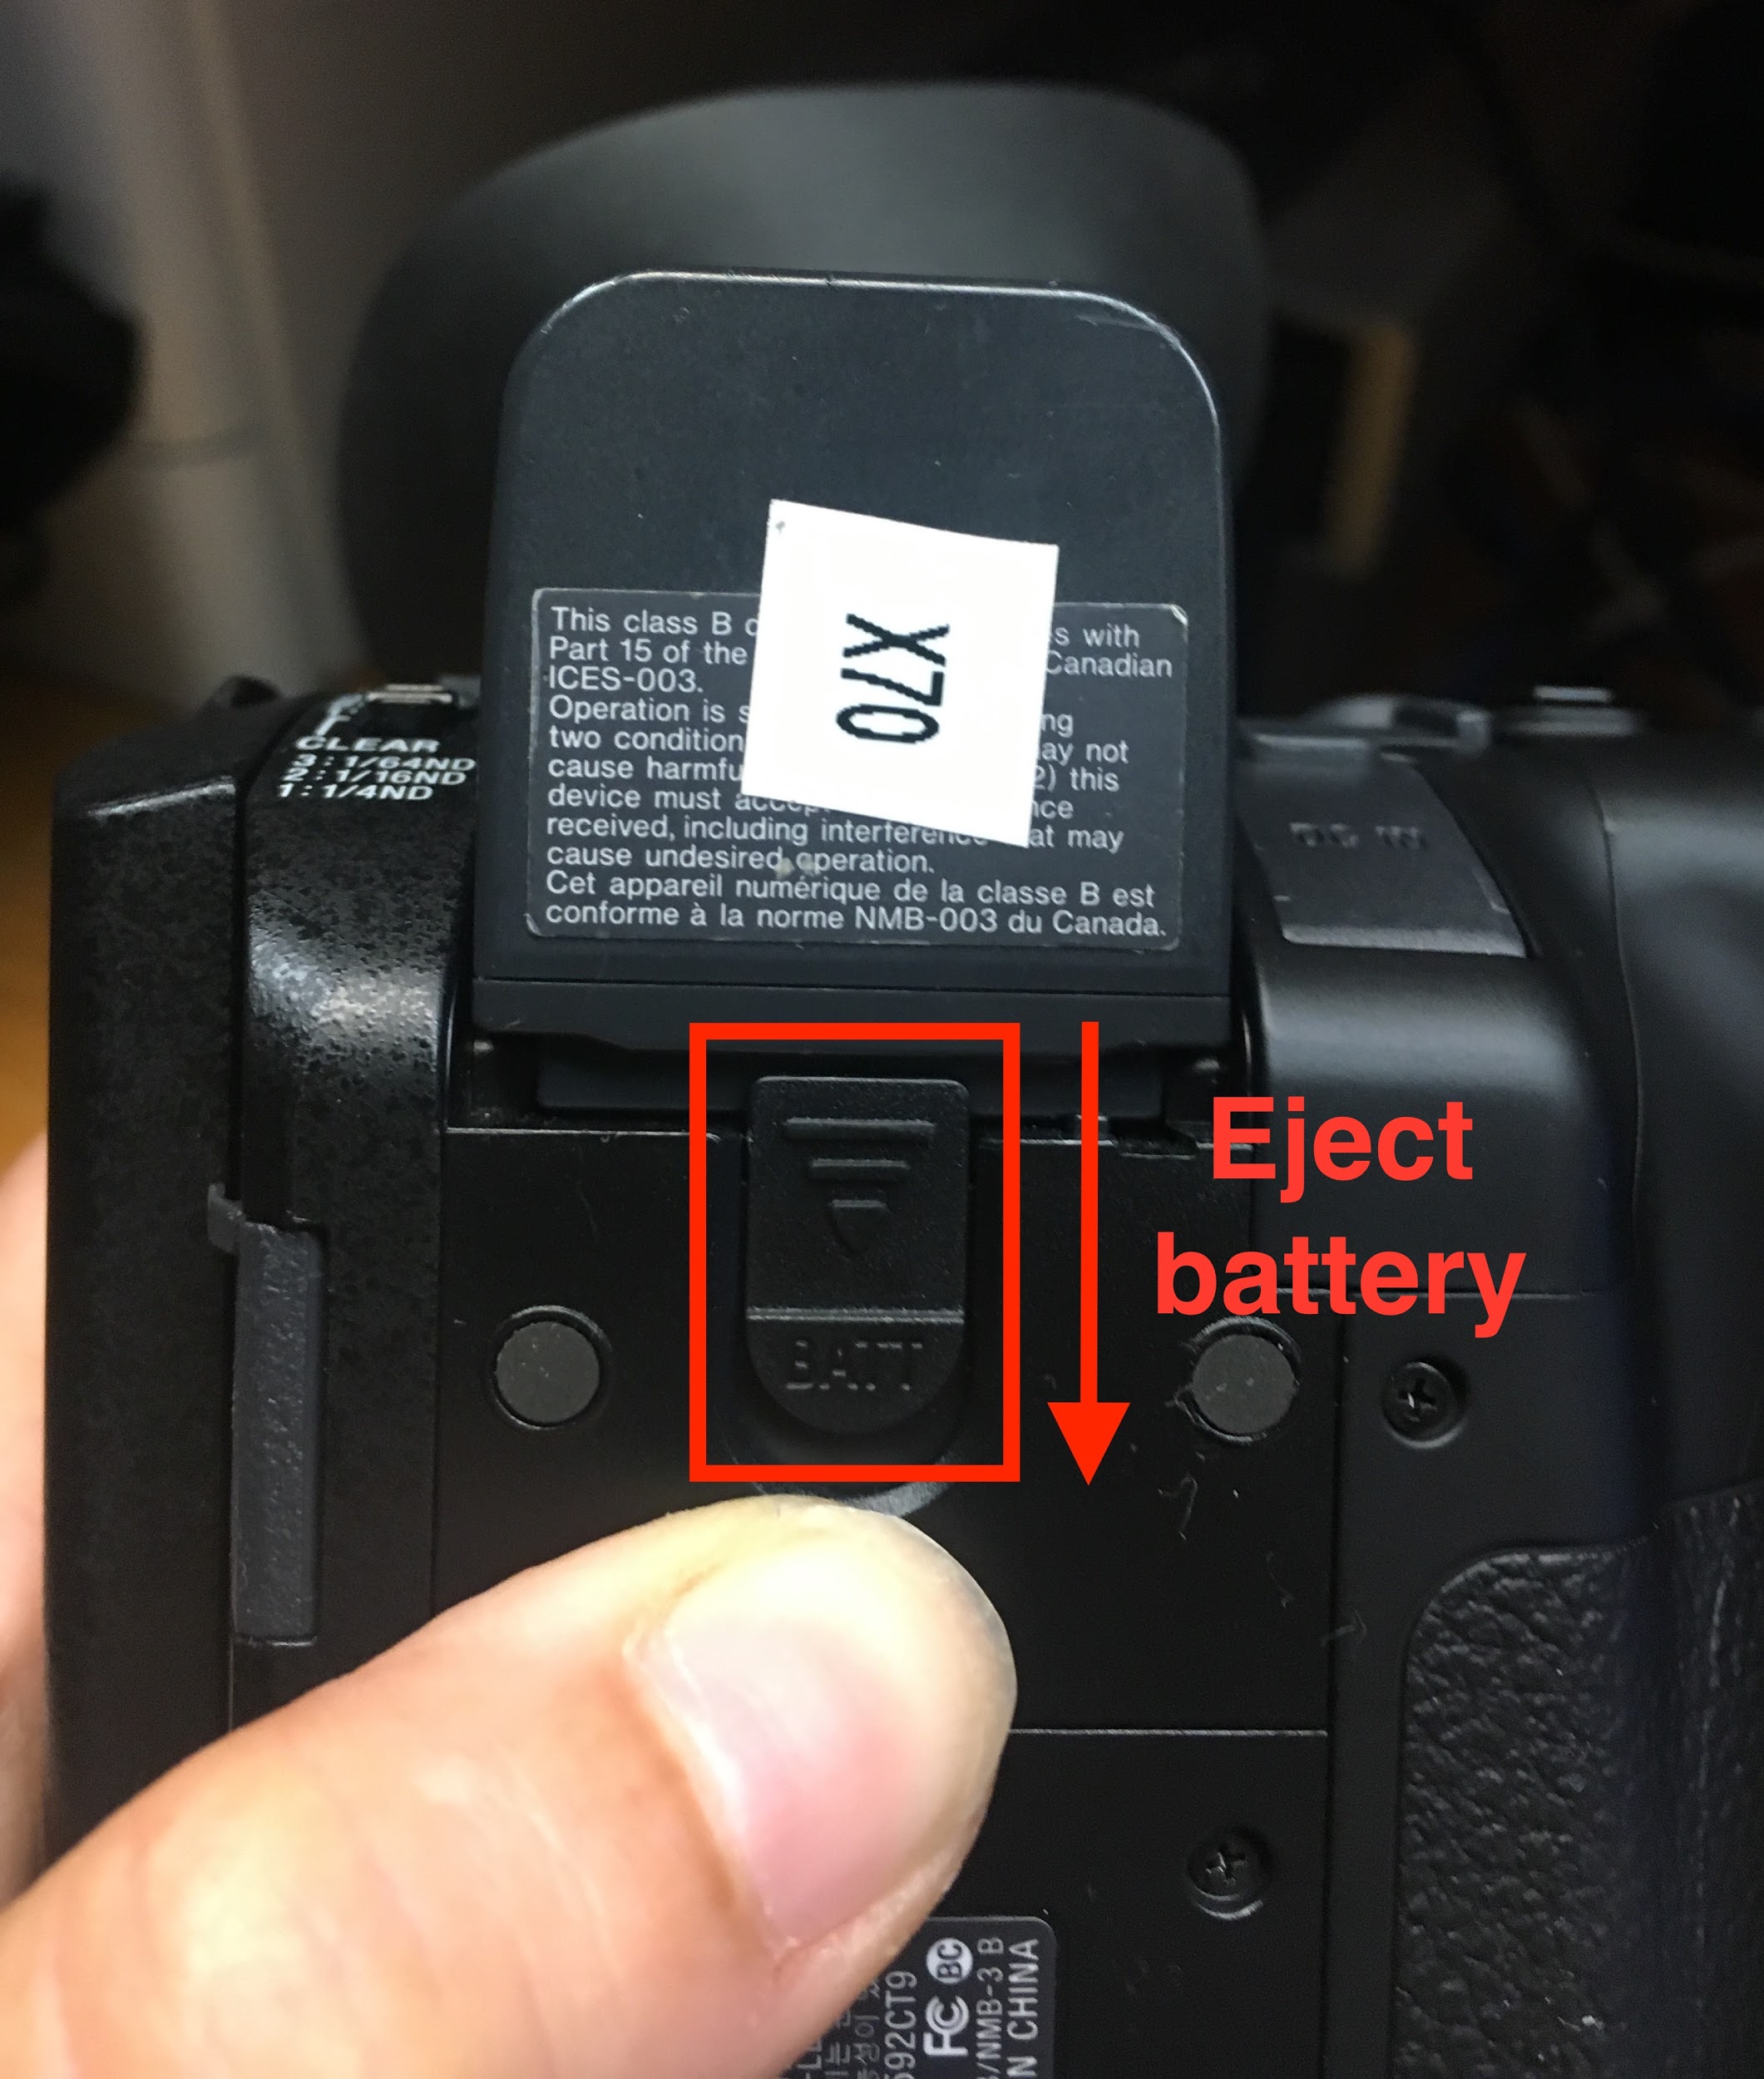
Removing the Battery
To remove the battery, look at the bottom of the camera and find the tab holding the battery in that says “BATT.” Slide that tab down and then gently slide the battery down and out.
Battery Life
To check how much time is left in the battery look at the battery icon in the upper left corner of the LCD screen.
Re-Charging the Battery
You can re-charge the battery in the camera.
Insert the battery into the camera as described above.
Plug one end of the AC adapter cable to the DC IN jack on the back of the camera and the other end of the cable into a power outlet.
The camera will start charging the battery.
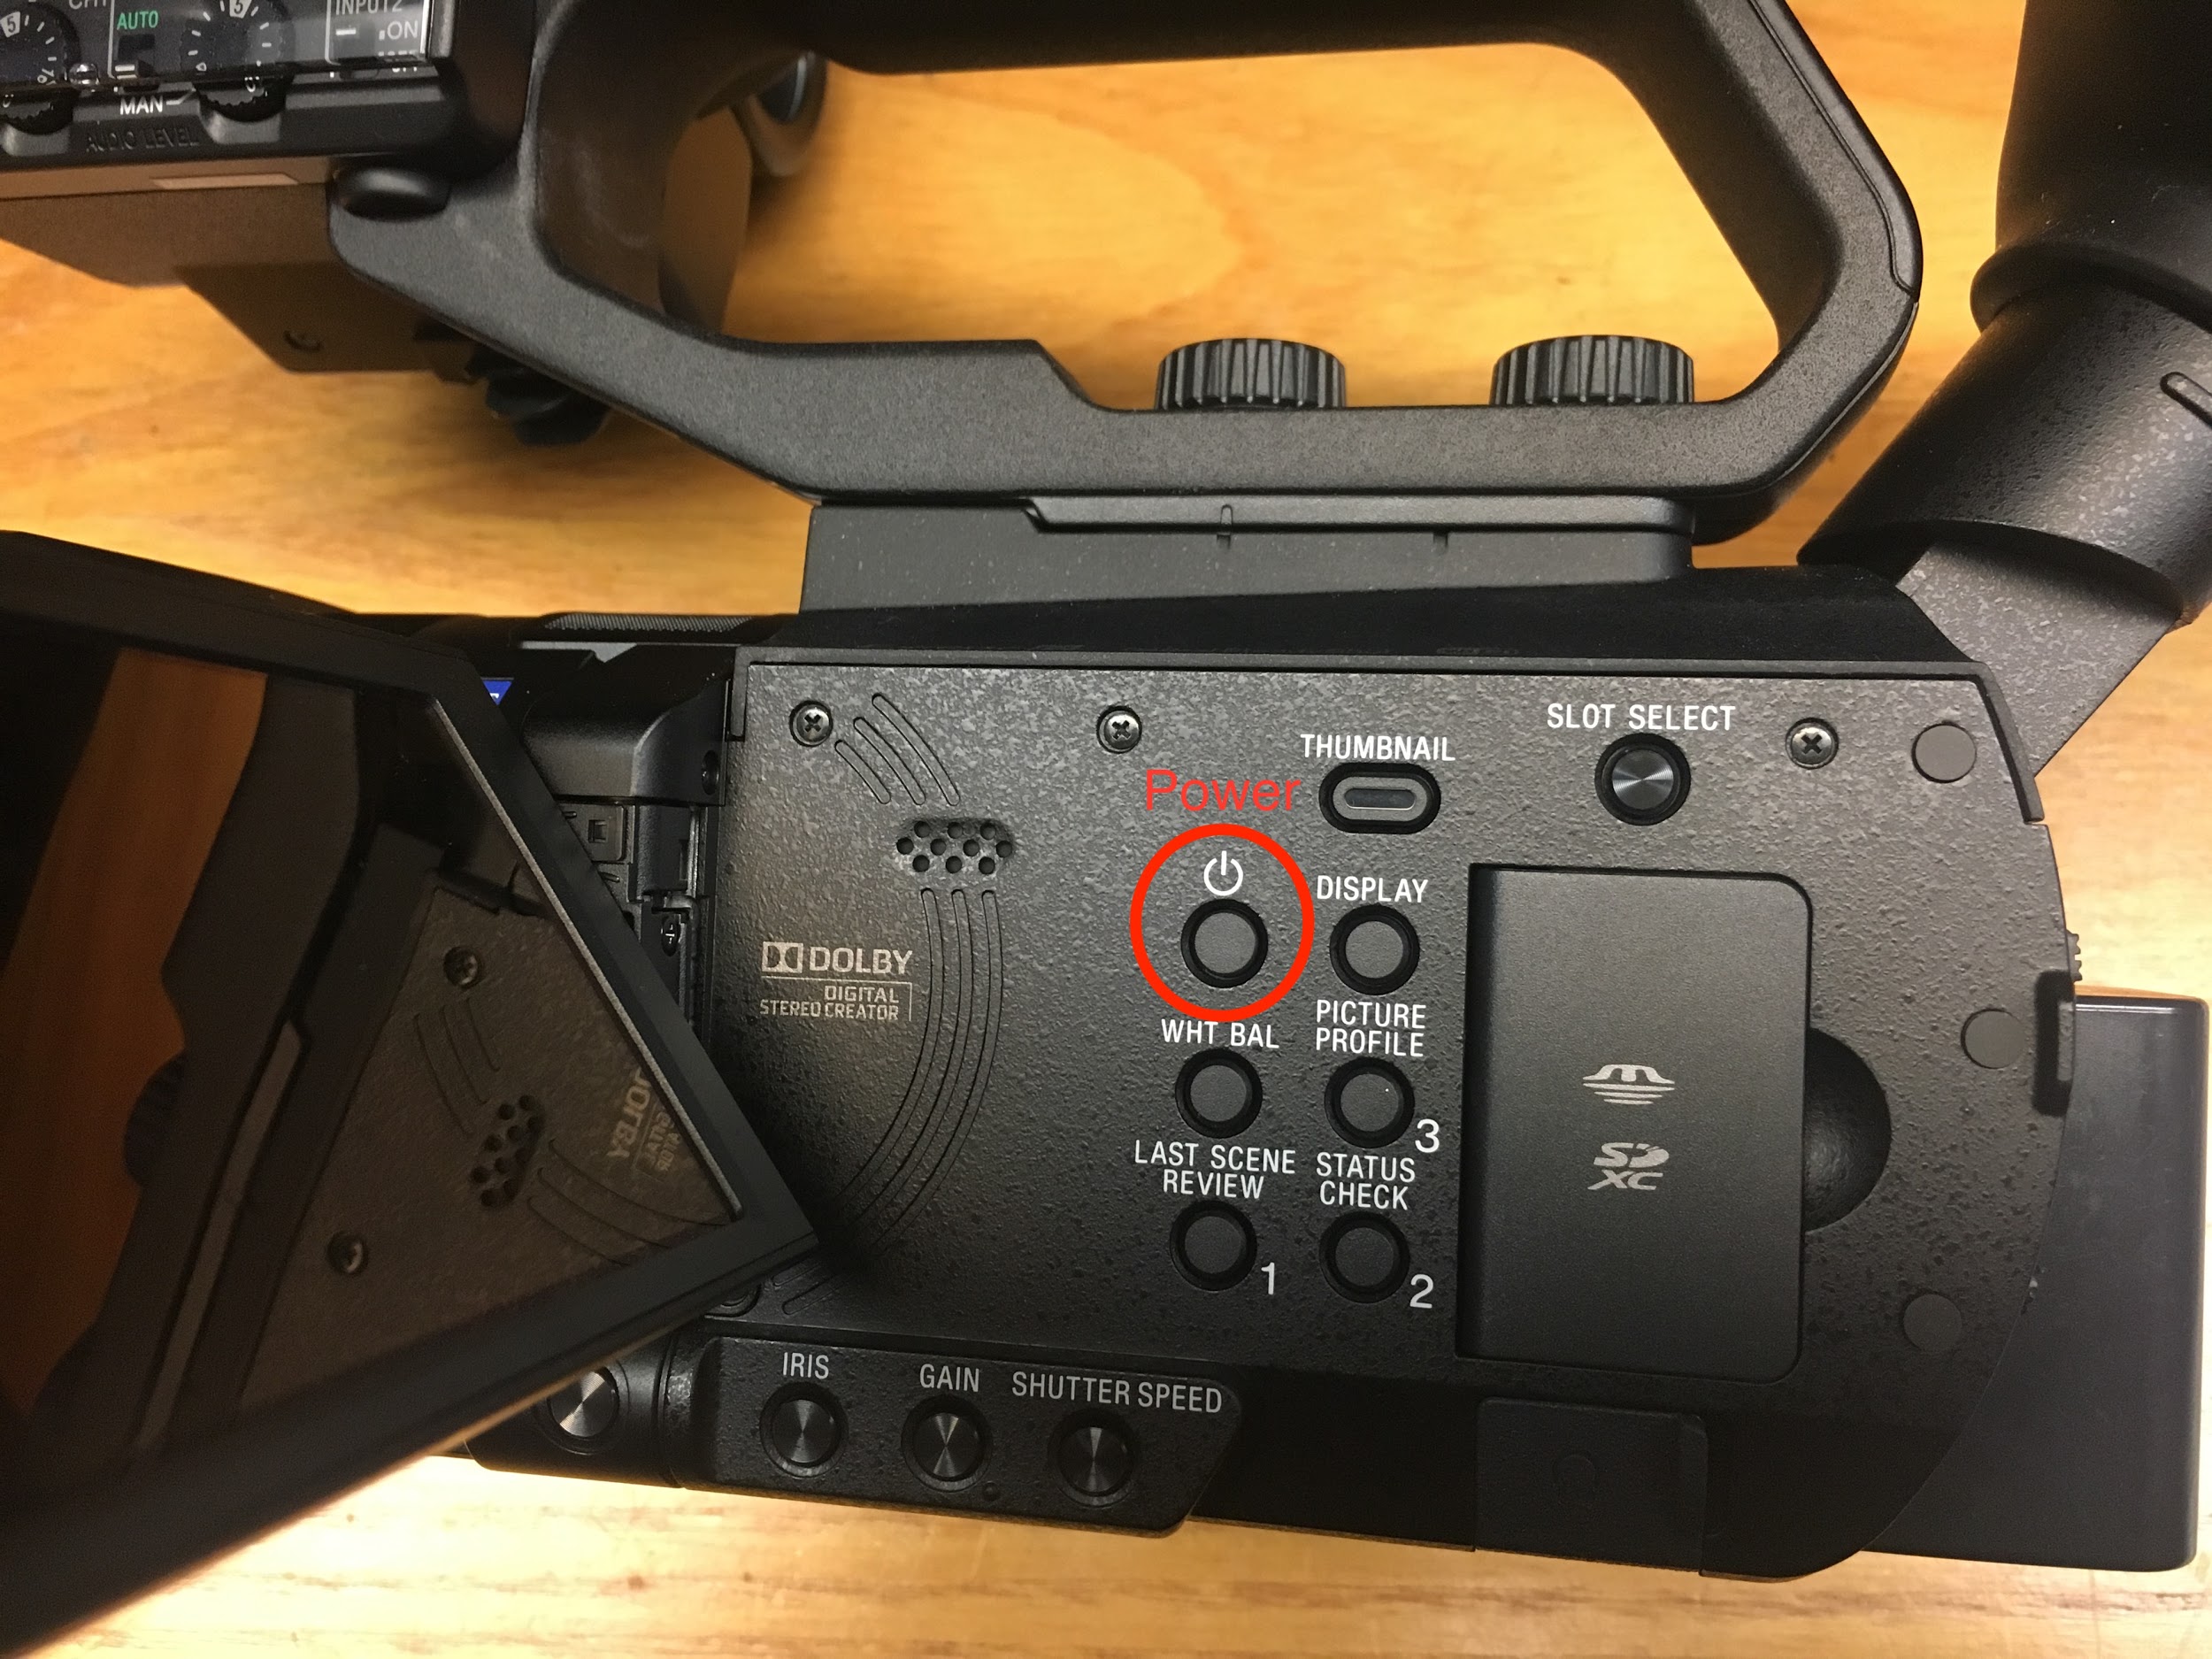
Turning On the Camera
Turn on the camera by opening out the LCD screen and pressing the power button located on the body of the camera.
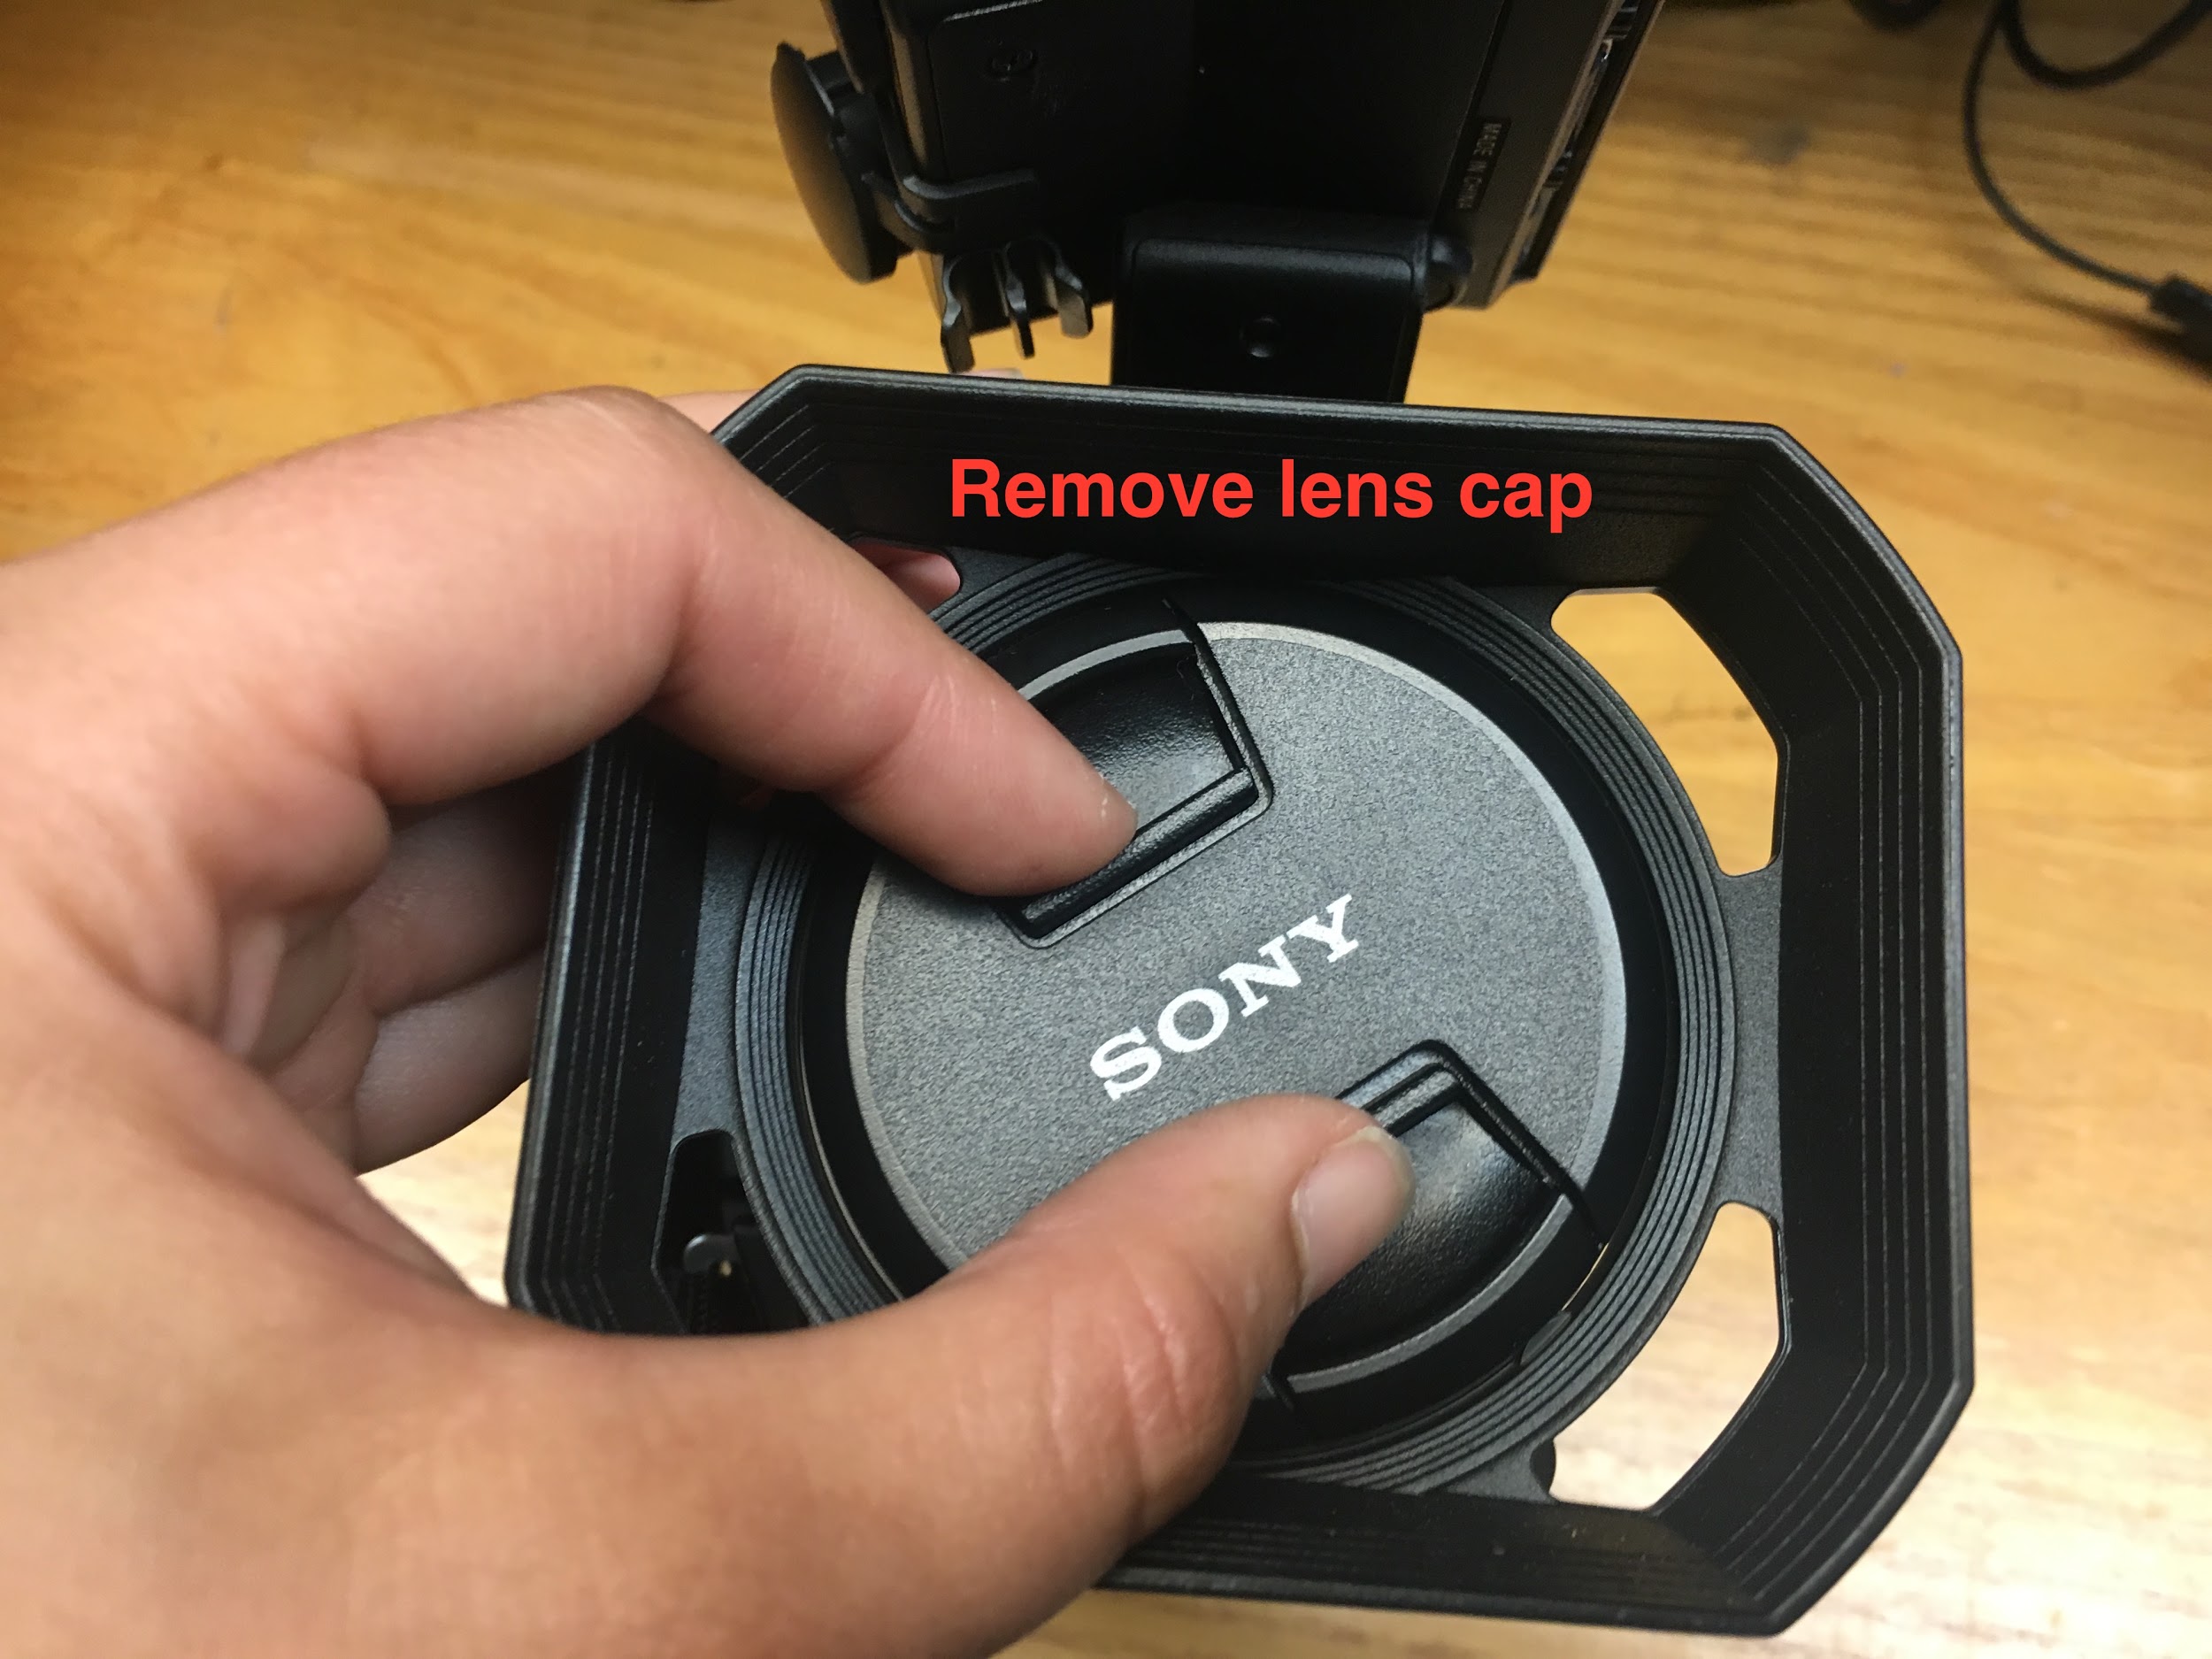
Don’t forget to remove the lens cap!
Memory Card
The Sony X70 records to external SD, SDHC, and SDXC memory cards (class 4 or faster for AVCHD file format).
Inserting the Memory Card into the Camera
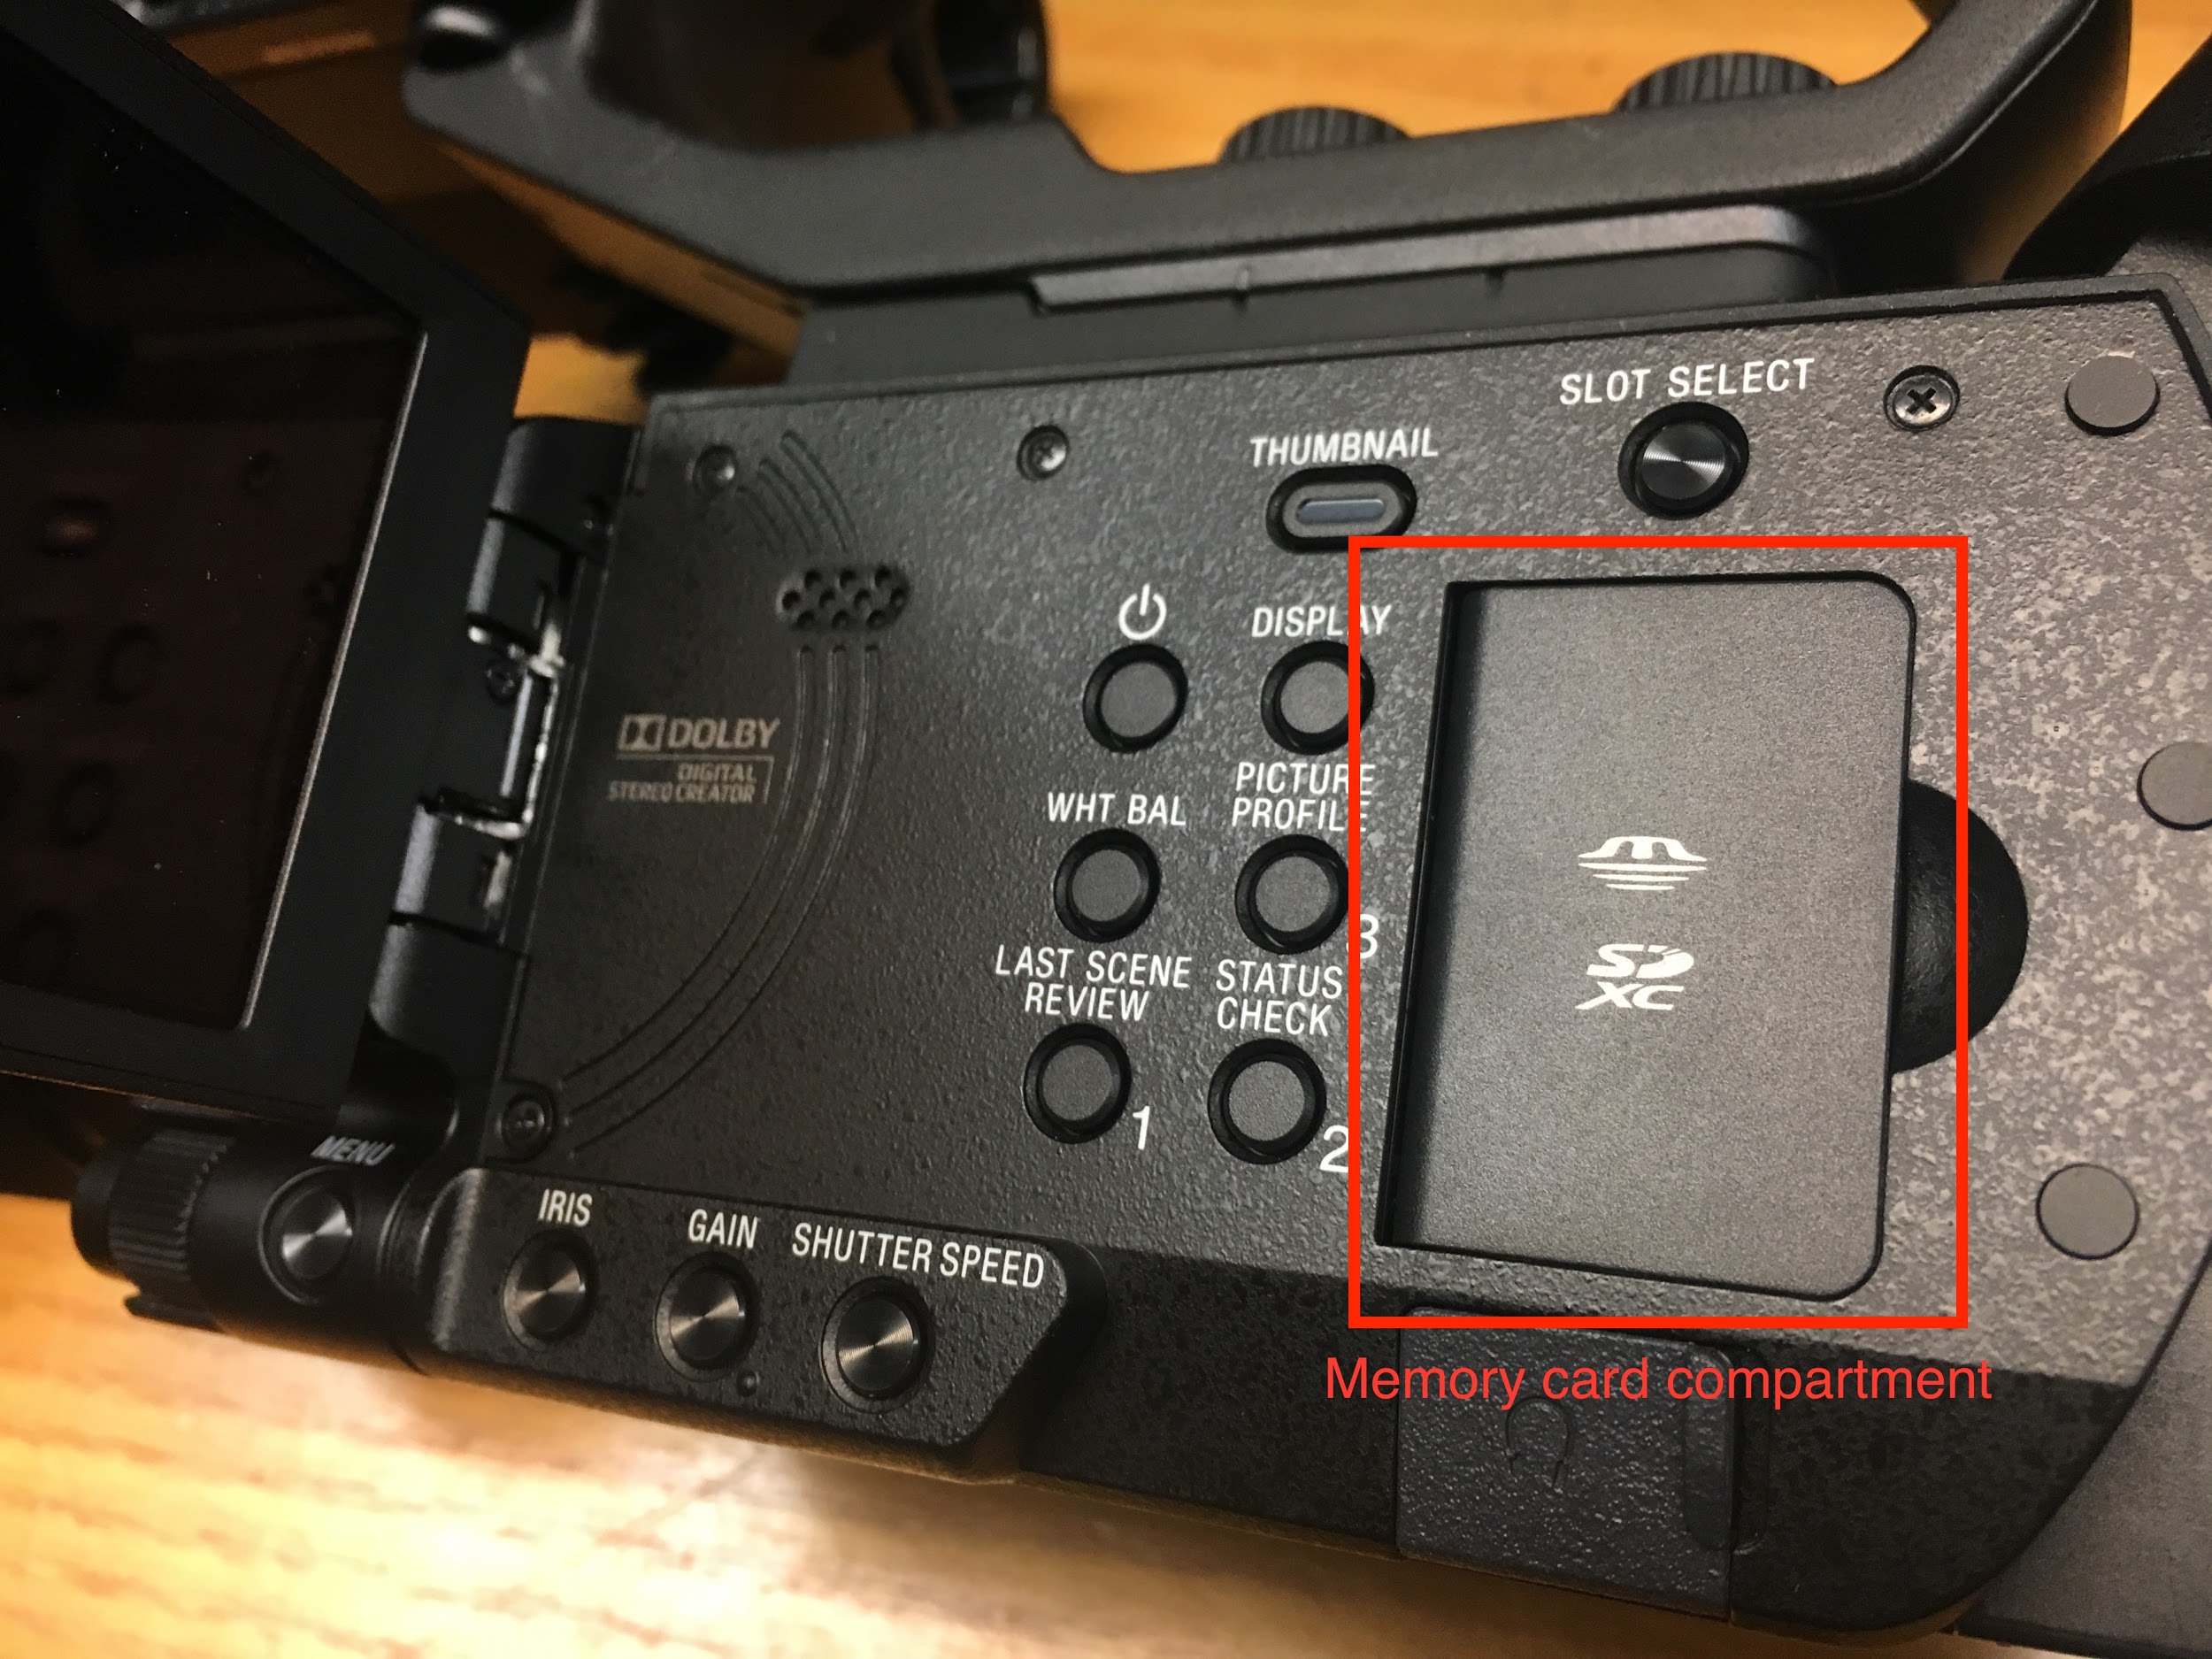
In the area located under the LCD screen, open the memory card compartment.
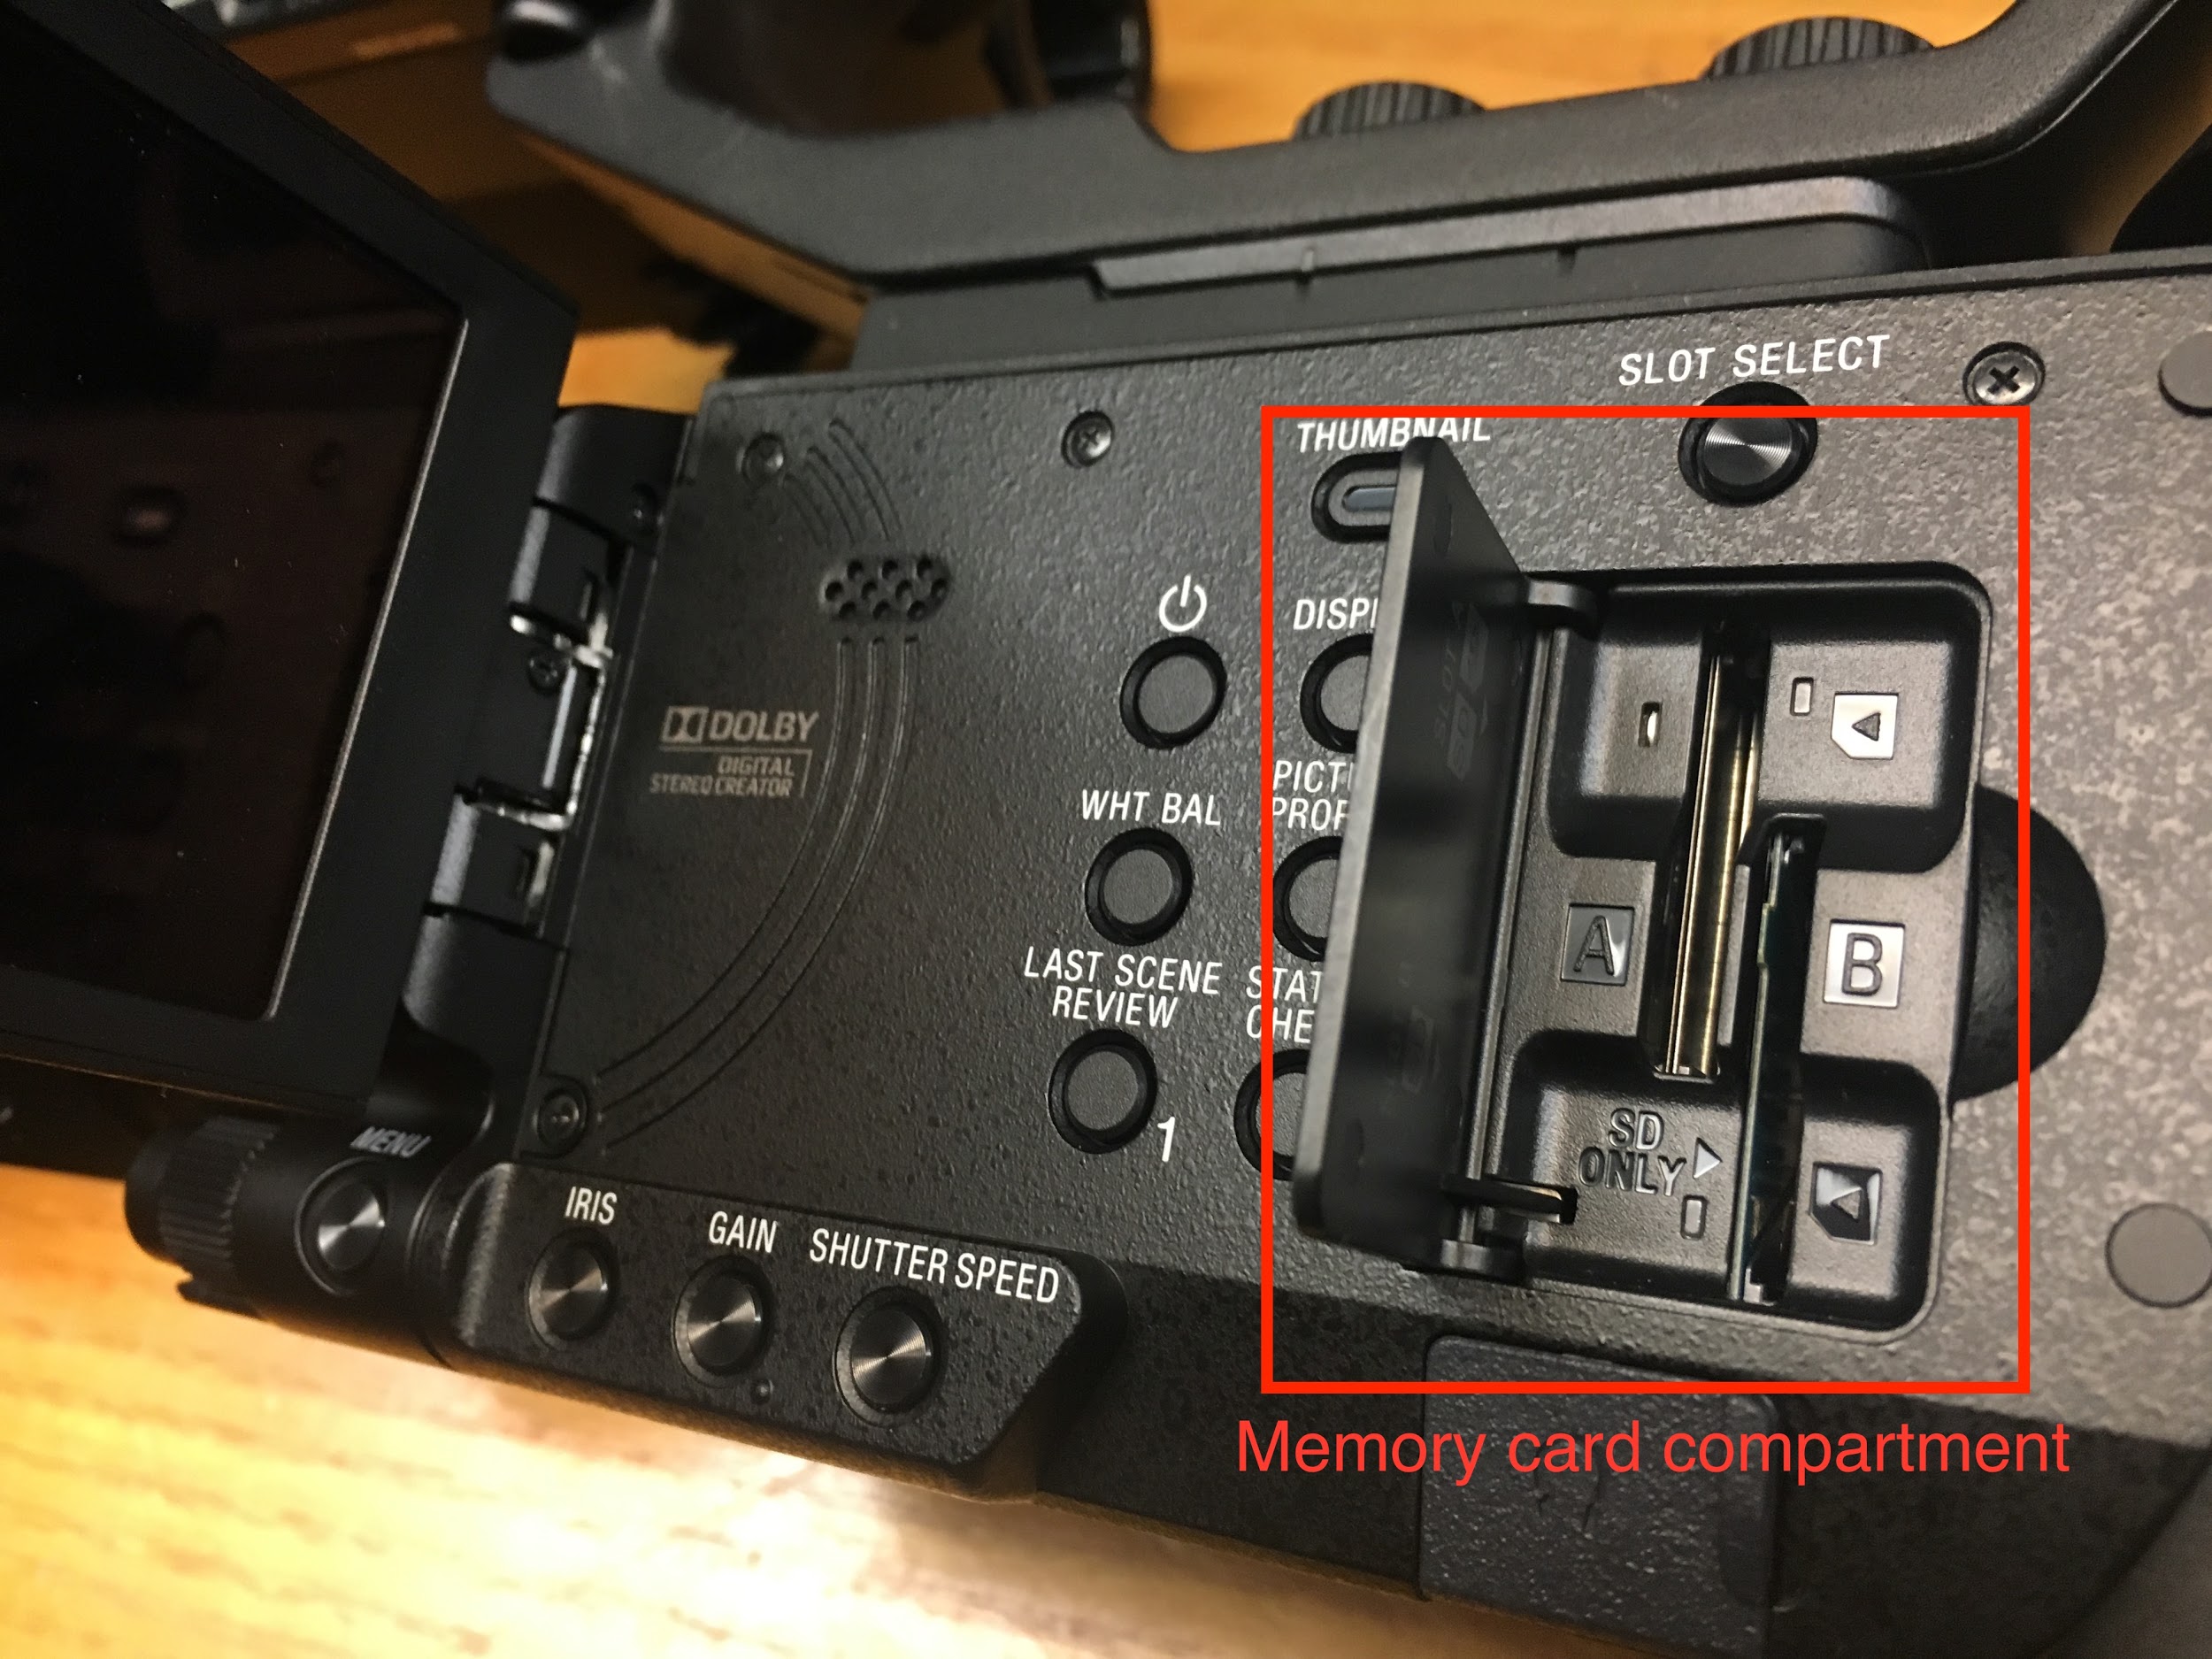
Insert the memory card into the slot with the notched edge of the card facing down until it clicks into place.
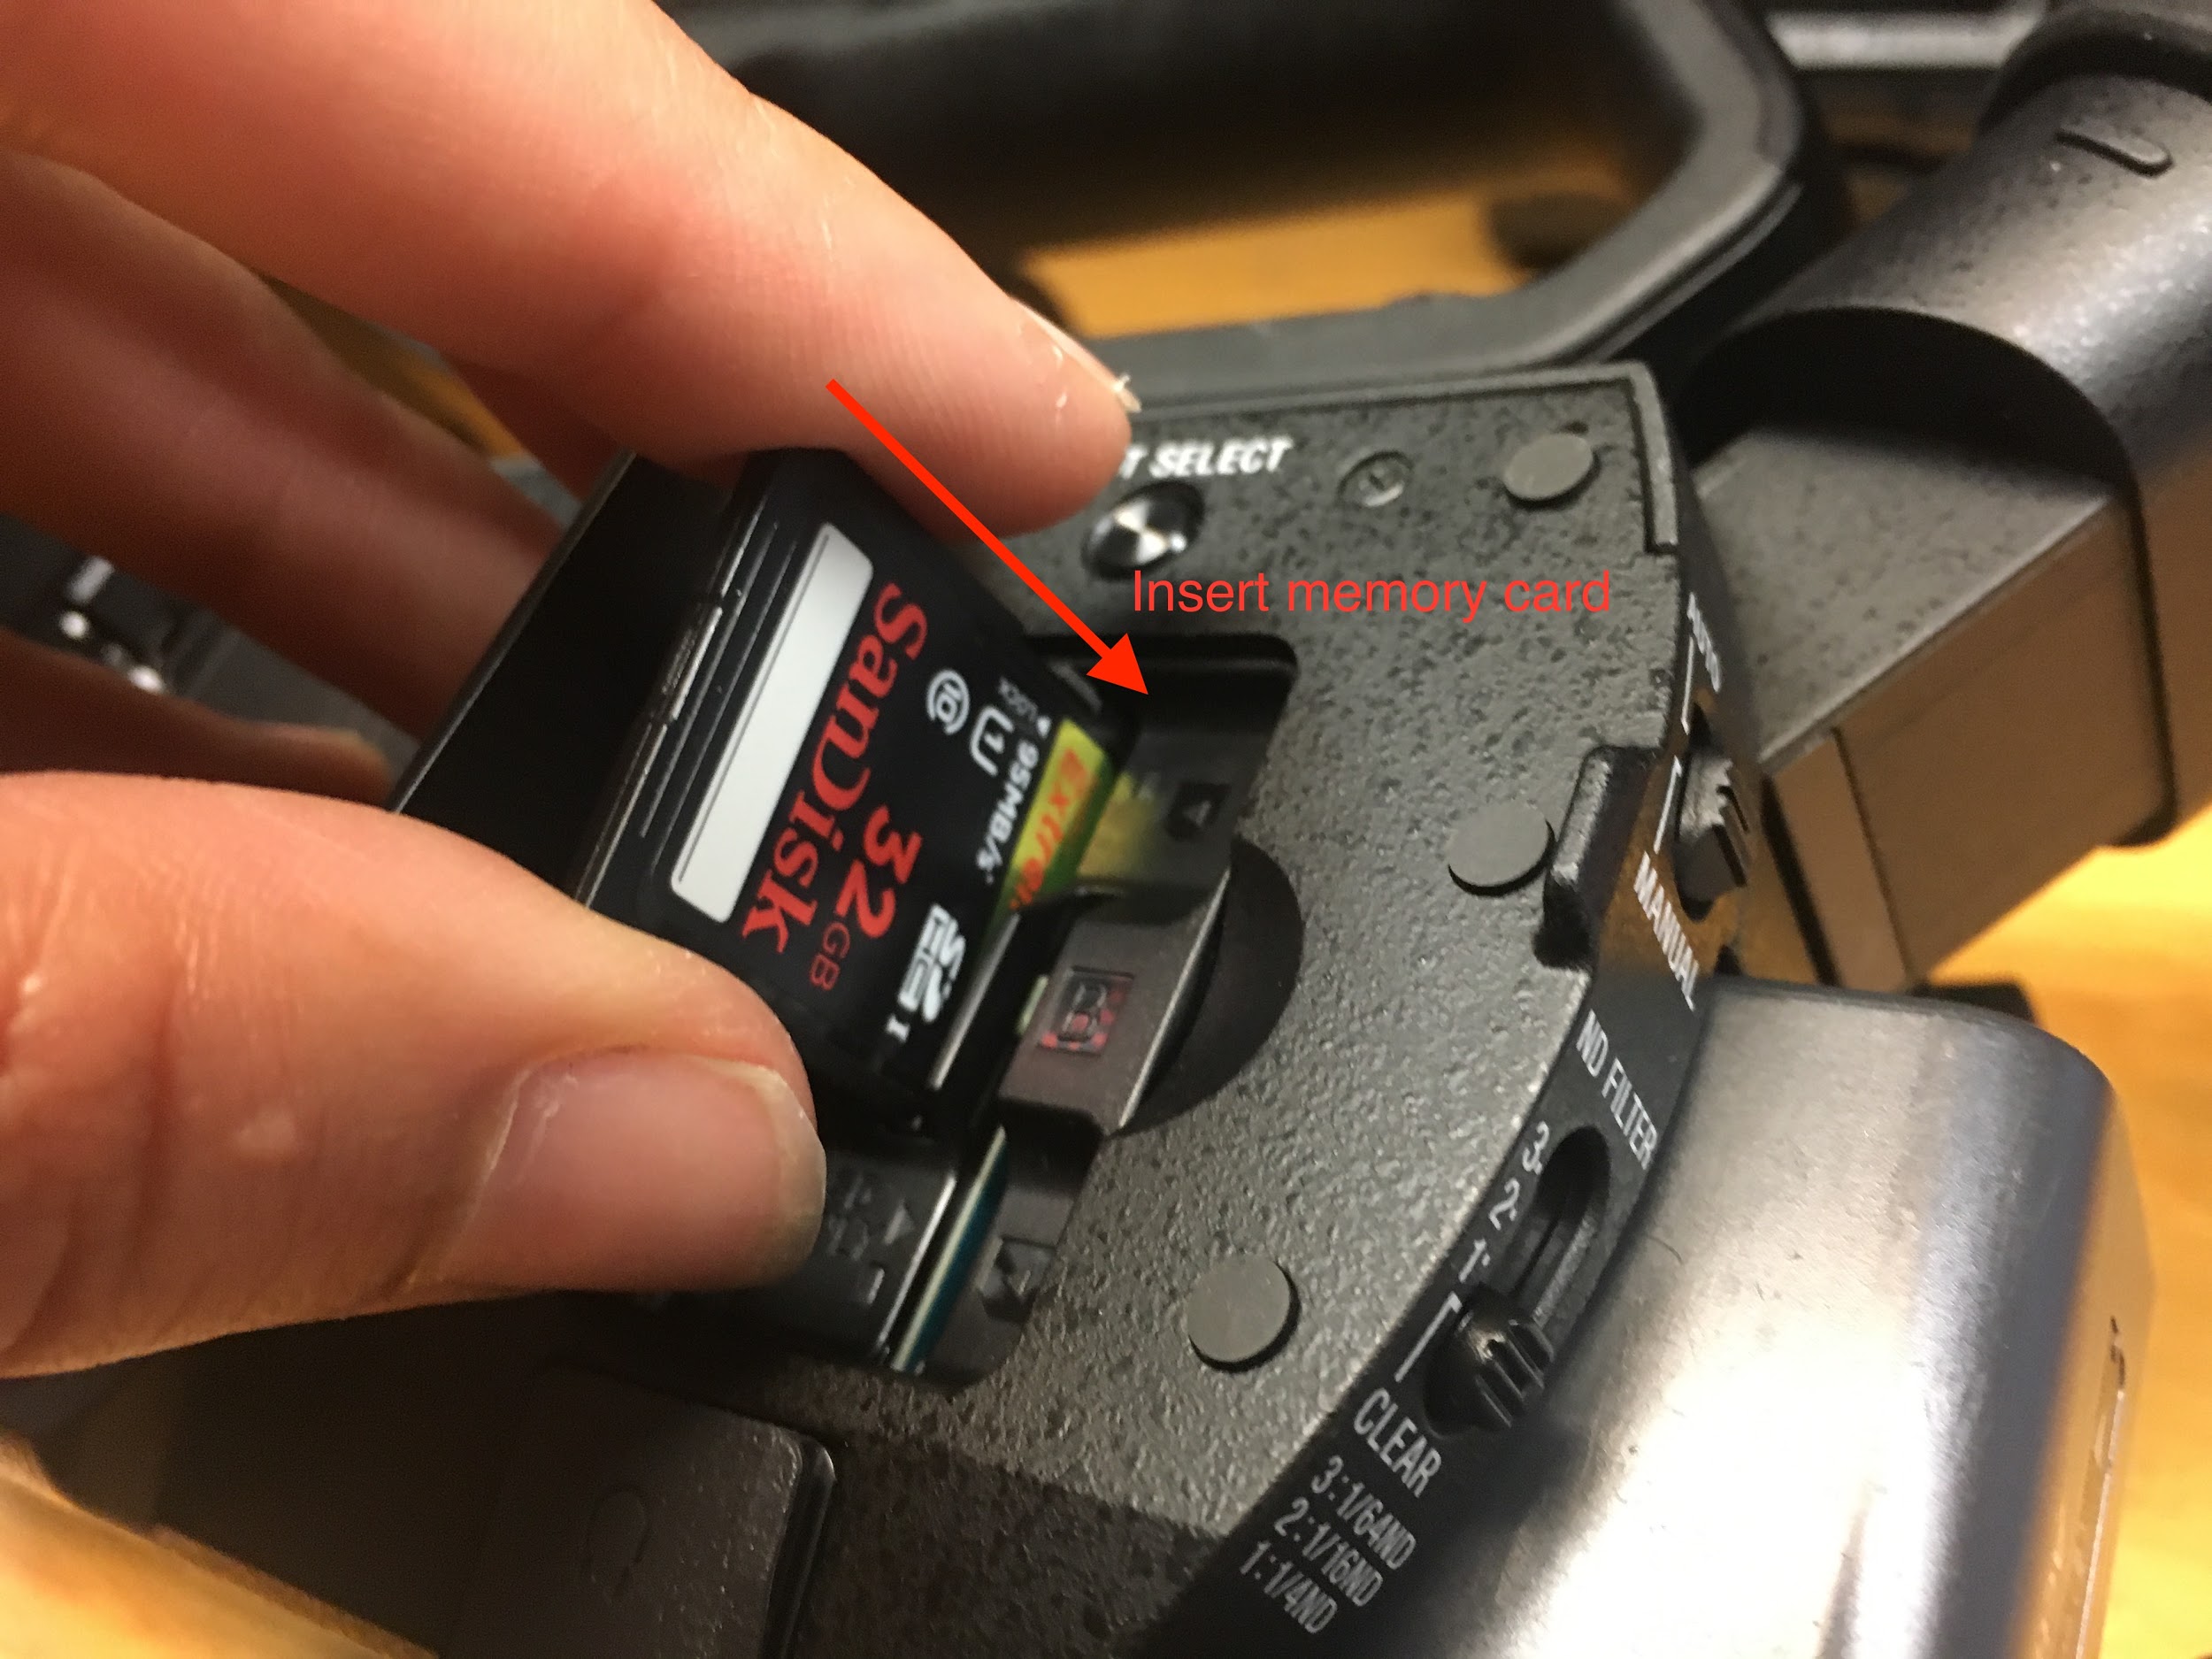
Warning – the card should slip into place with relatively little resistance. Don’t force the card into the compartment. If you’re getting resistance check to make sure the card is positioned correctly, with the notched edge to the front right.
Close the cover.
To eject the memory card, open the memory card compartment cover and gently push in the memory card. The card will pop out slightly so it can be removed. After removing the card close the cover.
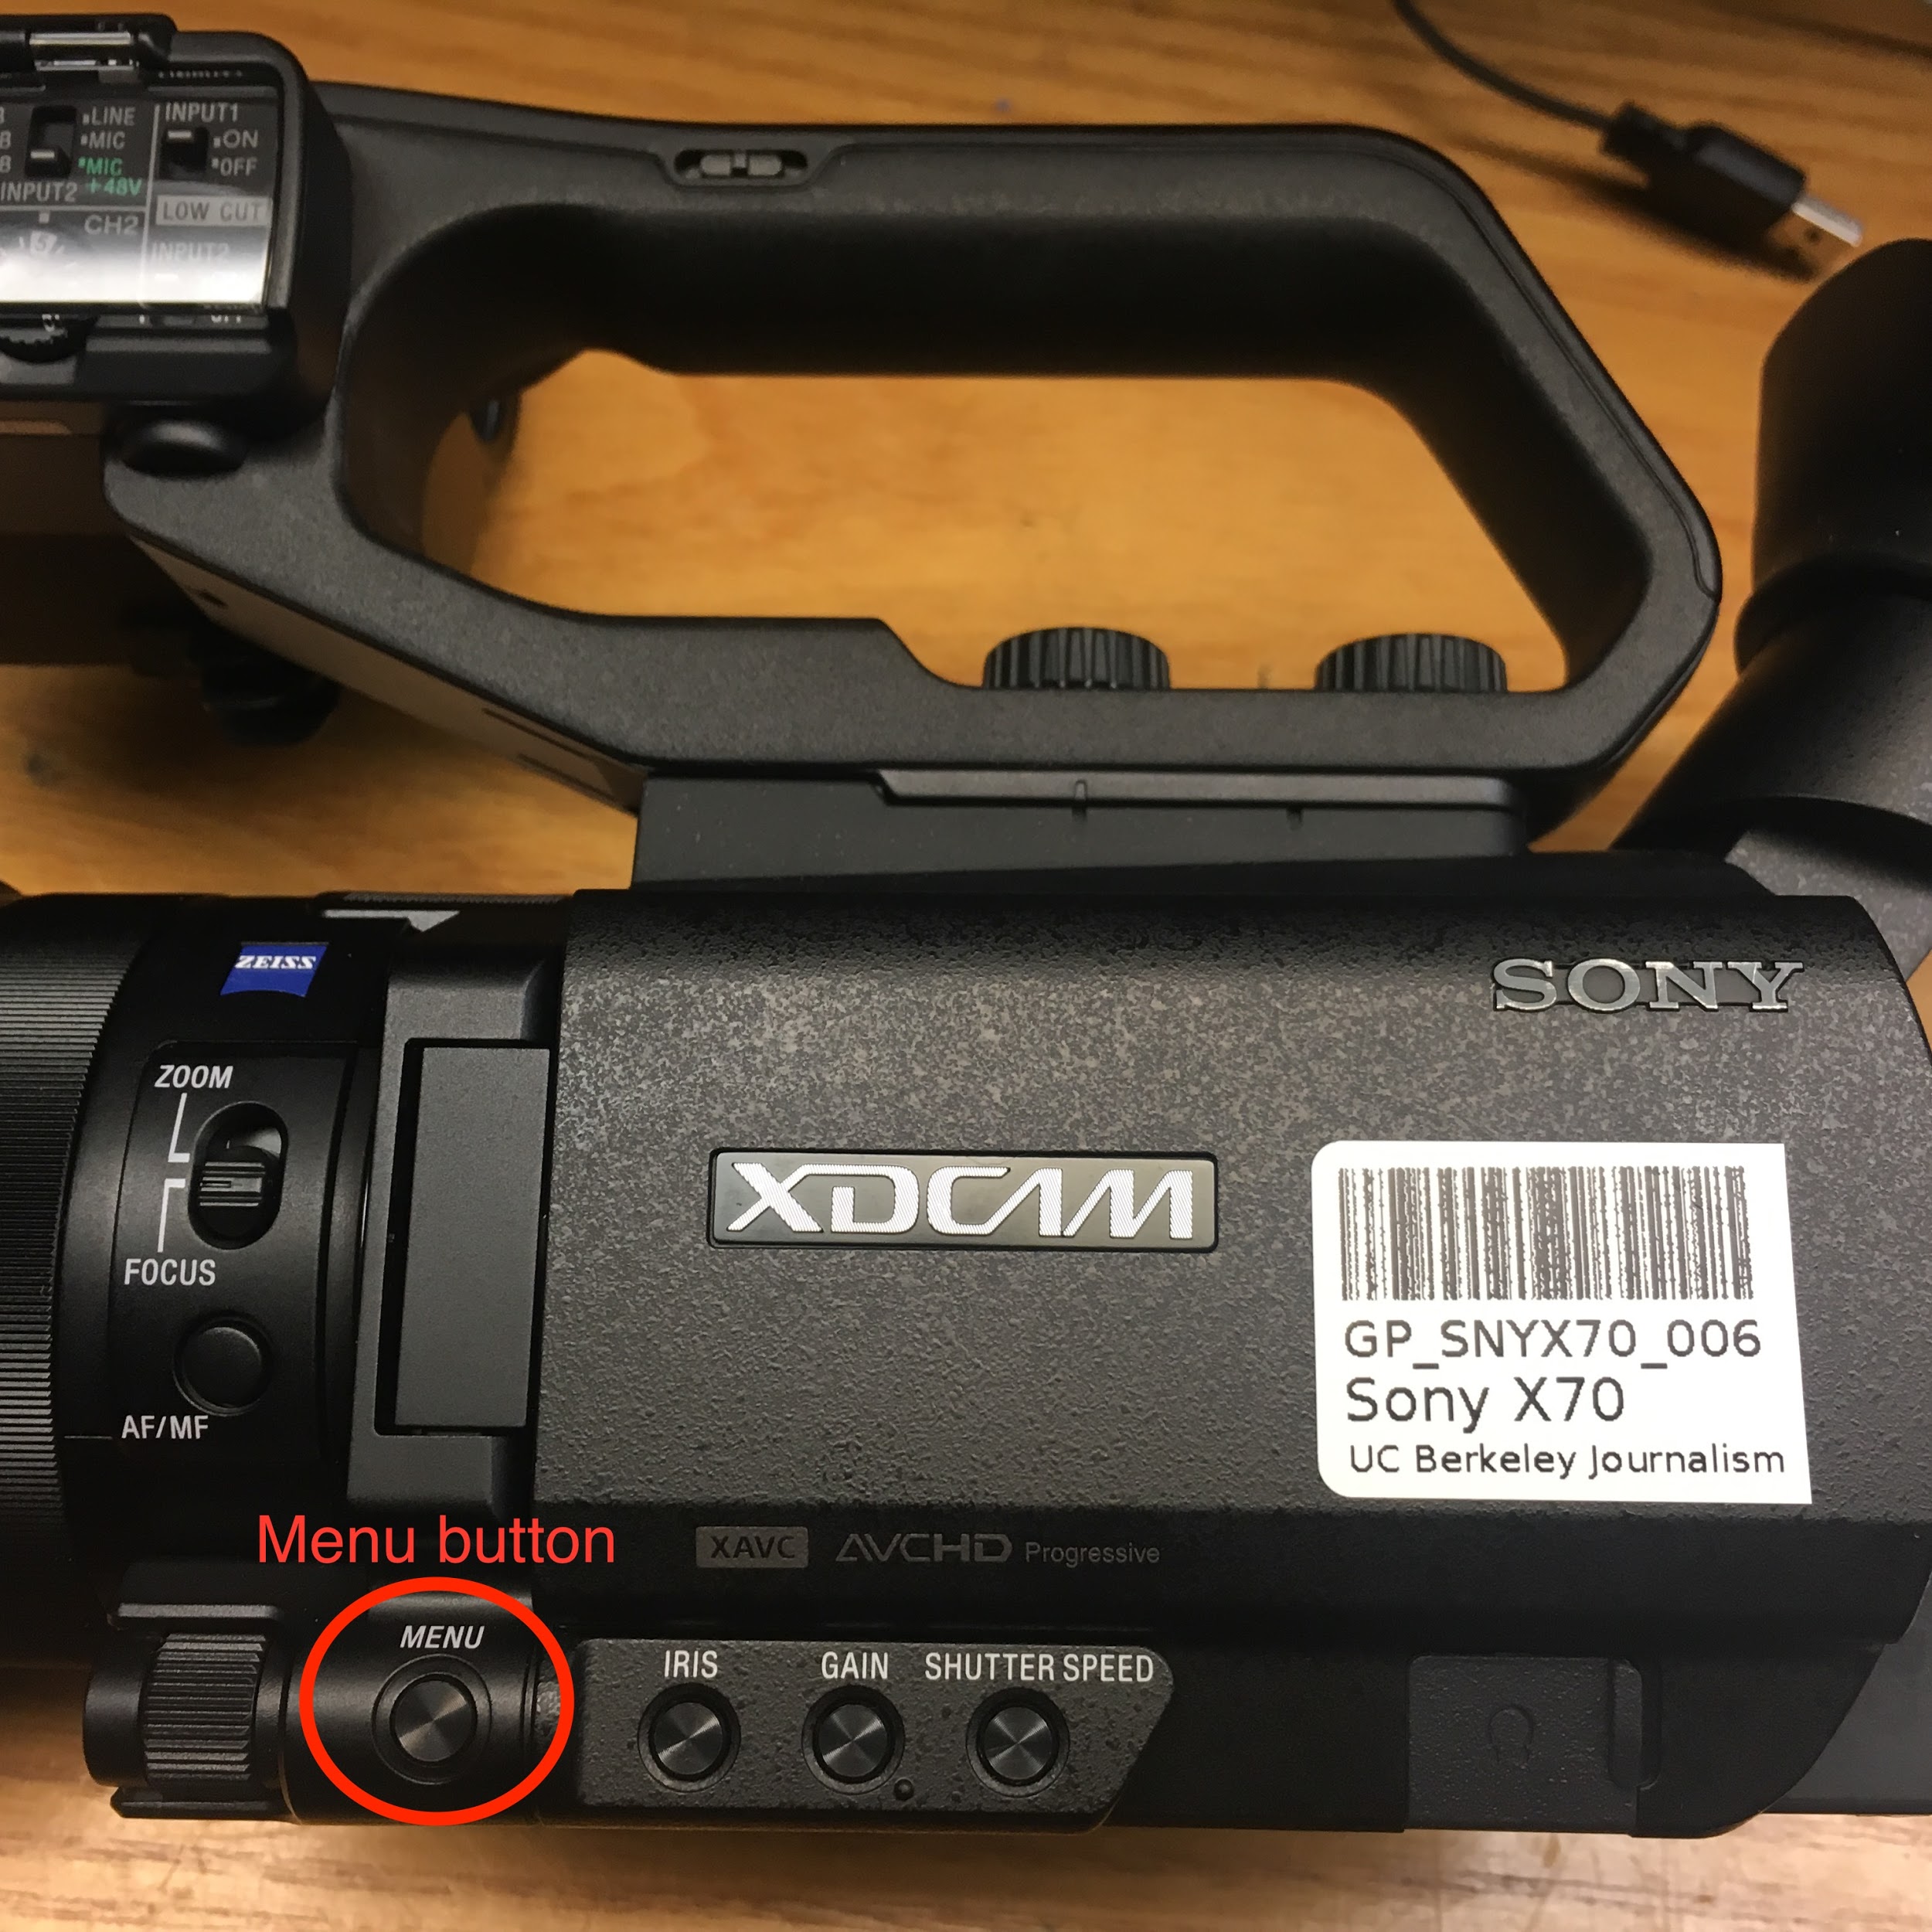
Preparing the Memory Card for Recording (Formatting the card)
Access the MENU by pressing the MENU button on the side of the camera, located just below the hinge of the LCD screen.
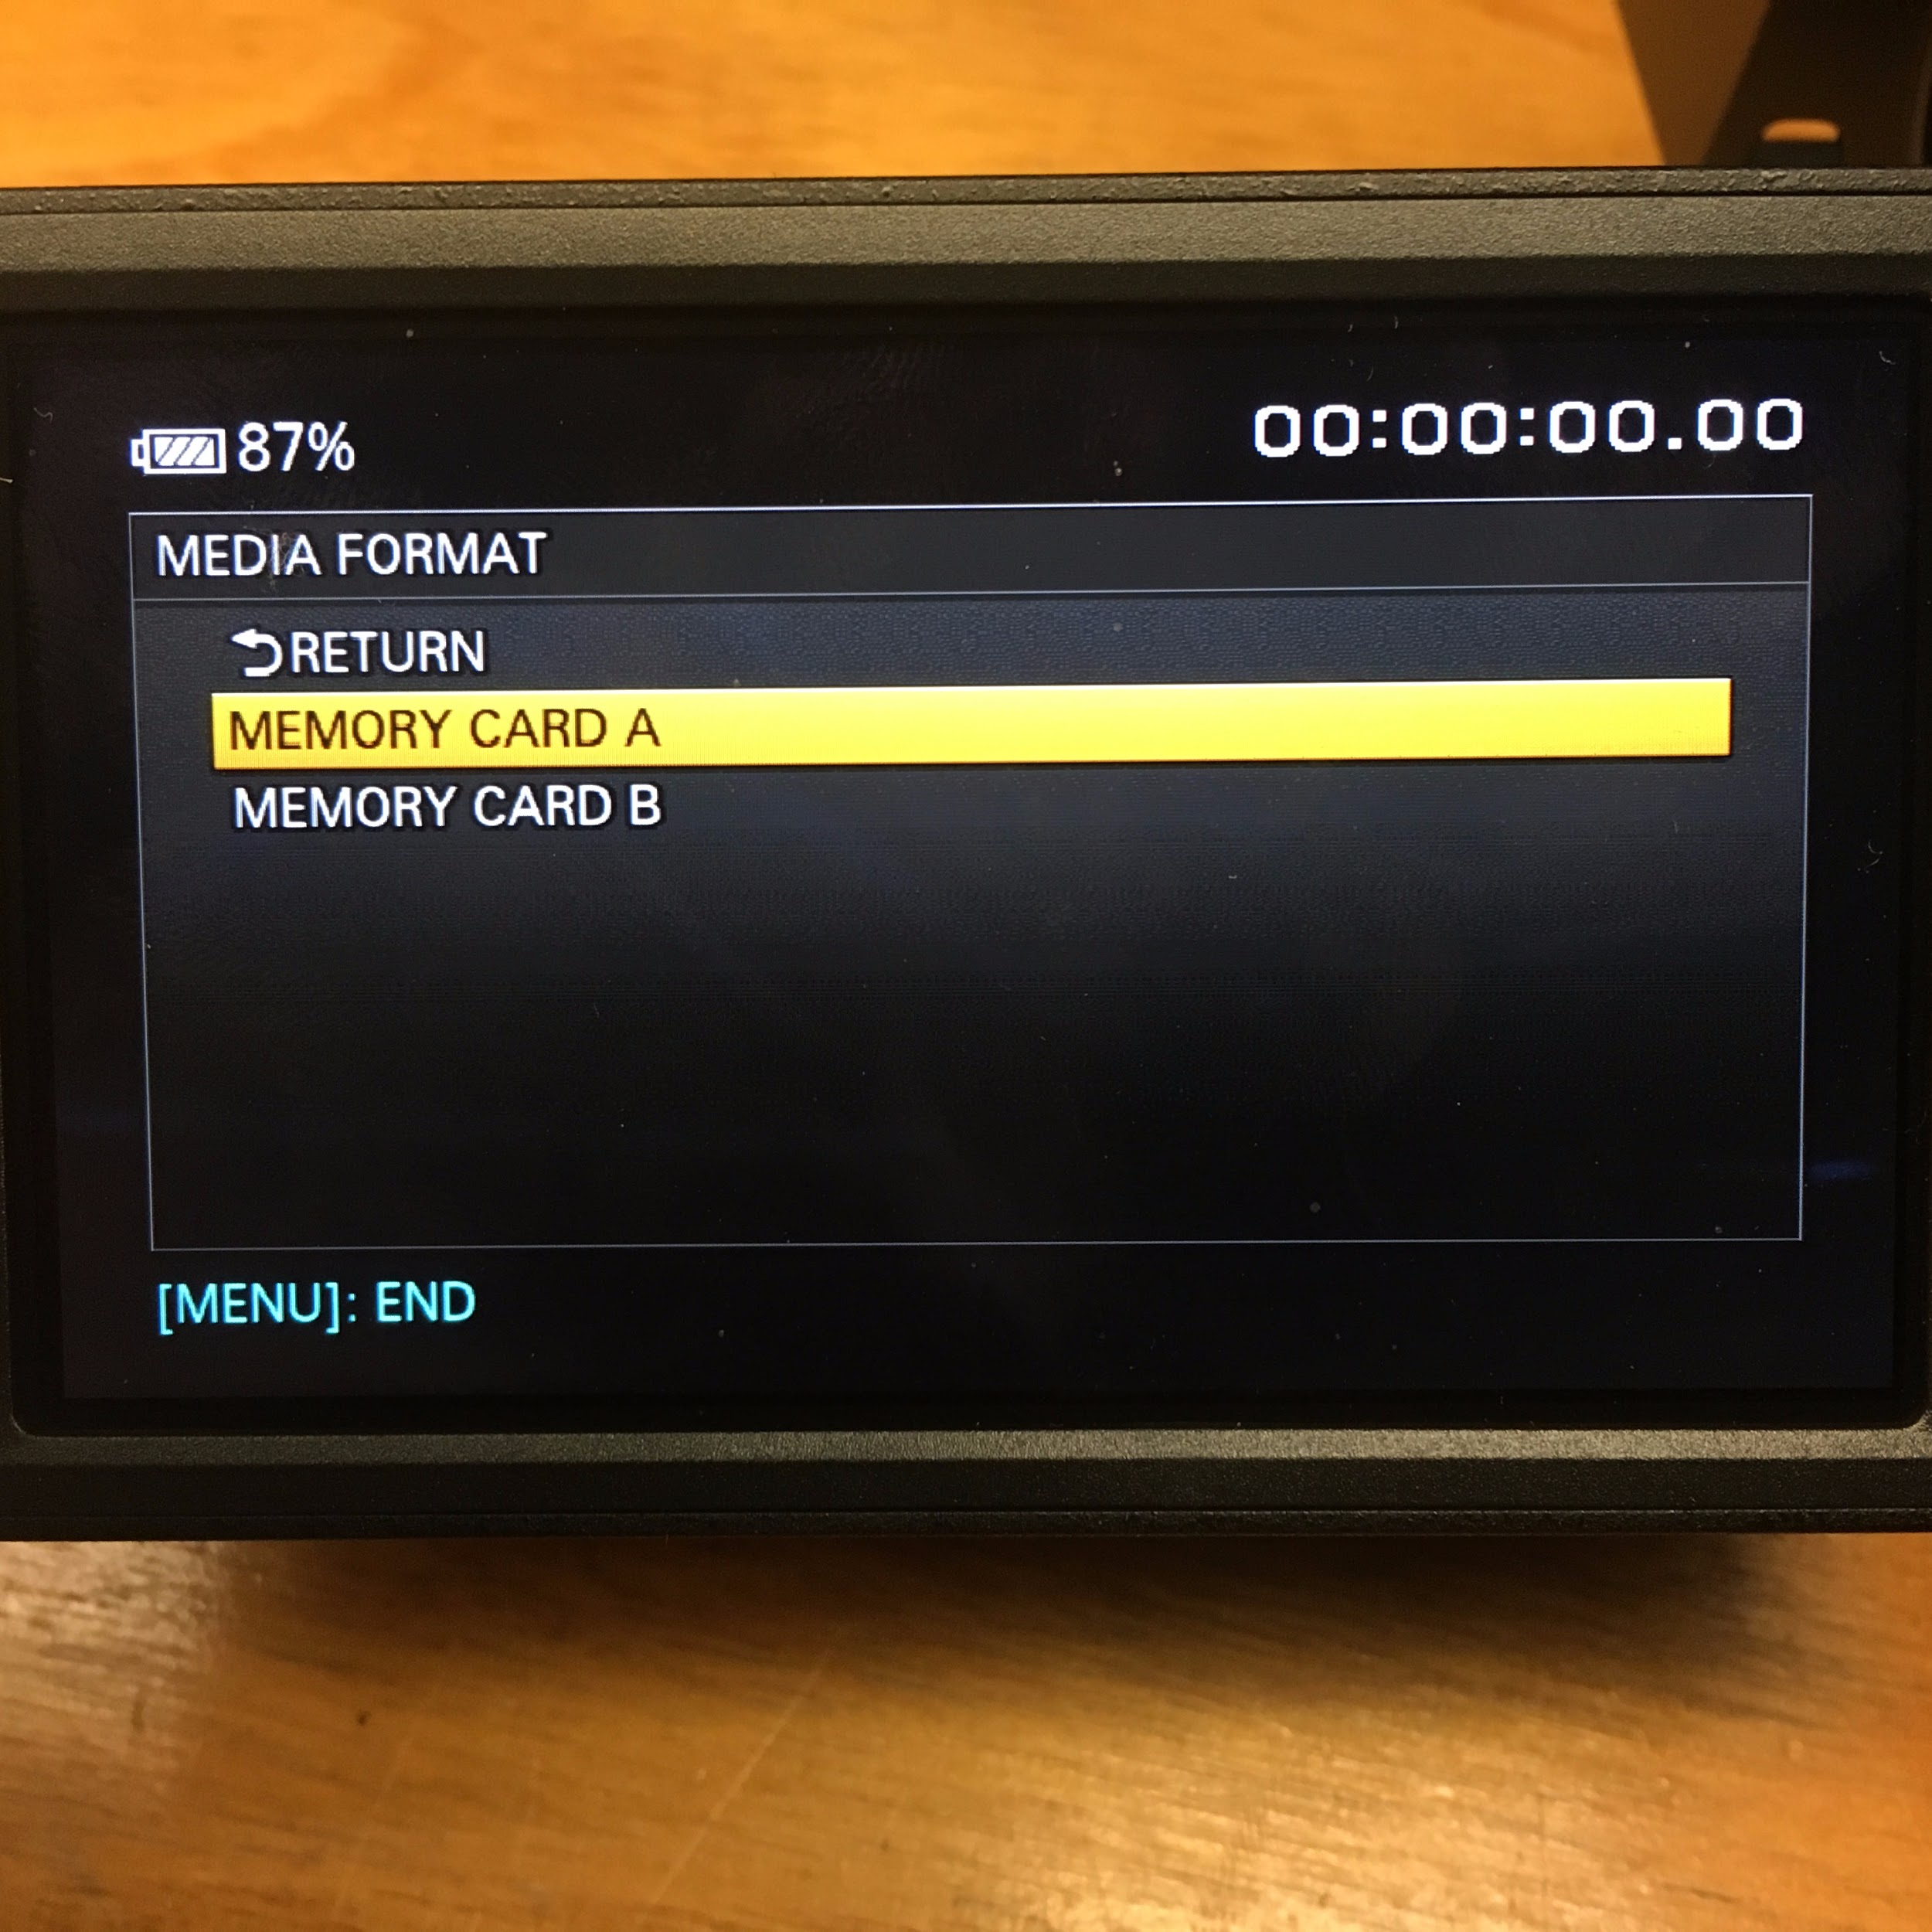
Once in the menu on the LCD screen, use the toggle button on the back of the camera to scroll down to the file cabinet icon, press the toggle button to enter that menu, and scroll down to “MEDIA FORMAT.”

Press the toggle button to set and choose the memory card you want to format.
Push the toggle button again to reach this screen: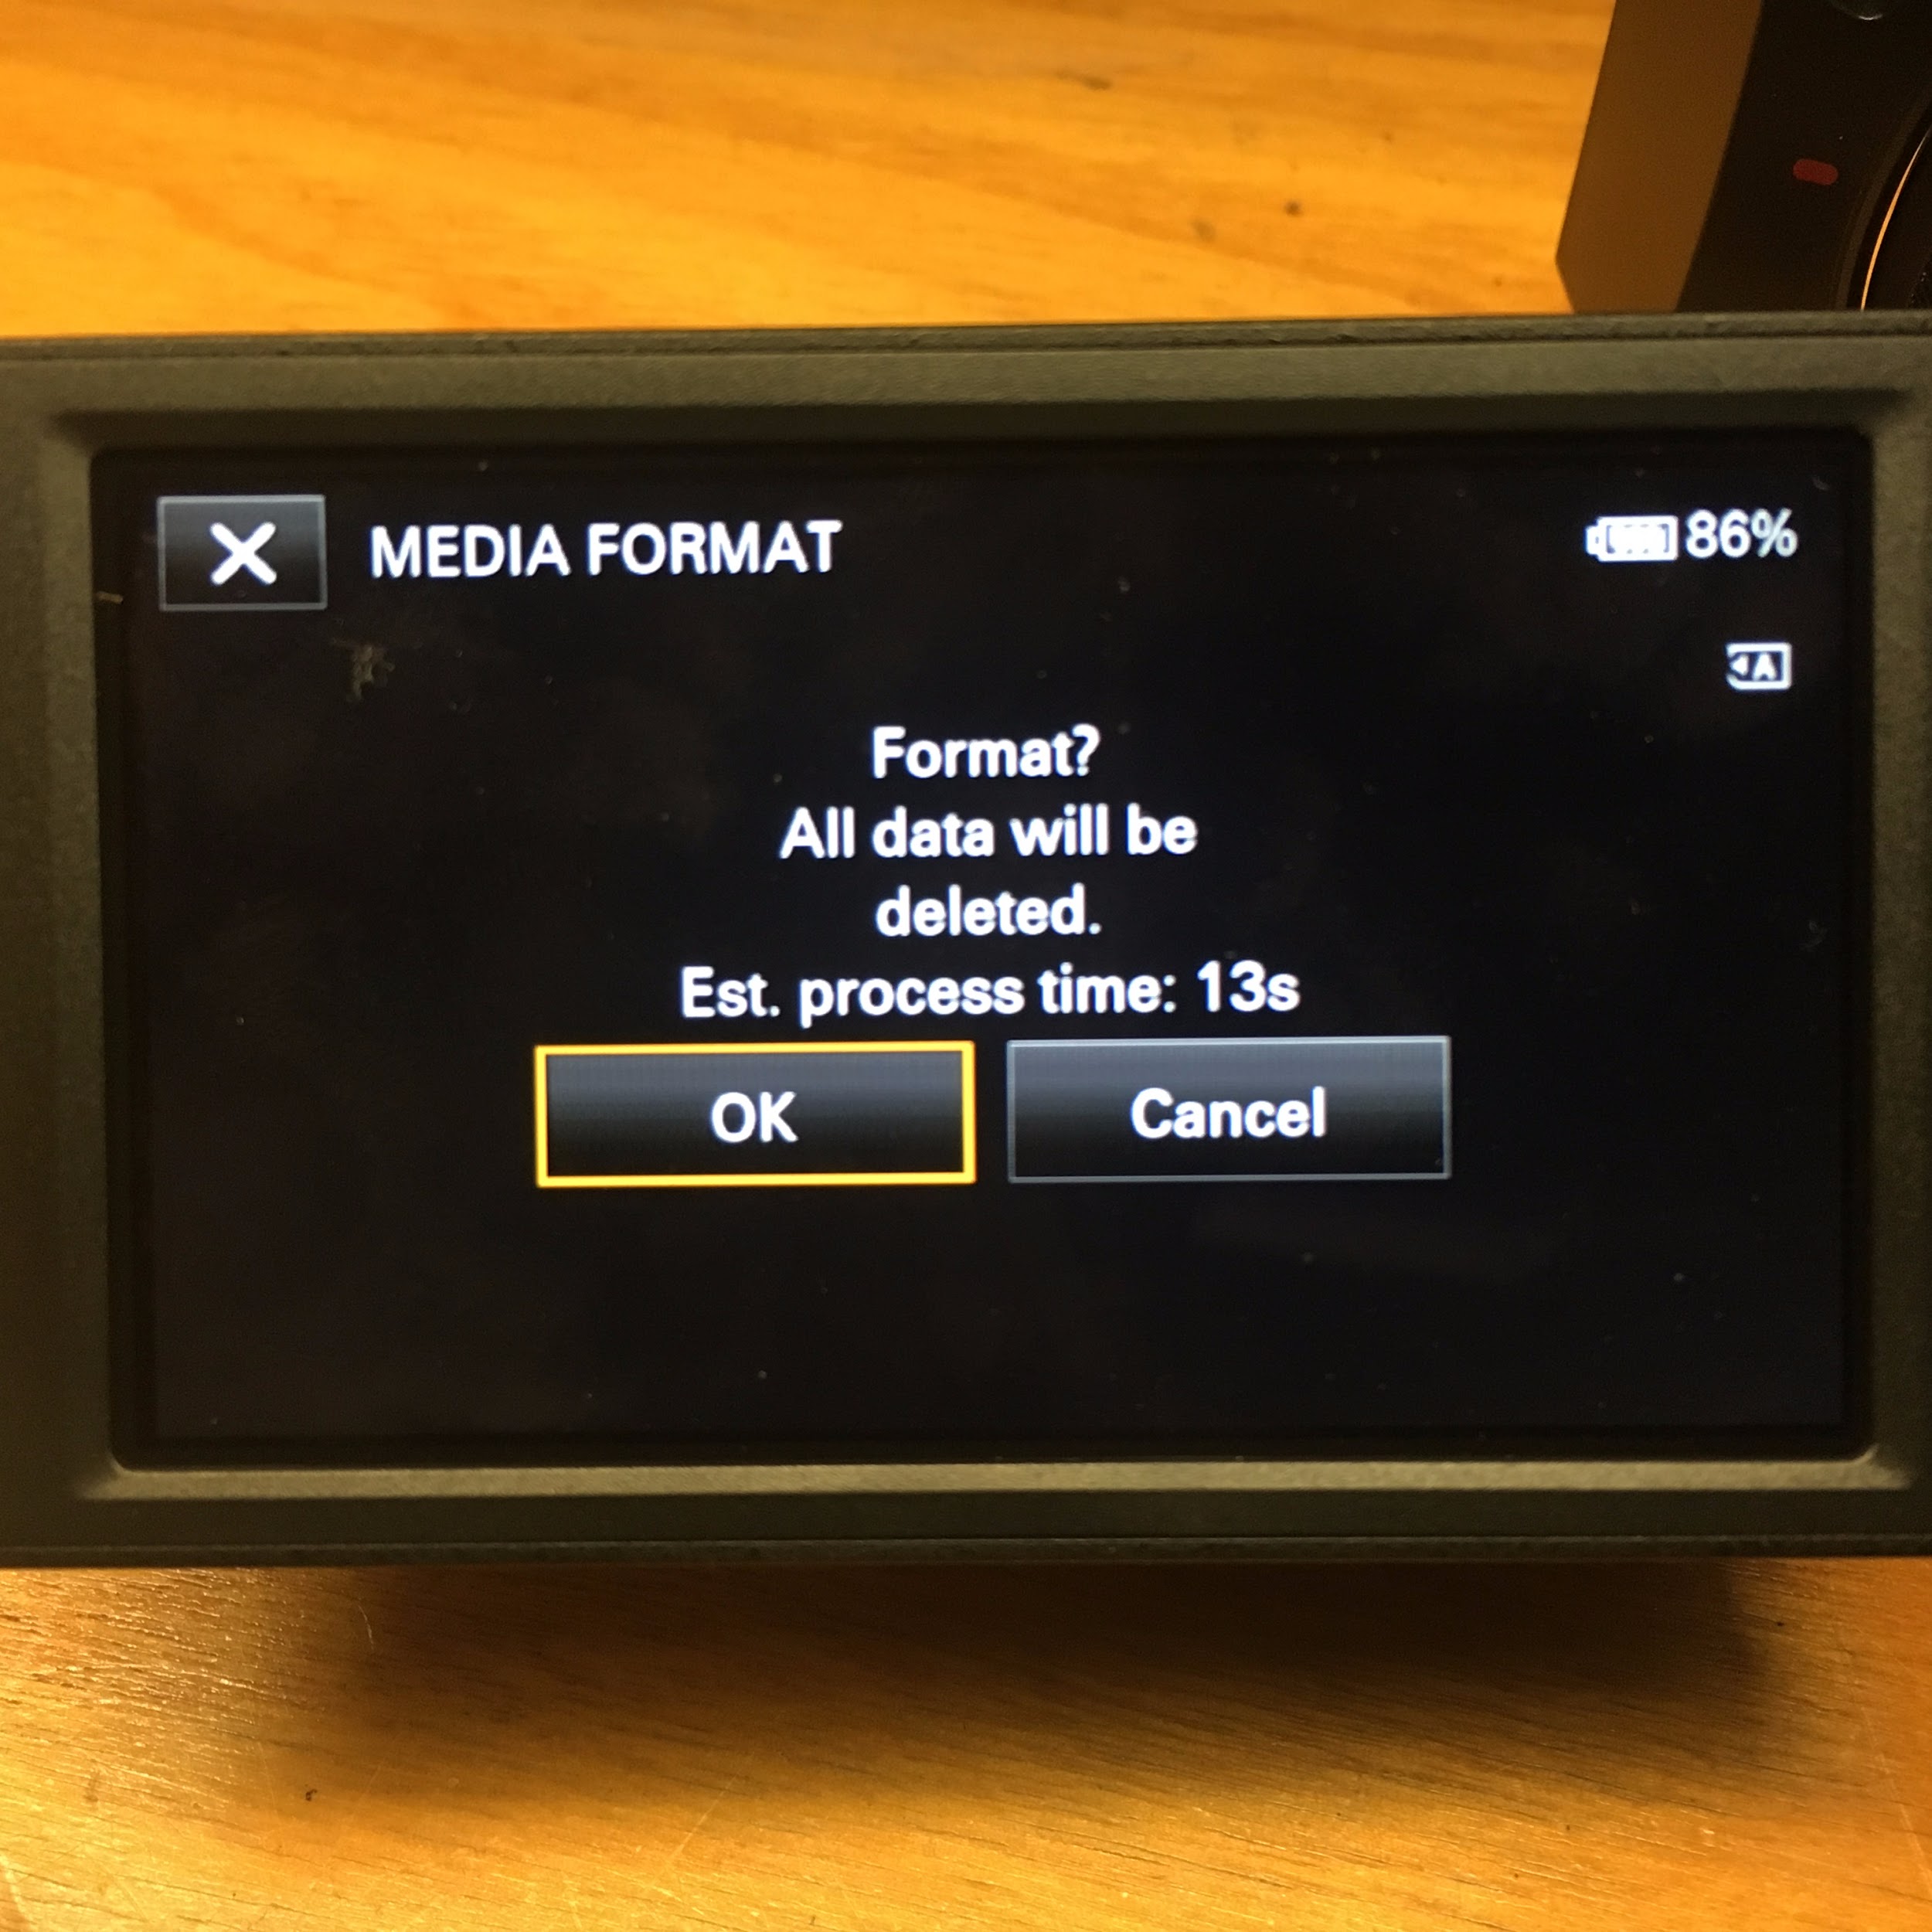
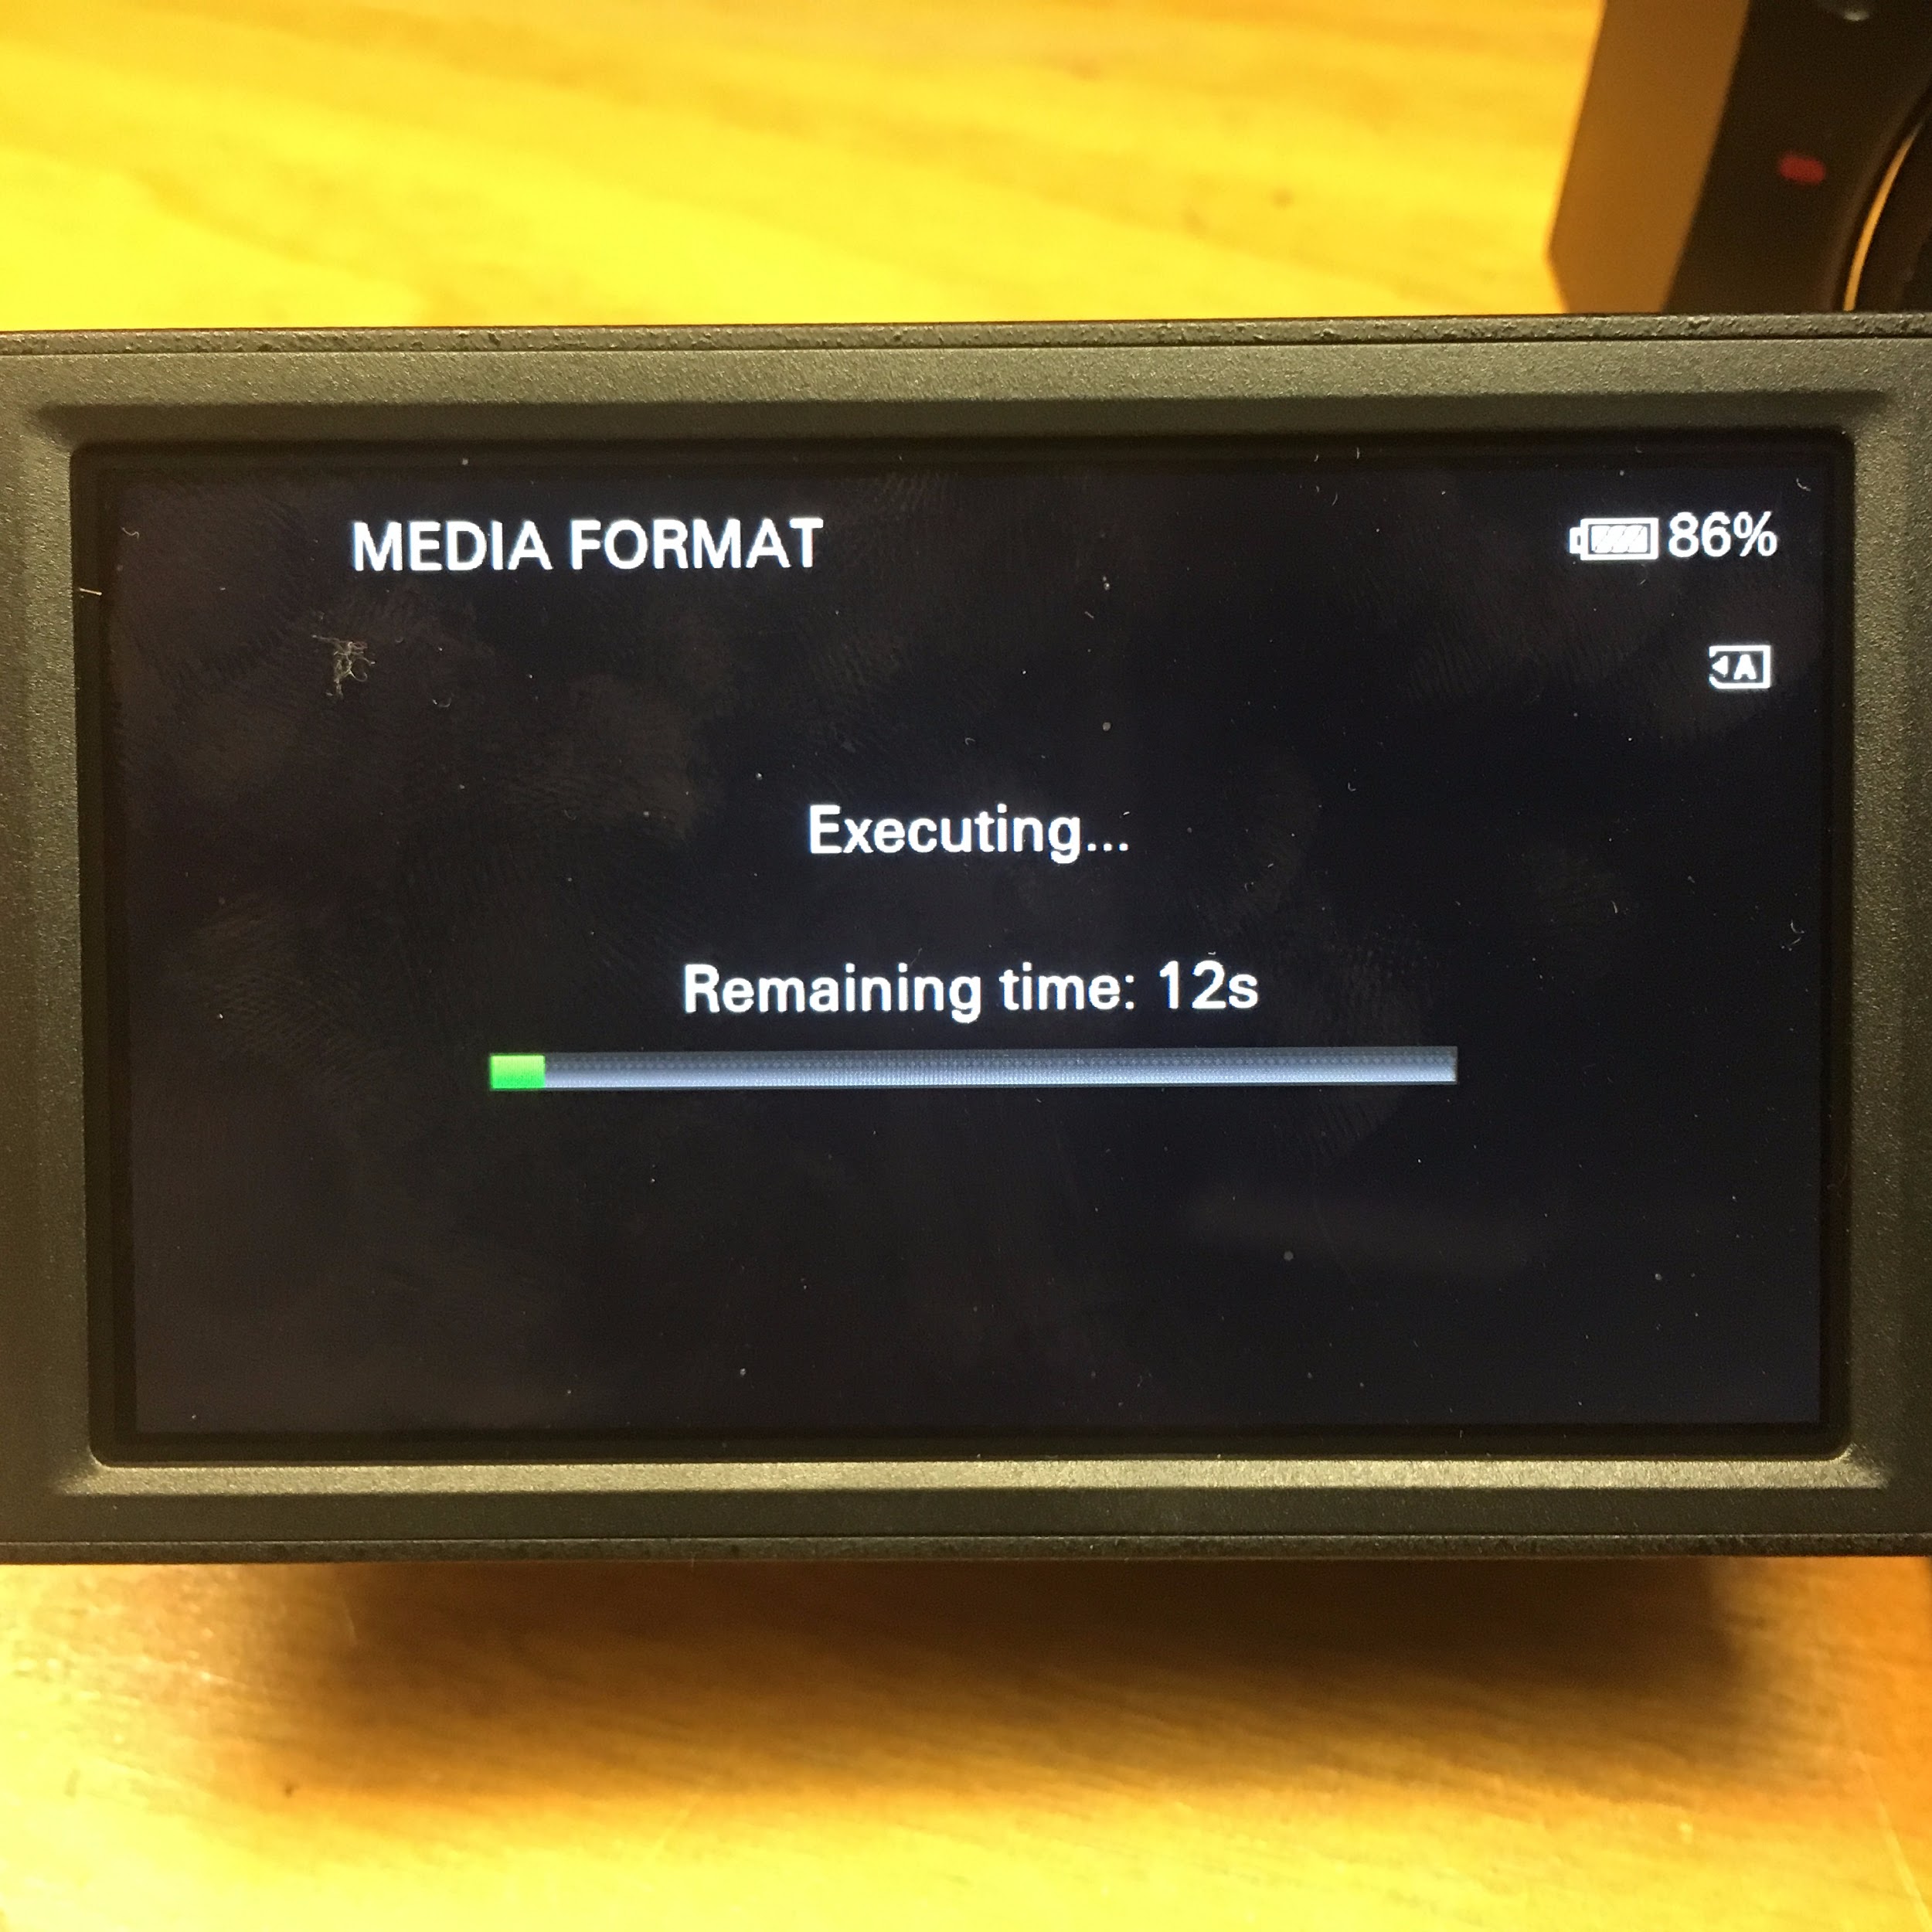
Use the toggle button to choose OK. You should see an Executing message and the time required to delete all data and complete the formatting will be displayed on the LCD screen. Do not operate the camera until this is completed.
Recording
To start recording first turn on the POWER.

Set AUTO or MANUAL mode with the switch at the back of the camera. If you set the camera to AUTO mode, the camera will automatically focus, set the iris (amount of light) and set the white balance for you.

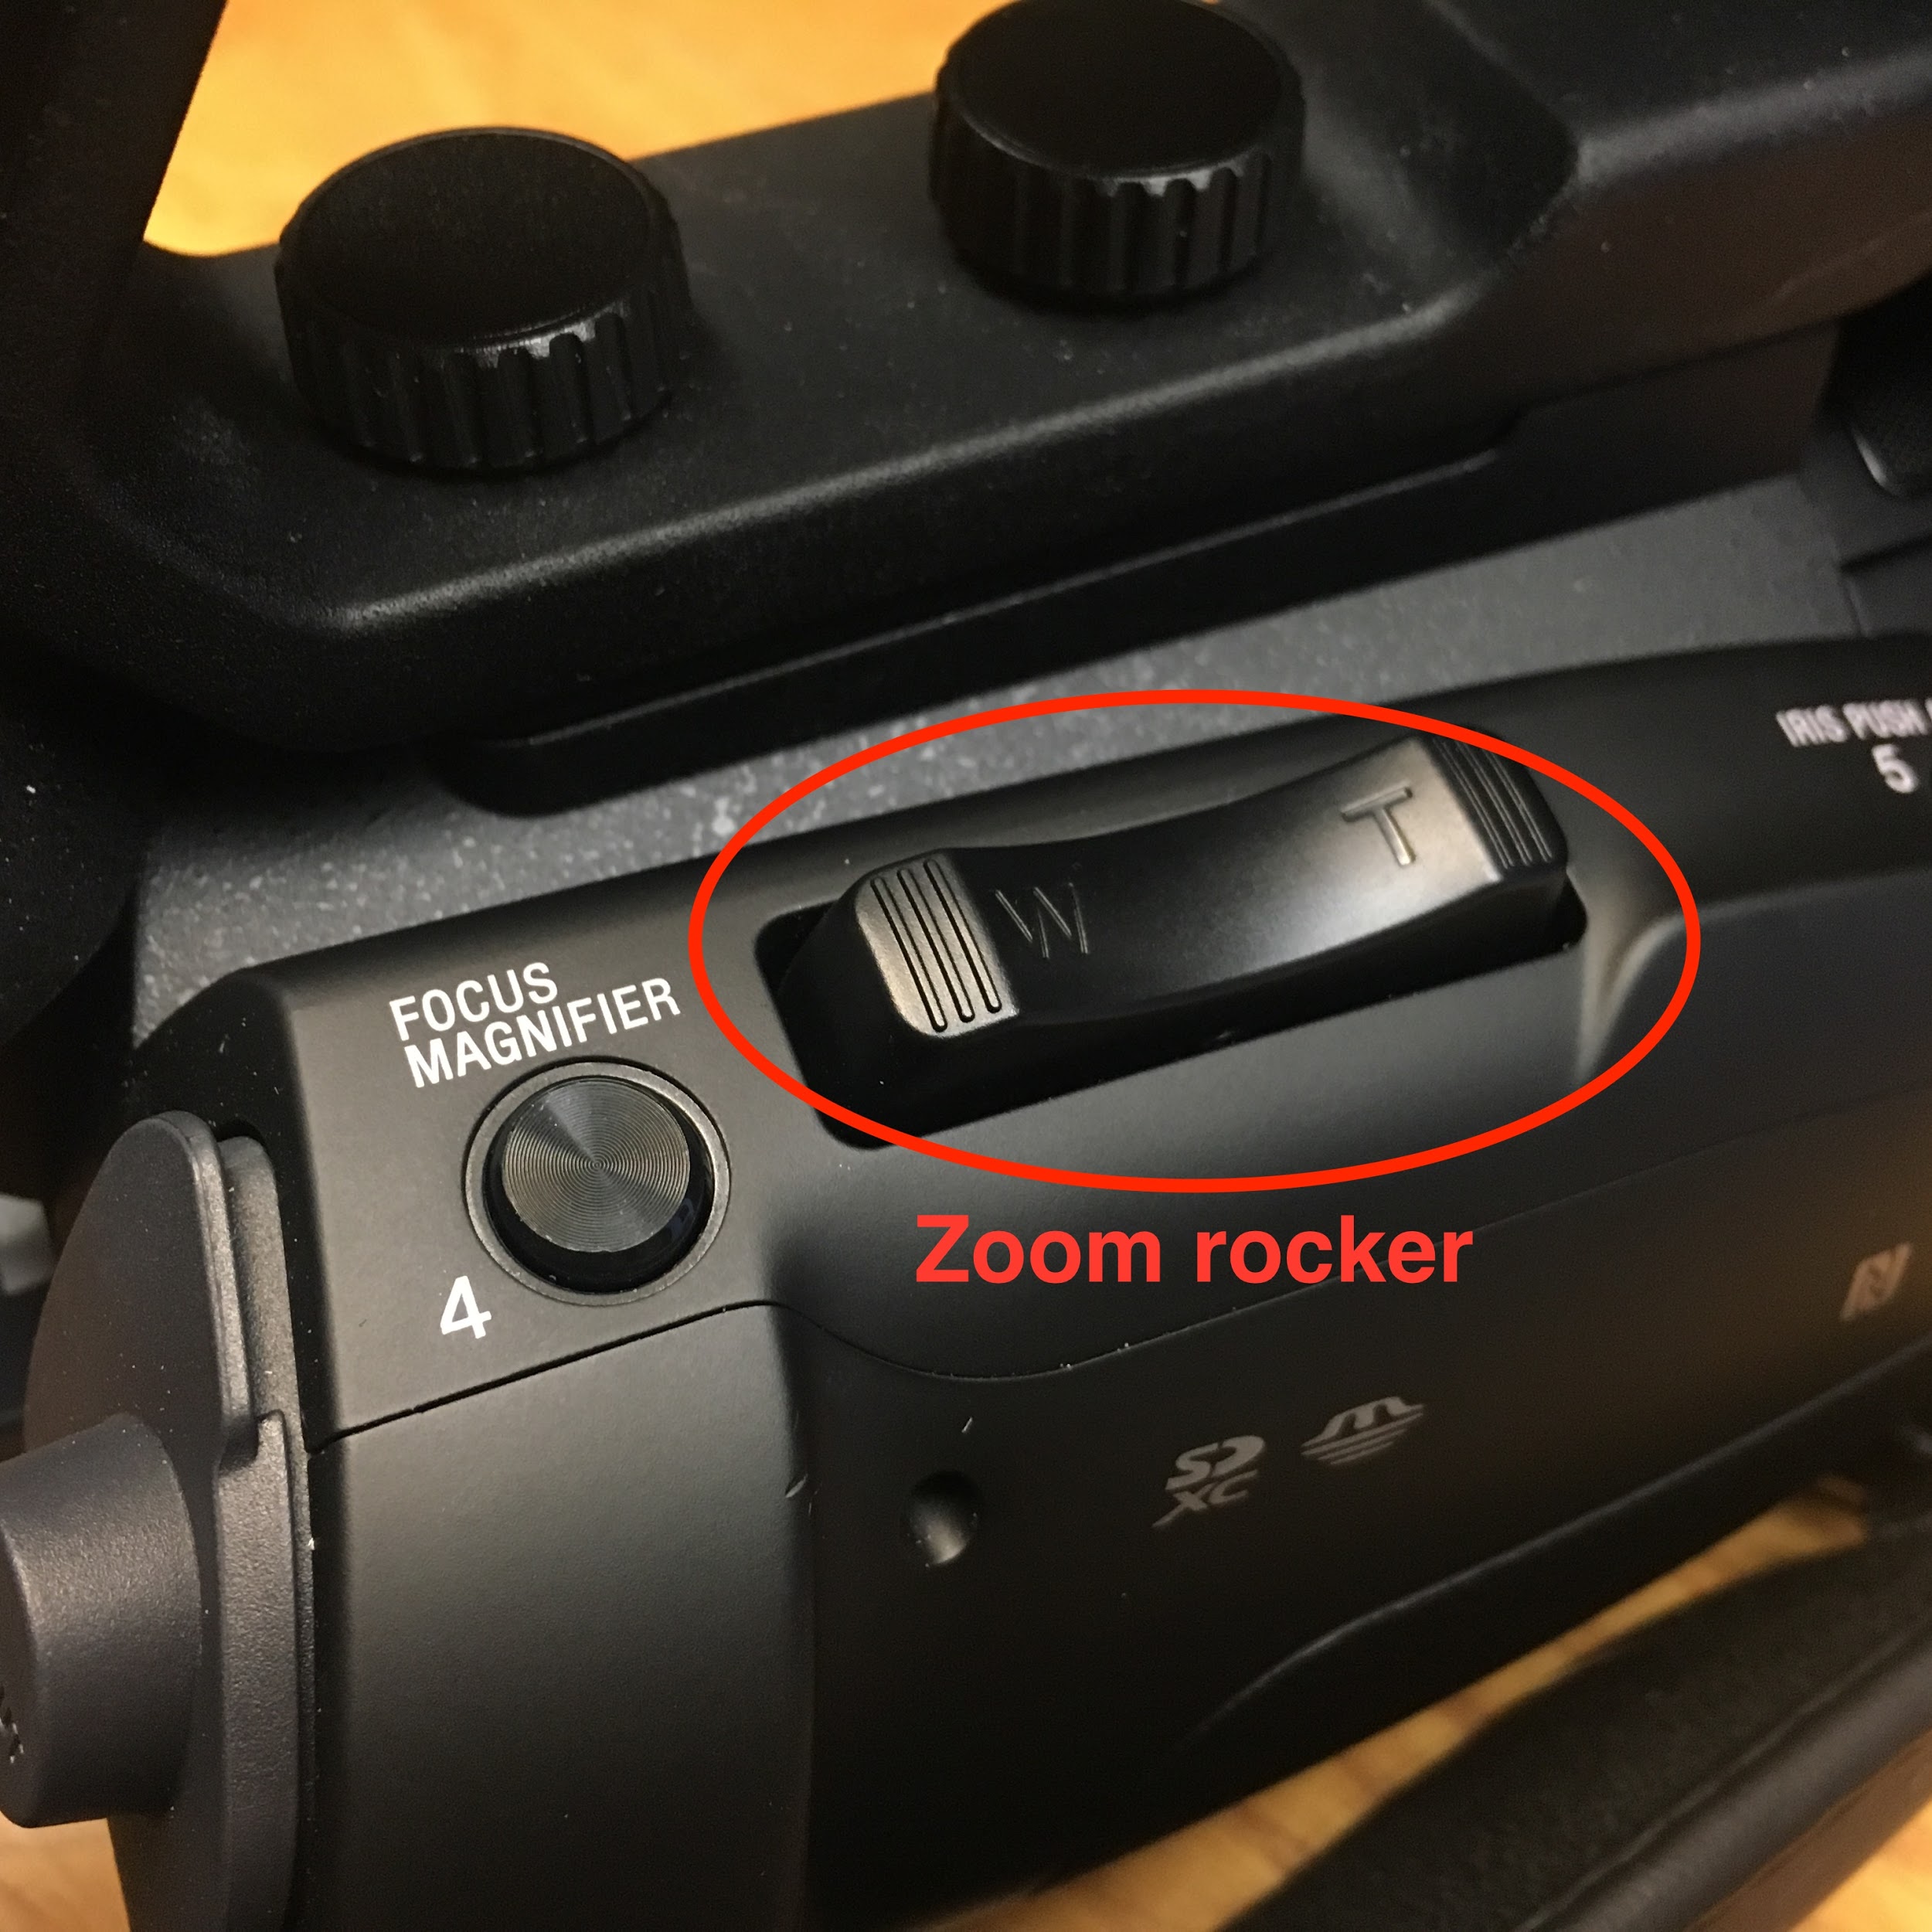
Zoom
To zoom back and forth between a telephoto closeup and a wide angle shot, press the rocker bar on the top left of the camera with the T and W letters on it.
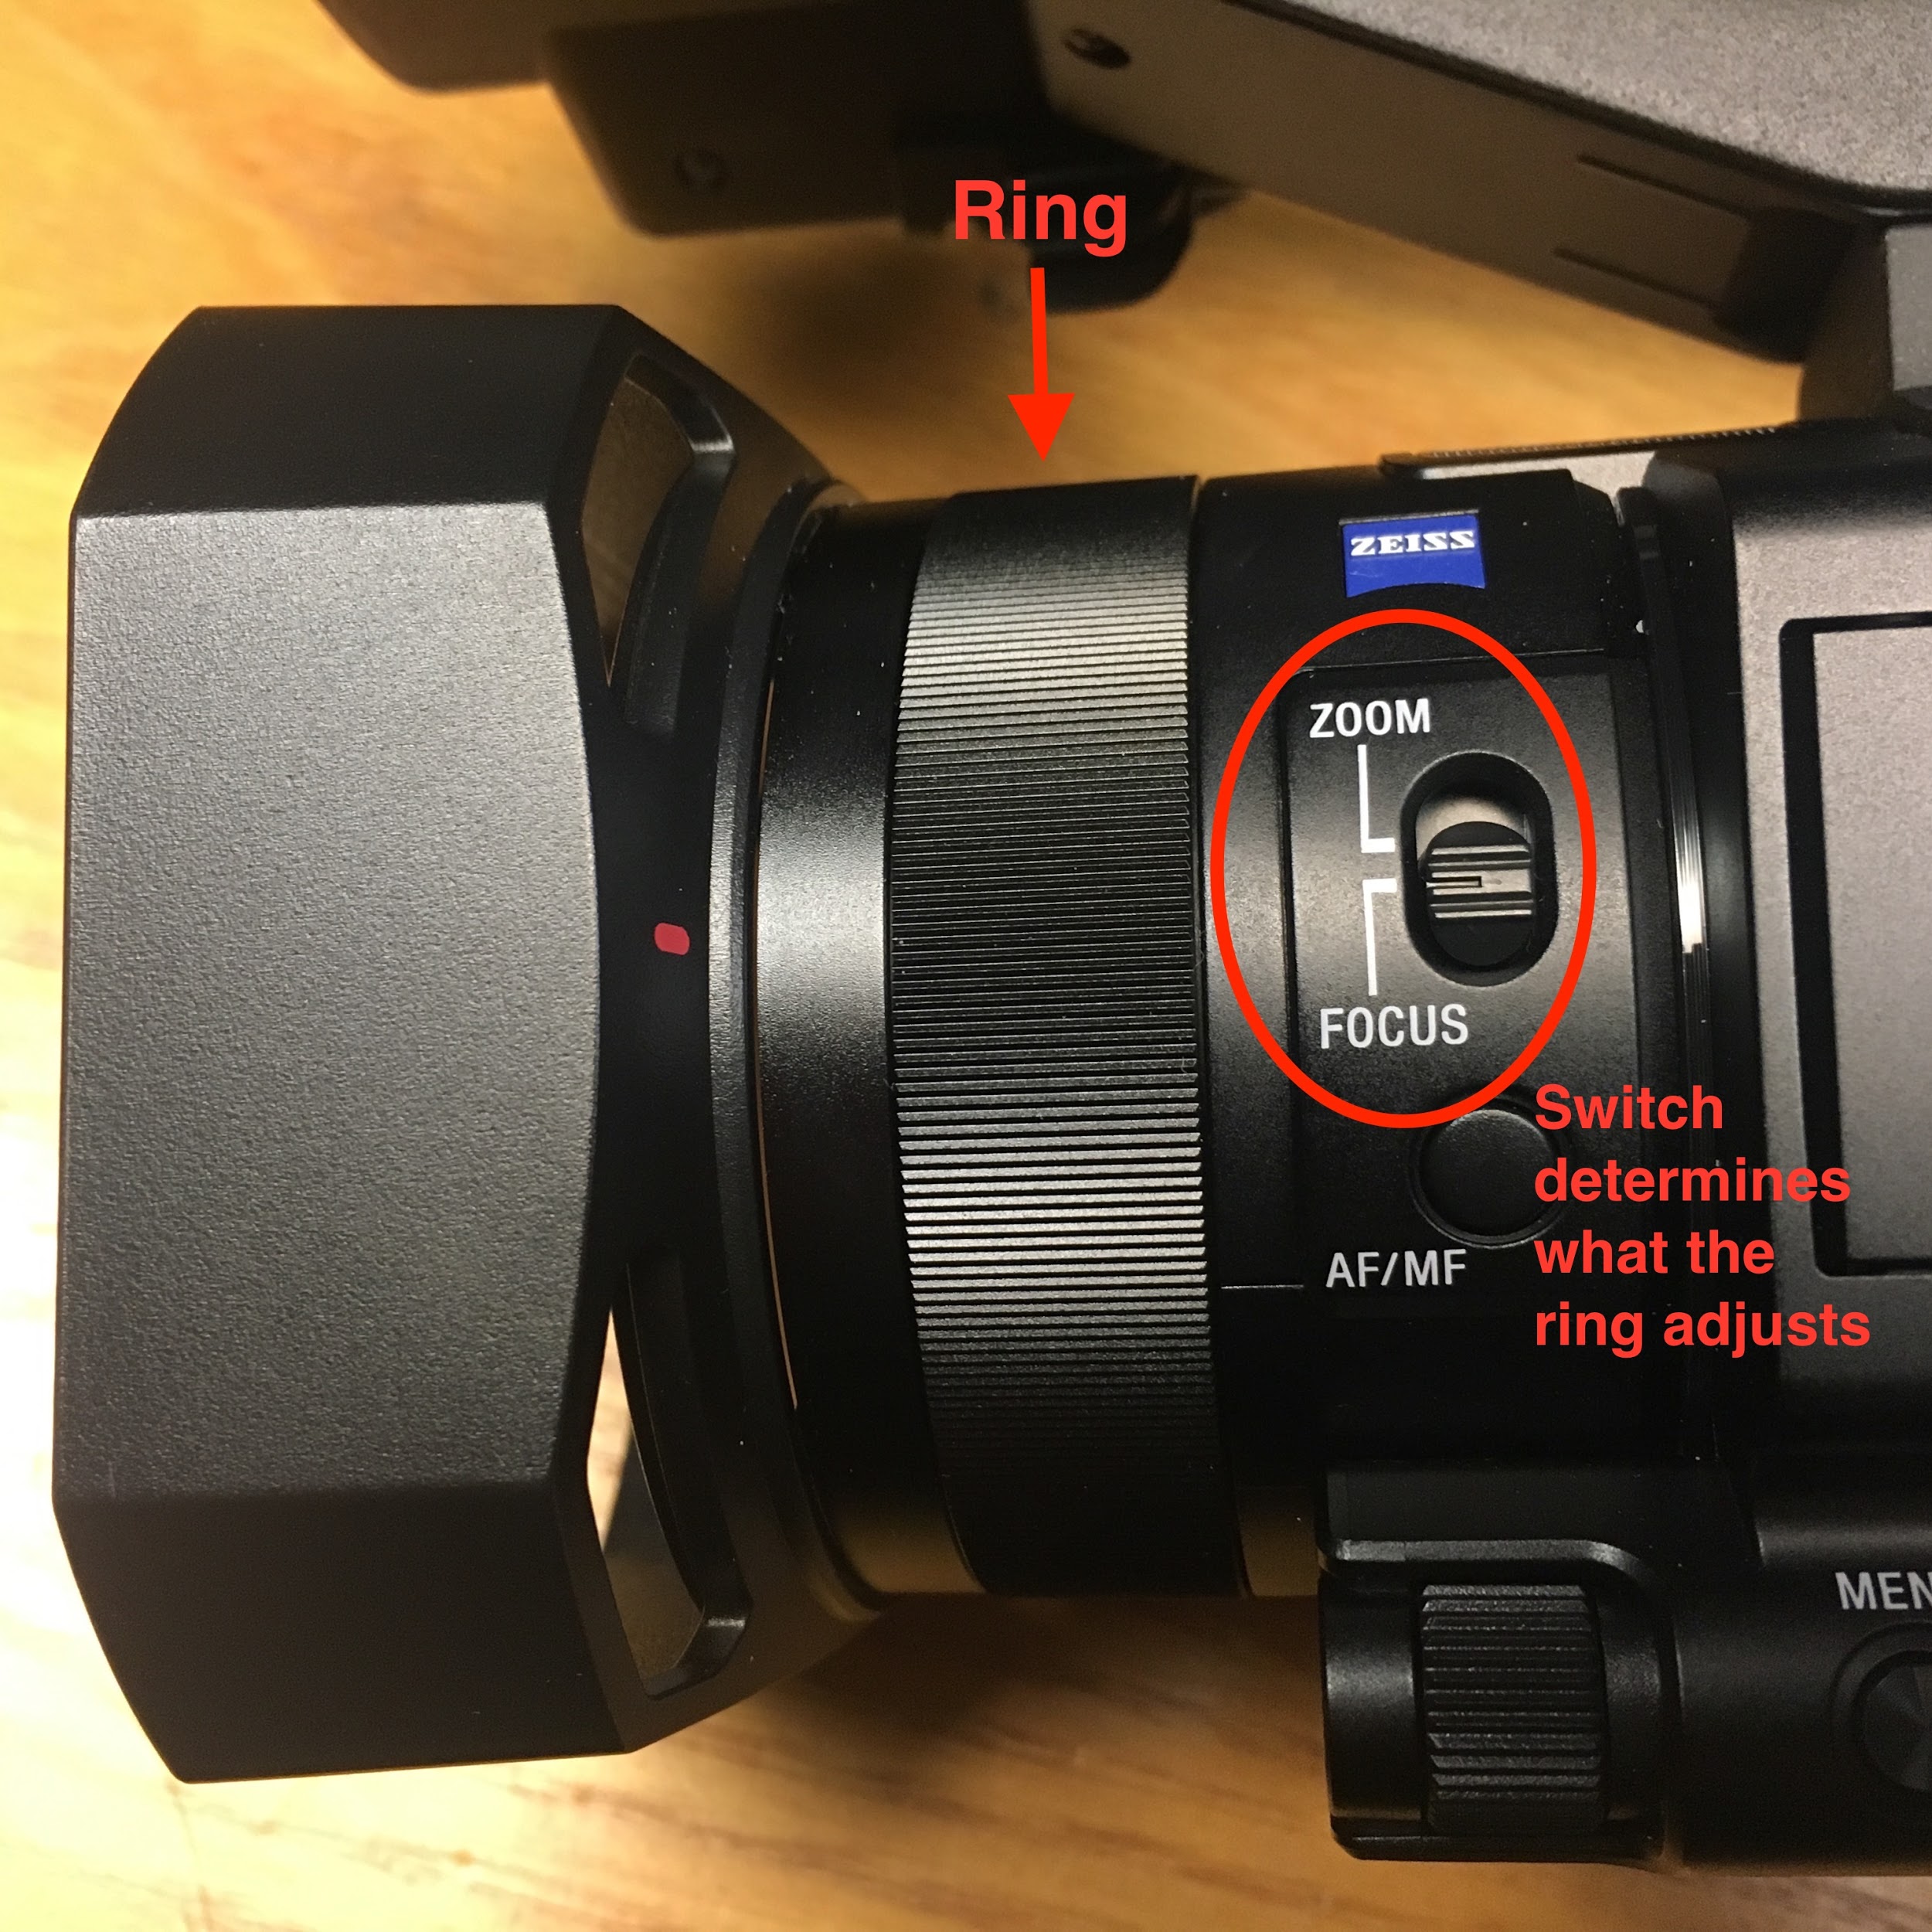
You also can use the manual ring on the front of the camera as a zoom. To do this, set the ZOOM/FOCUS switch on the left front of the camera to ZOOM.

Then use the ring to move between telephoto and wide angle.
Focus
You can manually focus the camera using the manual ring on the front of the camera.
First, set the ZOOM/FOCUS switch on the left front of the camera to FOCUS.
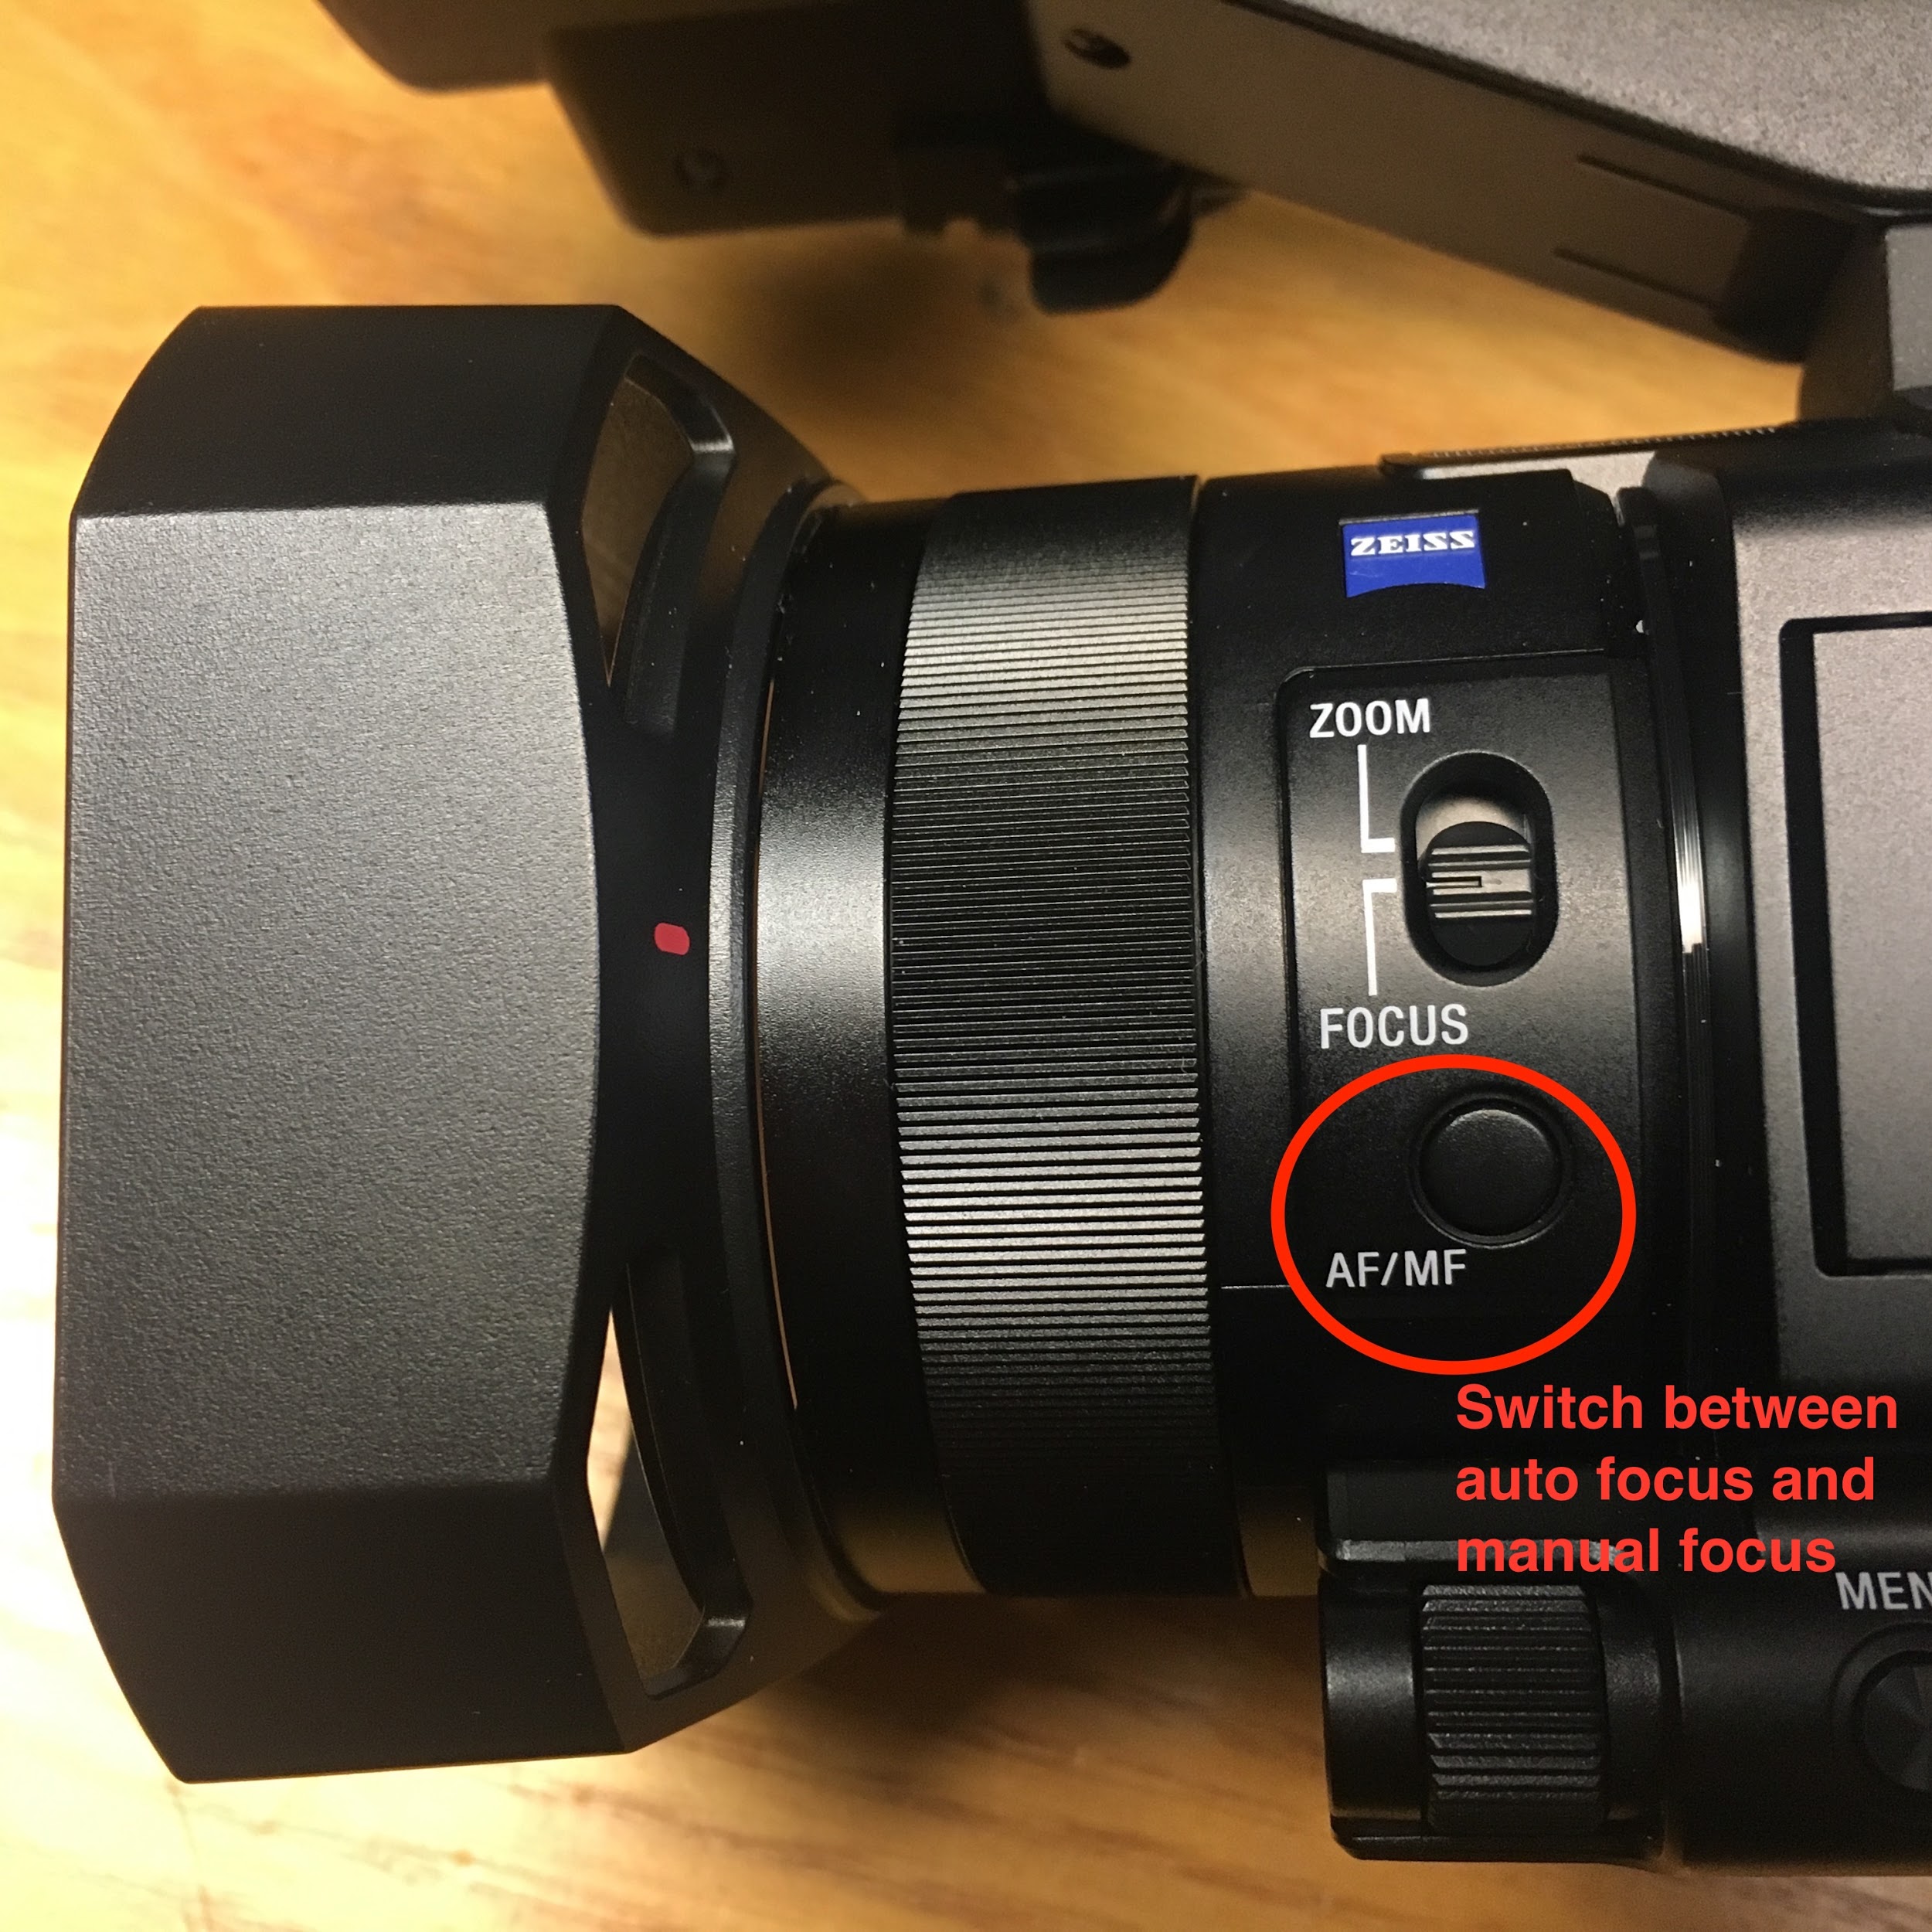
Then, press the AF/MF button on the left front of the camera until the LCD screen shows a small hand icon with the letter F in the middle.
You now can turn the manual ring to adjust the focus.
To return to automatic focus, push the AF/MF button again (the manual focus icon will disappear from the LCD screen).
Iris and Exposure
You can manually adjust the iris/exposure for the camera, which sets the aperture for the amount of light that hits the camera lens (measured in F stops).
To manually adjust the iris, on the back left of the camera, set the AUTO/MANUAL switch to MANUAL.

Then, on the bottom left of the camera find the IRIS button:
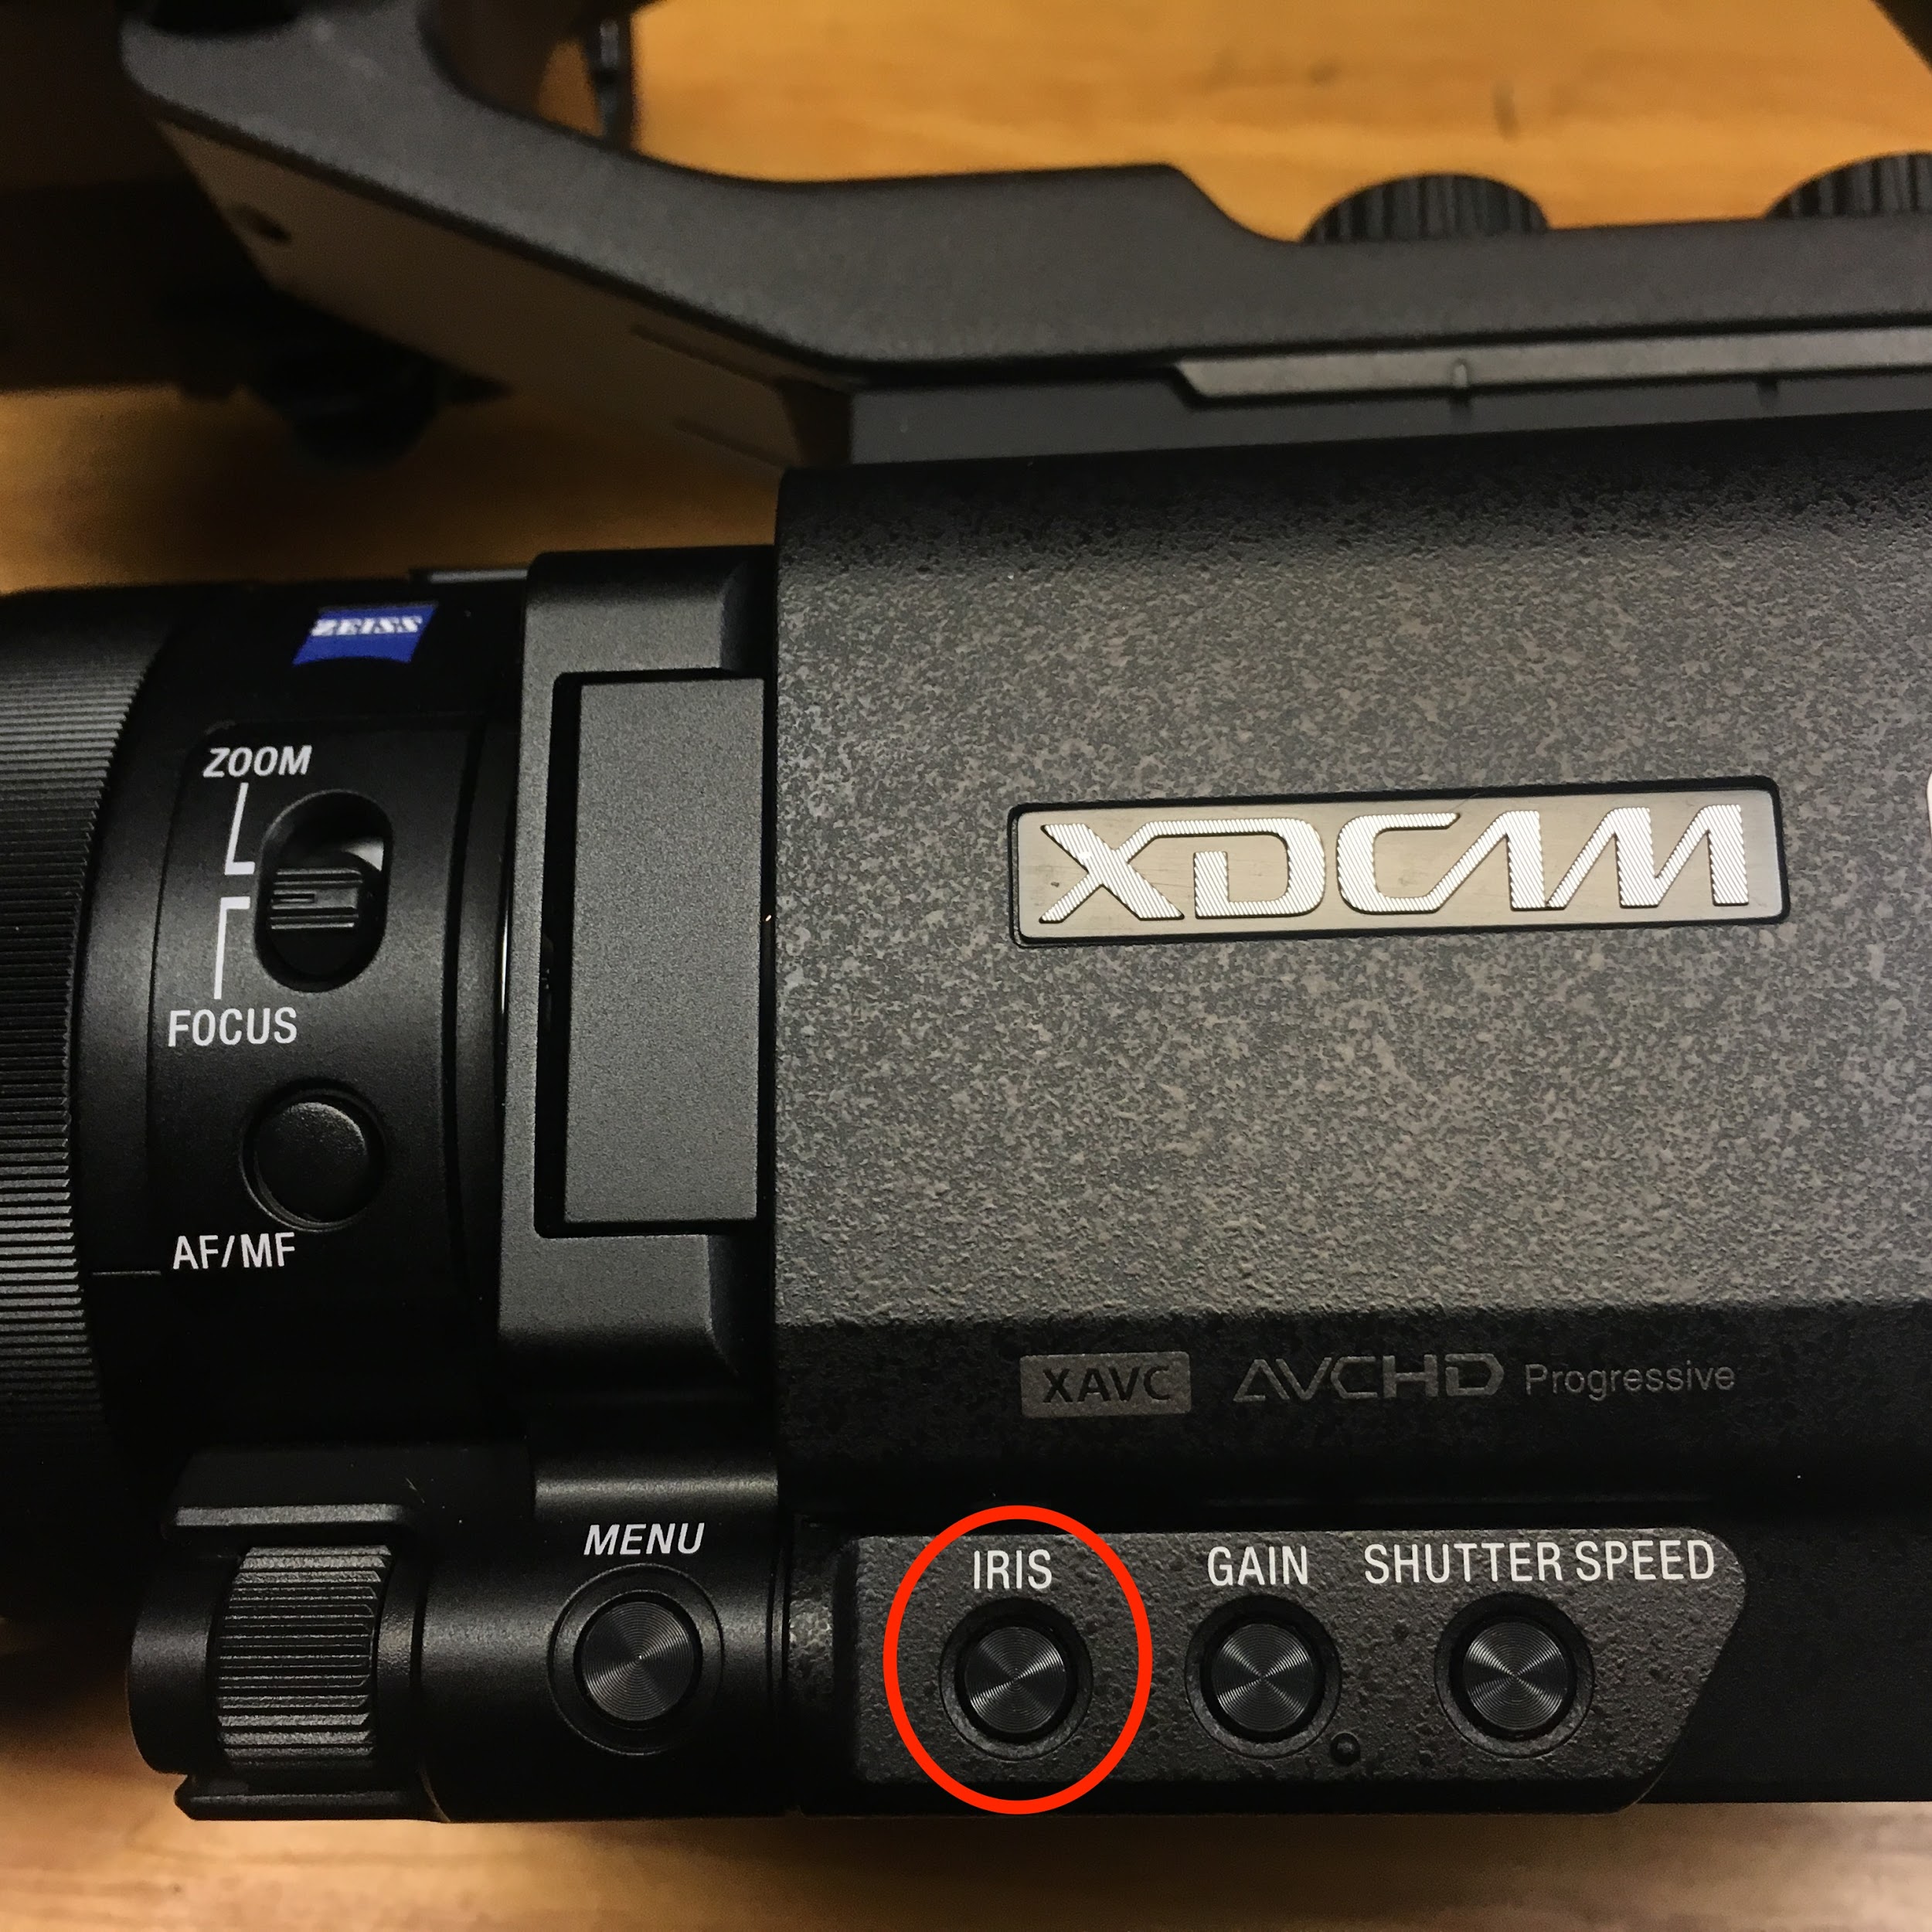
Look at the LCD screen and push this button so the F stop value is highlighted, which is manual mode. (If it has a small “A” next to it and is not highlighted, the iris is in auto mode.)
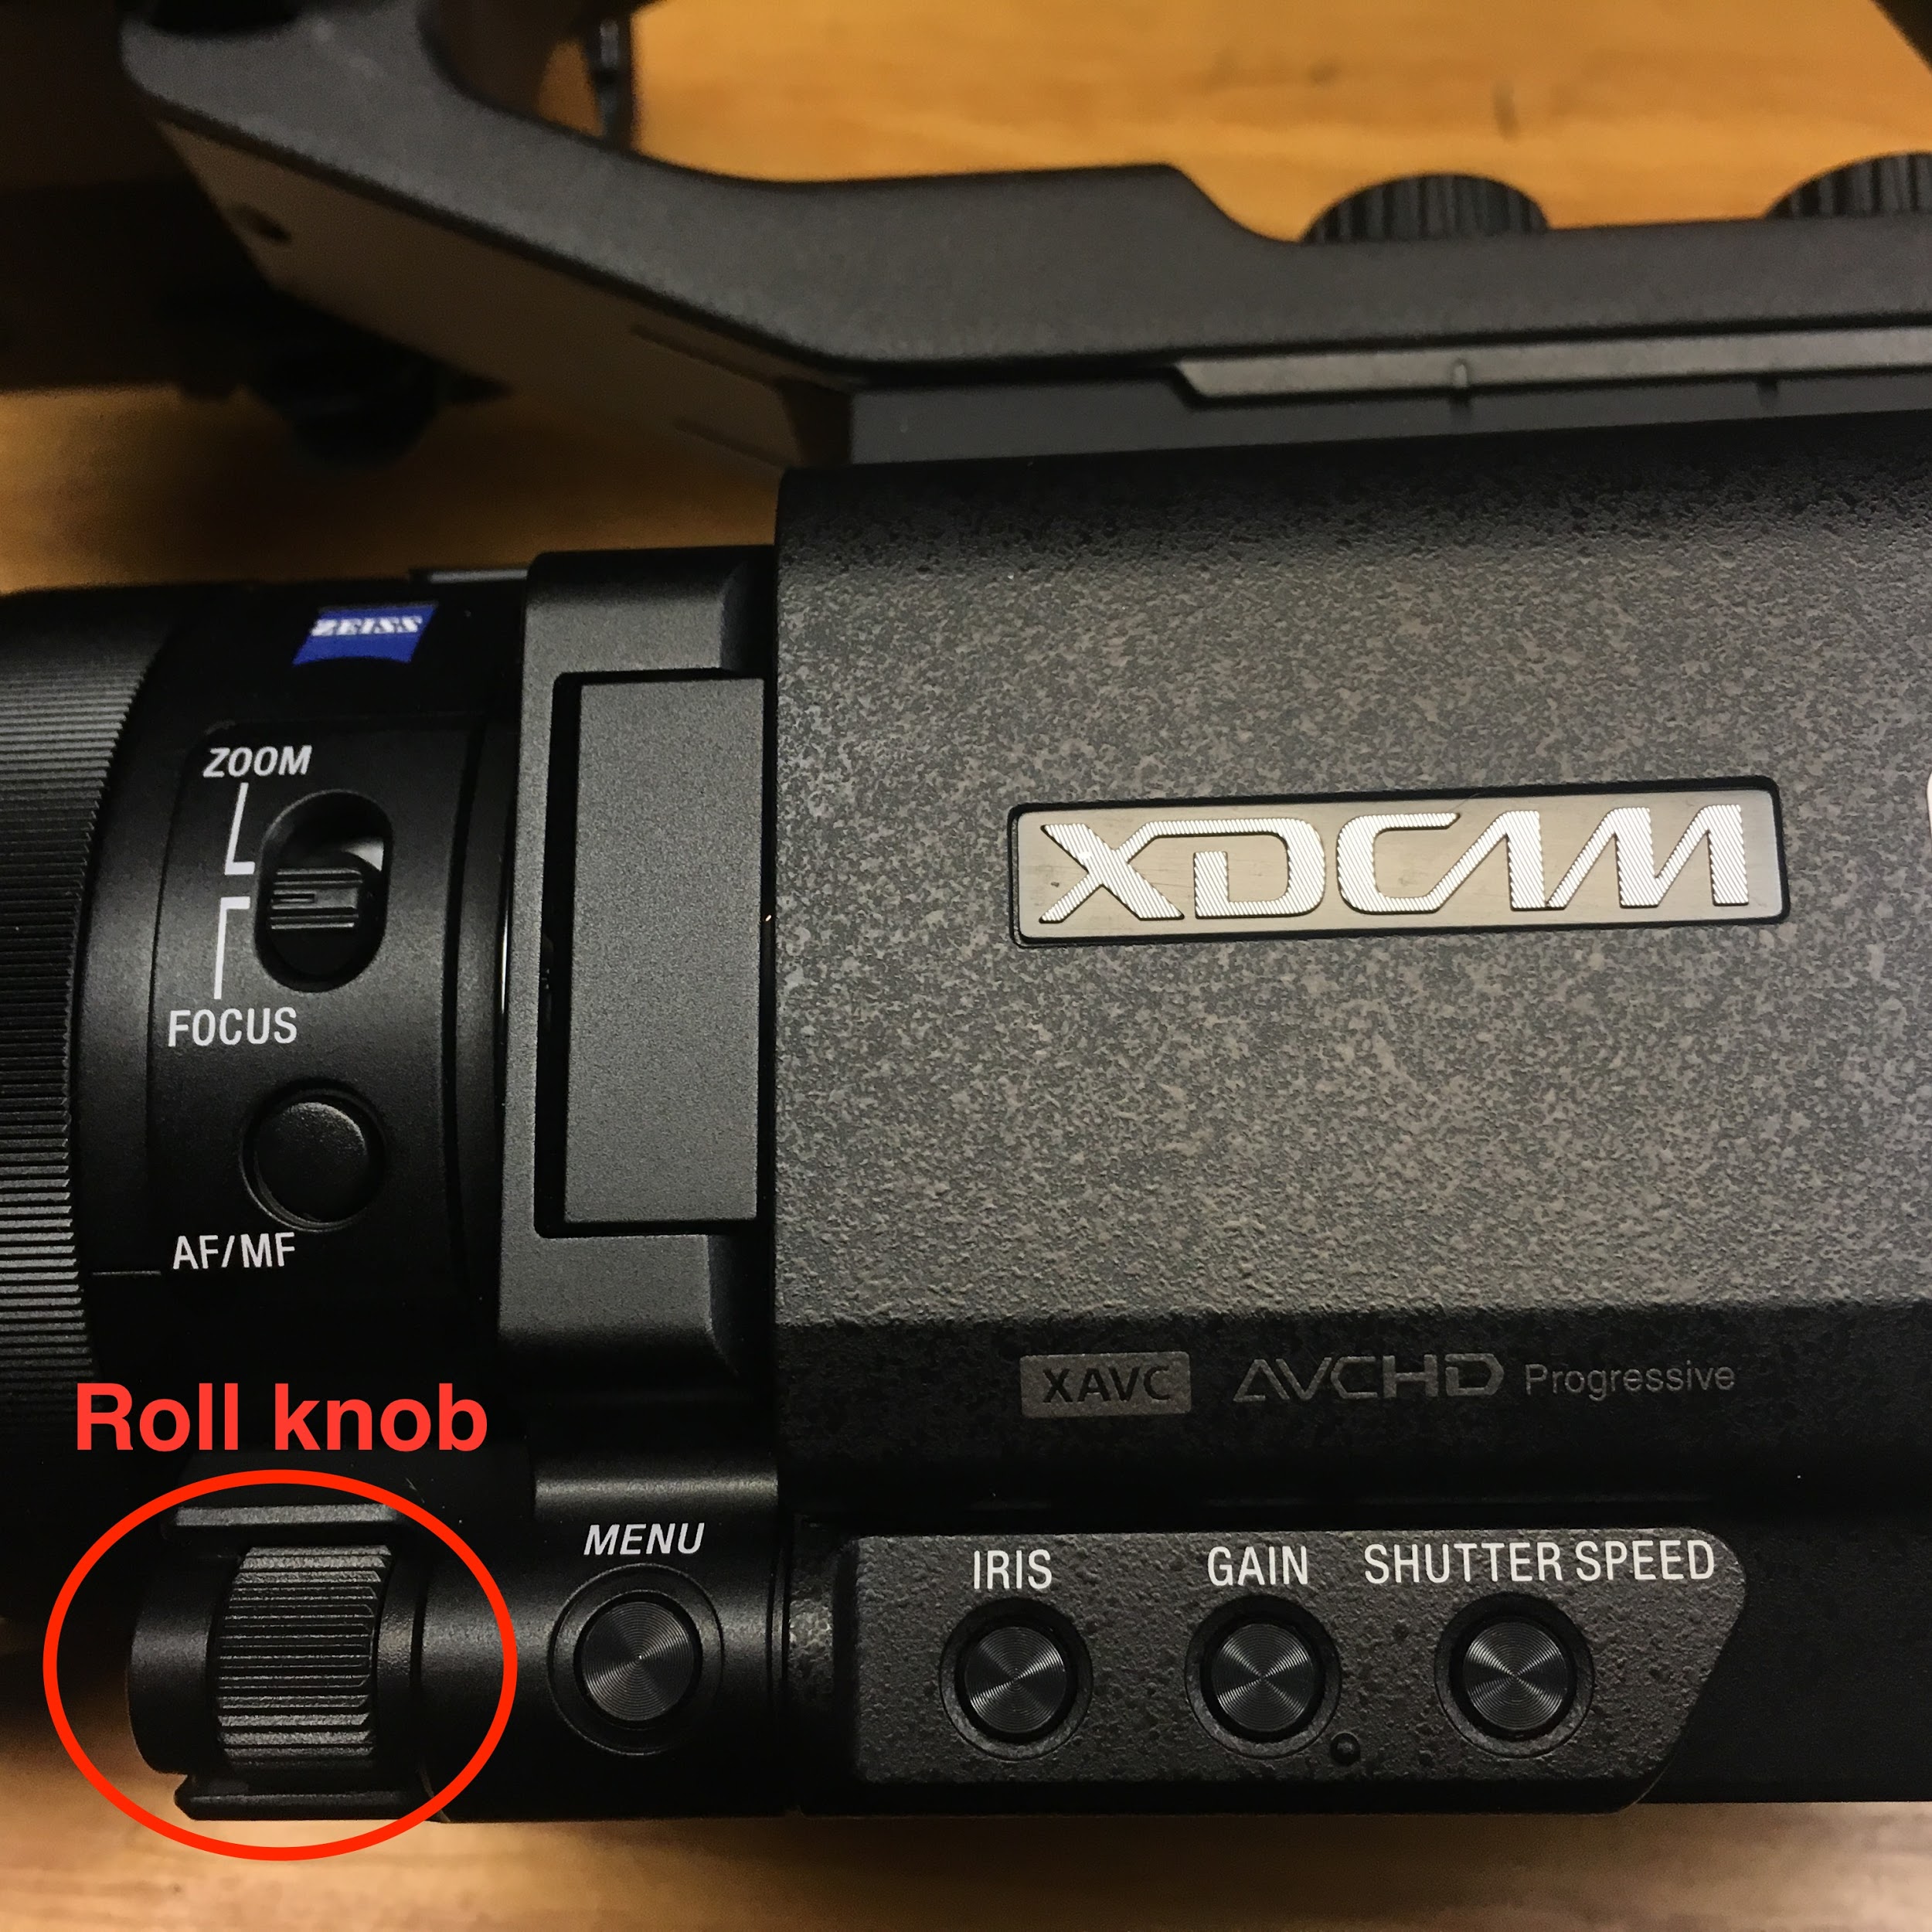
Once in manual iris mode, you can raise and lower the F stop using the roll knob on the bottom left side of the camera:
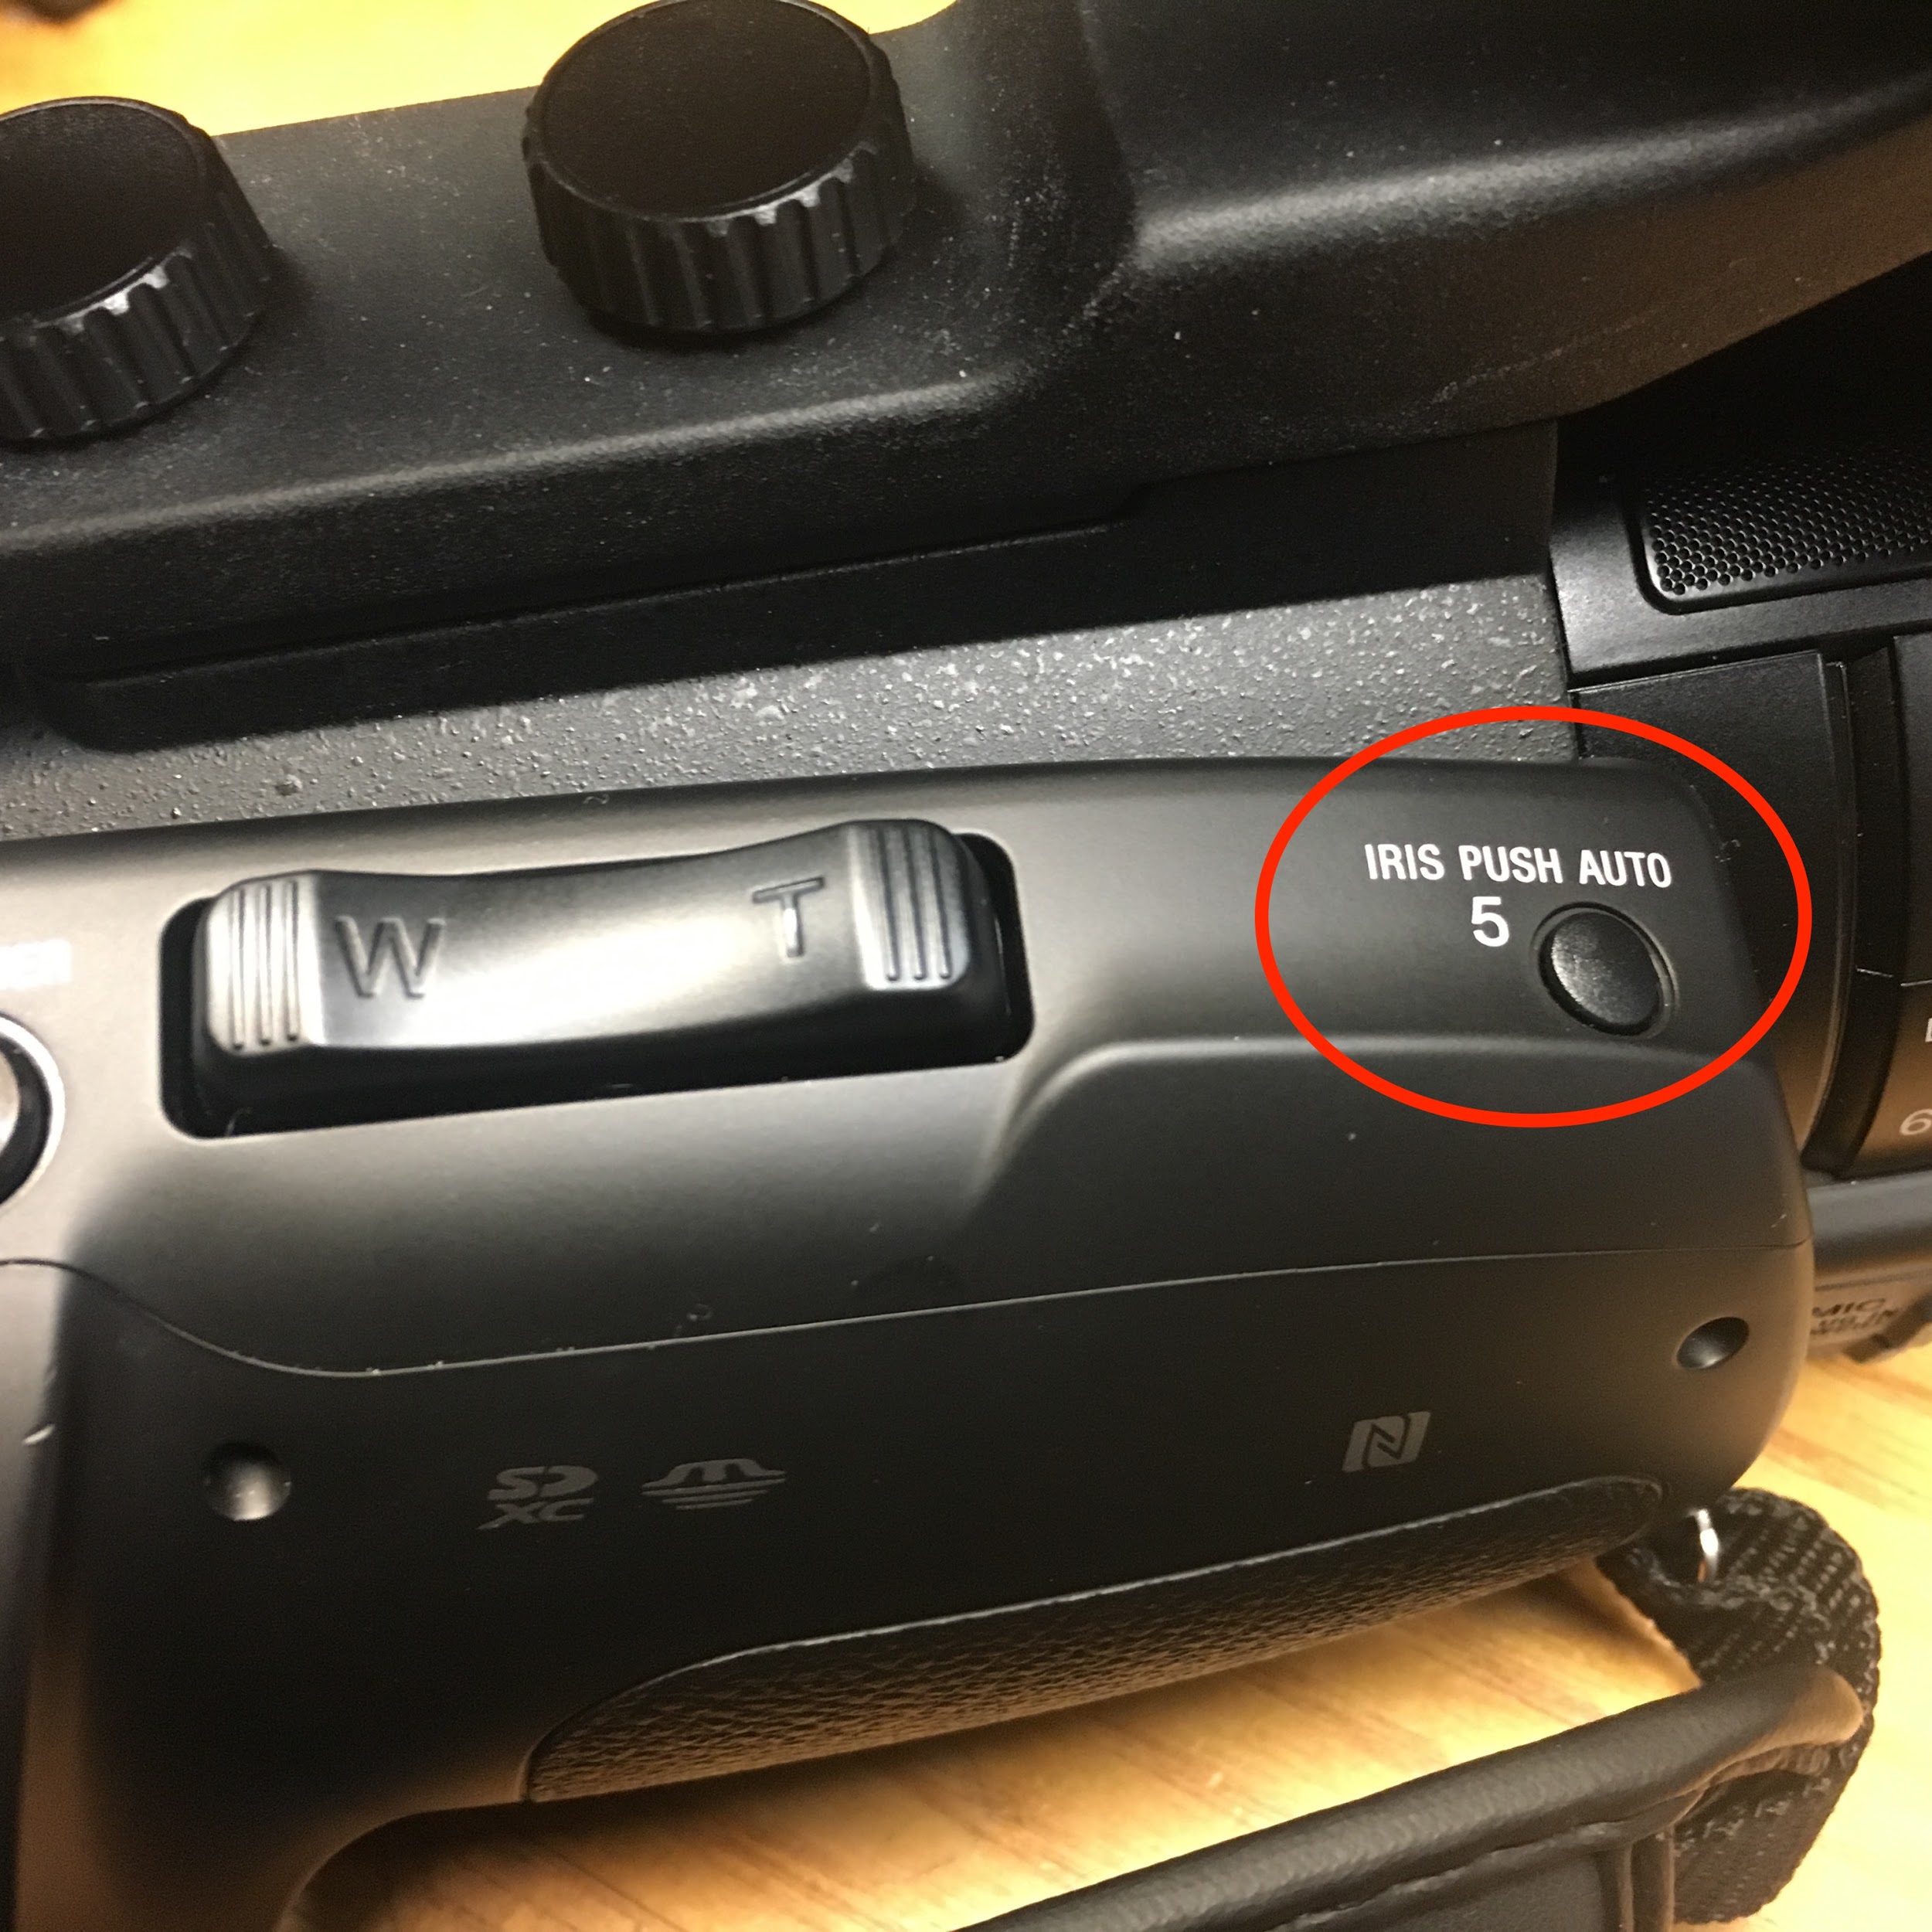
When in manual mode, if you want to quickly have the camera adjust the iris to the correct exposure for you, press the IRIS PUSH AUTO button on the top right of the camera. You can still manually adjust the iris from this point on, but pressing this button will temporarily set the iris to the correct exposure for the current scene in the viewfinder.
To return to automatic iris, push the IRIS button again.
White Balance
You can manually adjust the white balance for the camera, which adjusts the camera to the temperature of the light hitting the subject of your shot.
First, on the back left of the camera, set the AUTO/MANUAL switch to MANUAL.
Press the WHT BAL (white balance) button, which can be found under the power button. The white balance value will highlight on the LCD screen. Then you can turn the roll knob at the front left of the camera to select PRESET, A, or B.
-
To choose the PRESET value, go into the MENU → CAMERA SET → WB PRESET → your desired setting, or MENU → CAMERA SET → WB TEMP SET → your desired color temperature
-
To set the custom A or B value:
a. Use the roll knob at the front left of the camera to select A or B.
b. Go to MENU → CAMERA SET → WB SET.
c. Frame a white object (such as a piece of paper) that fills the screen under the same lighting conditions as your subject.
d. Press the EXEC button. The adjusted value will be stored.
Steady Shot
You can use the steady shot function on the camera to stabilize the camera in situations where there’s a lot of shake, such as hand-held shooting.
Or you can turn off the steady shot function when using a tripod for stability.
To turn steady shot on or off, go to MENU → CAMERA SET → STEADYSHOT → your desired setting:
-
Standard – to activate steady shot and stabilize the camera, which is the setting you’ll use most often
-
Active – to apply a more powerful steady shot effect, for situations where shaking is more severe
-
Off – to turn off steady shot, for situations where the camera is very stable such as on a tripod
Audio
The Sony X70 has a built-in internal microphone (on the top front of the camera), but it also comes with a shotgun microphone that can be attached to the top of the camera via an XLR adapter mount. You also can use the XLR adapter mount to attach other external microphones, such as a lavalier clip-on mic or a handheld mic, or to get a line feed from an audio mixer.
How many inputs?
If you are using two inputs (mics or lines) then you need to set the REC CH SELECT option to CH1.
If you are using one input (mics or line) then you need to set the REC CH SELECT option to CH1•CH2.
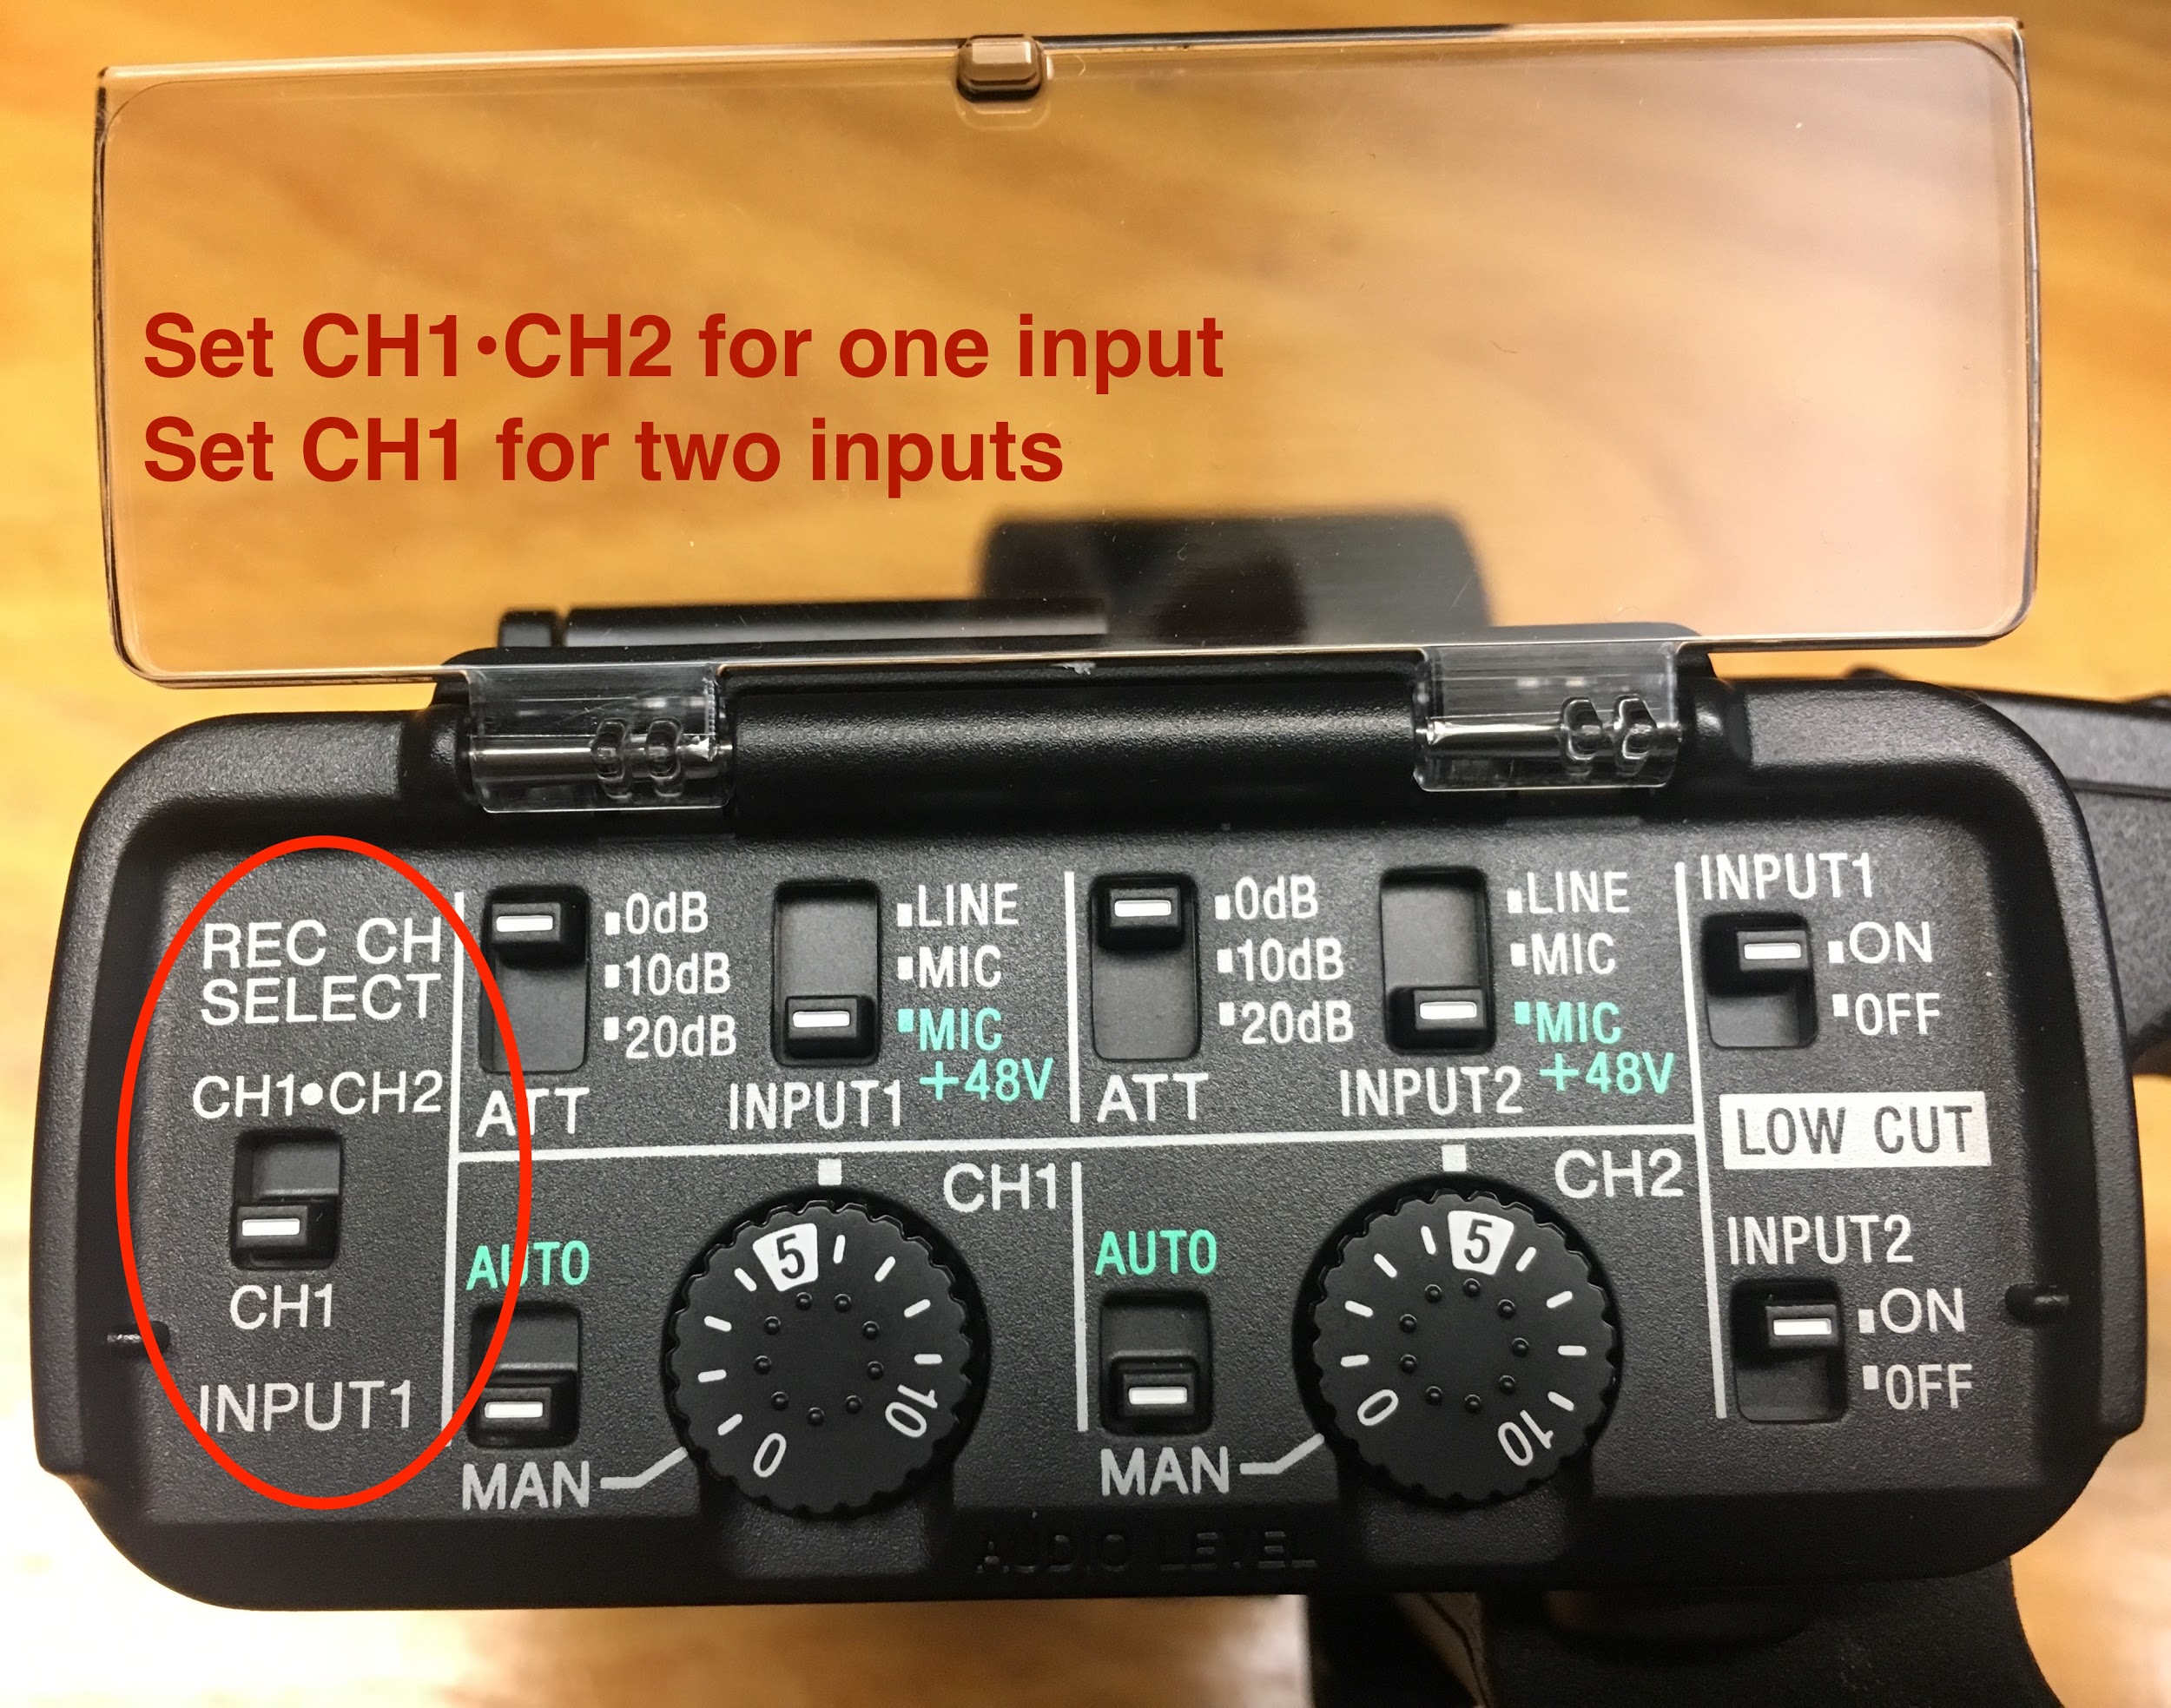
This is counter-intuitive to some people. This is basically asking you into which channels to direct the input1. Do you want input1 to be recorded on both left and right channels simultaneously? Or should input1 go to channel 1, and input2 go to channel 2?
Shotgun Microphone
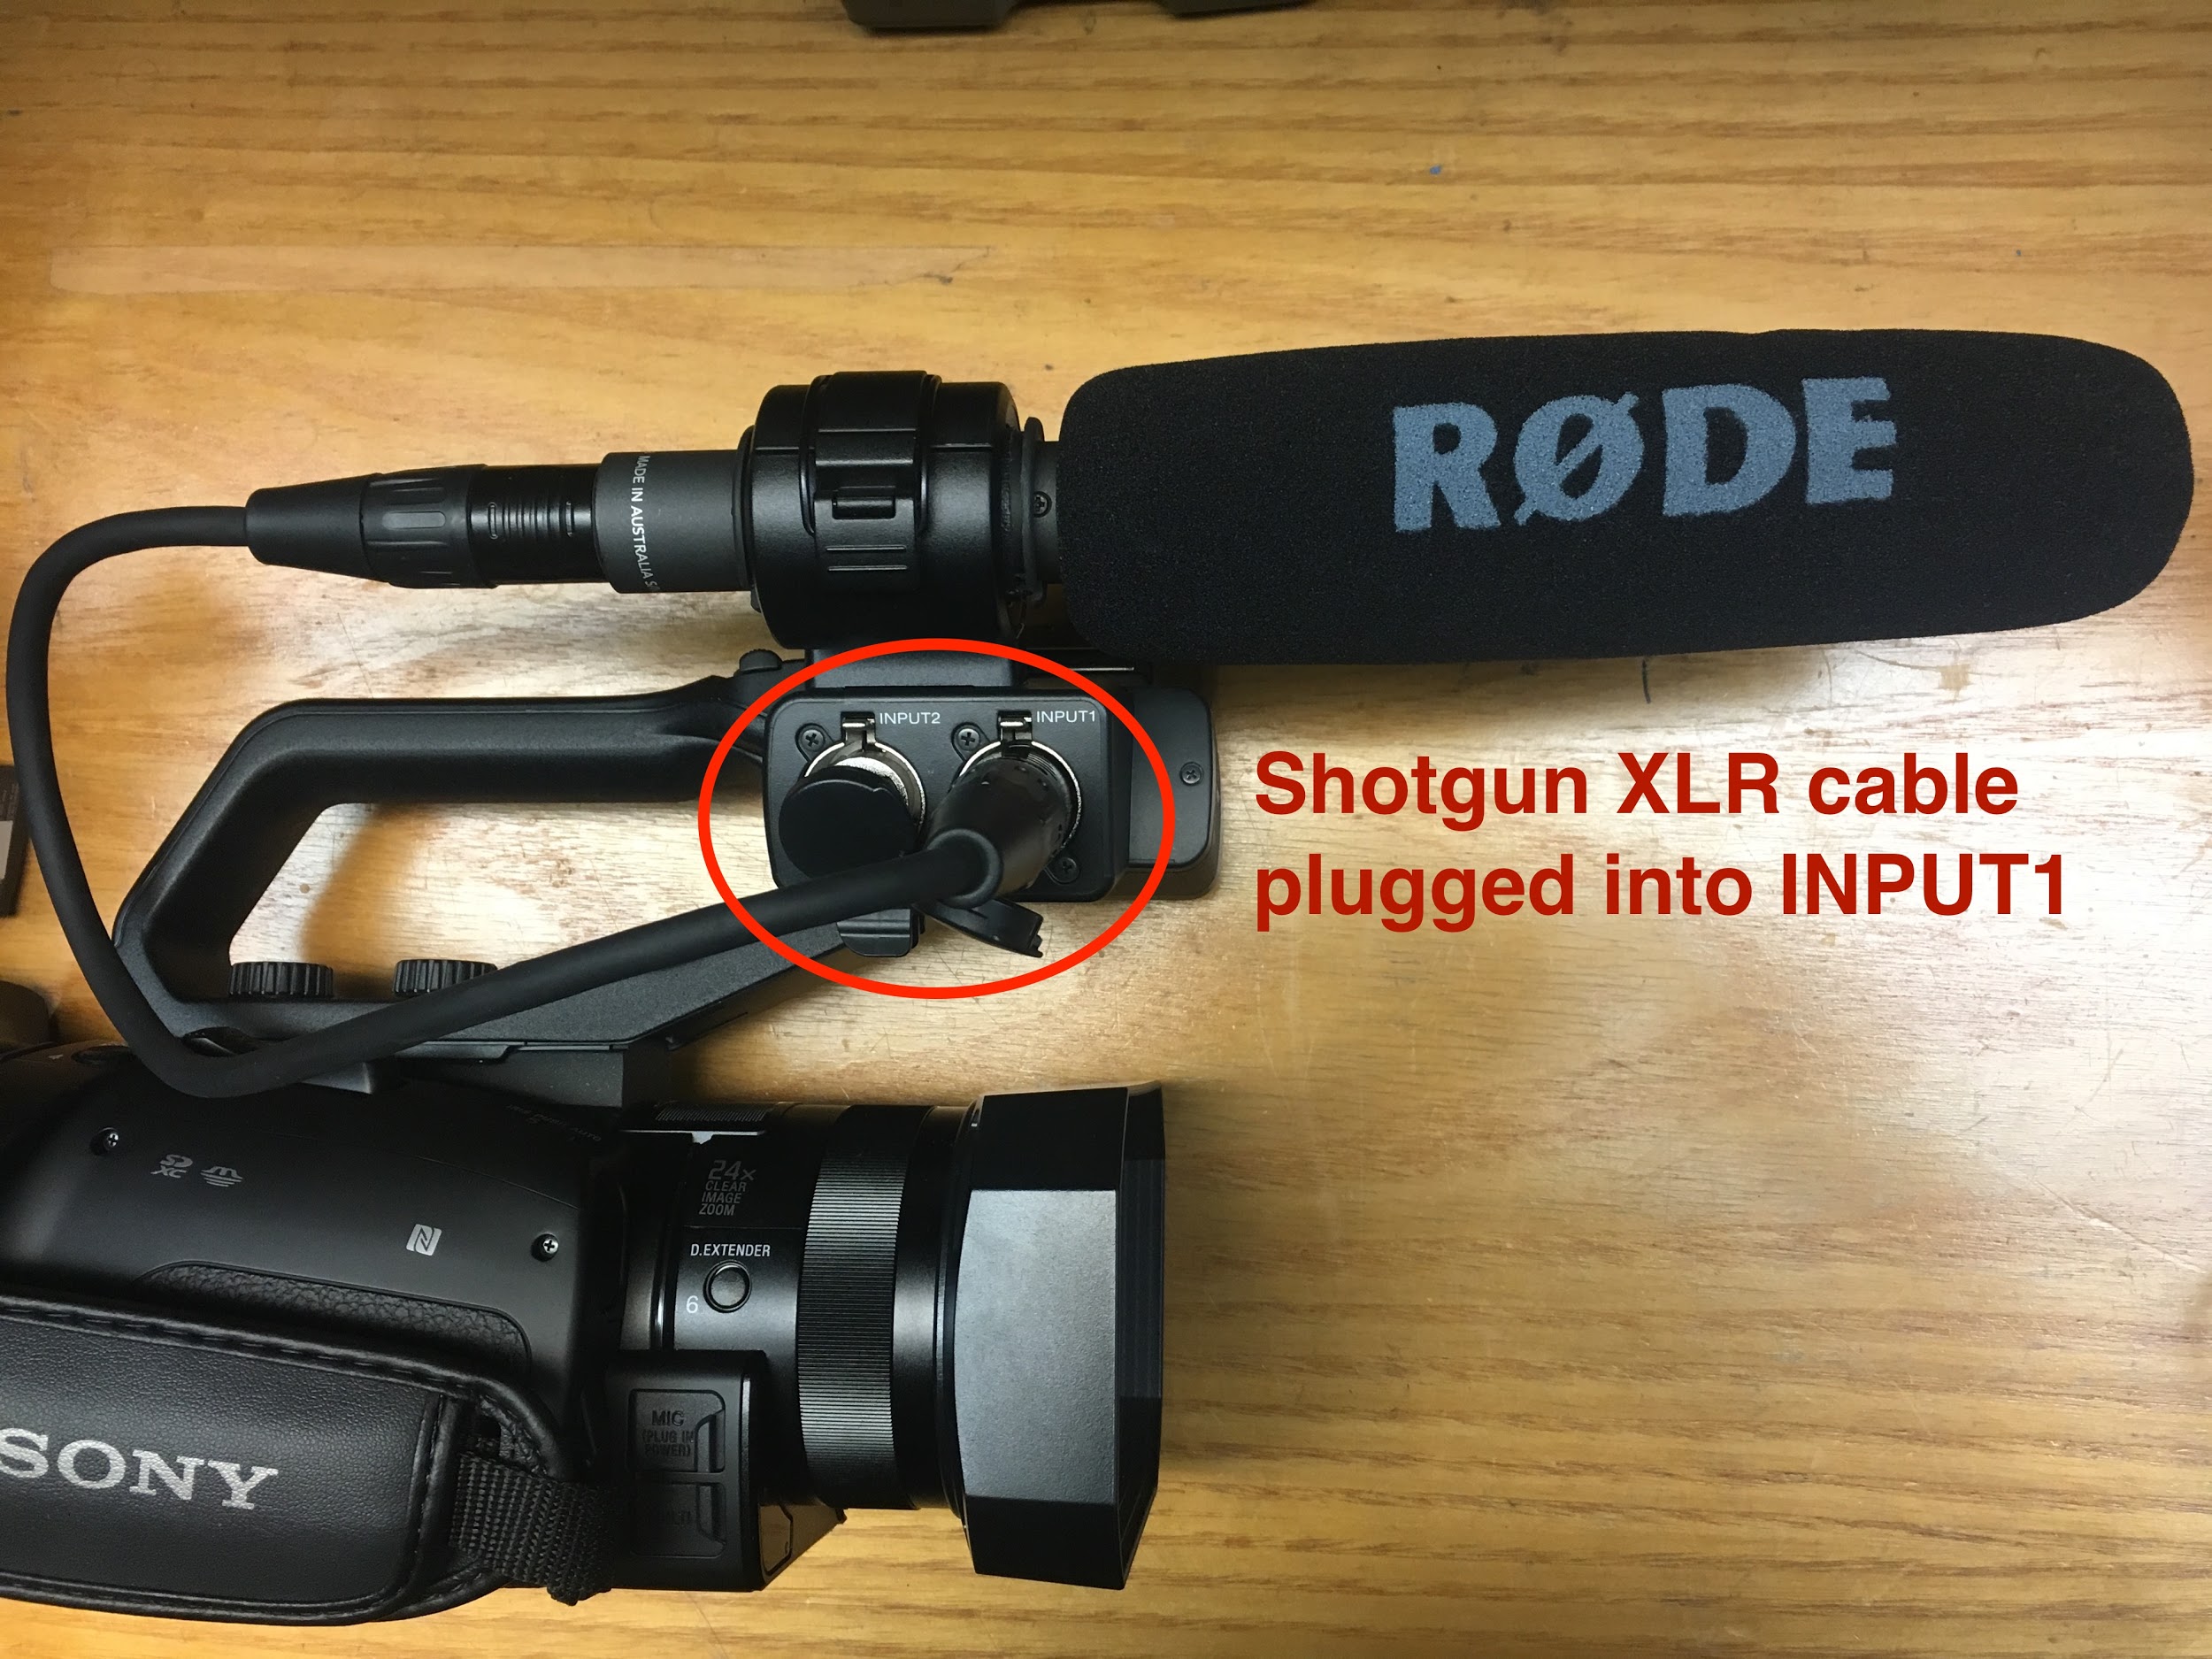
The shotgun microphone that comes with the X70 camera has an XLR cable that should be plugged into the XLR INPUT1 jack on the XLR adapter mount secured to the top of the camera.
You adjust the audio settings for the shotgun mic using the set of switches and dials on the left side of the XLR adapter mount (the opposite side from the XLR input jacks). The main settings for the shotgun mic are:
-
The INPUT1 switch at the top toward the left should be set to MIC+48v for the shotgun mic (this is the setting for a microphone like the shotgun that requires external power)
-
The ATT attenuation switch at the top left, which adjusts the audio input level to the sensitivity of the microphone, should be set to 10dB for the shotgun mic to start and can be adjusted as necessary.
If you want to be able to manually adjust the audio level, make sure the AUTO/MAN switch next to the dial is set to MAN for manual. Turn the CH1 audio level dial just to the right of the switch to adjust the audio up or down.
To return to automatic audio settings, change the CH1 AUTO/MAN switch at the bottom left back to AUTO.
Additional External Microphone
You can connect an additional external microphone with an XLR cable by plugging it into the XLR INPUT2 jack on the XLR adapter mount secured to the top of the camera.
Then adjust the audio settings for an external mic using the set of switches and dials on the left side of the XLR adapter mount (the opposite side from the XLR input jacks). The main settings are:
-
the INPUT2 switch at the top toward the right should be set to MIC+48v for a microphone that requires external power or to MIC for a microphone that supplies its own power (such as with batteries)
-
The ATT attenuation switch at the top left, which adjusts the audio input level, should be set to match the sensitivity of the microphone – 0dB, 10dB or 20dB
-
the REC CH SELECT switch to the far left must be set to CH1 in order to record audio from both INPUT1 and INPUT2.
If you want to be able to manually adjust the audio level, make sure the AUTO/MAN switch next to the CH2 dial is set to MAN for manual. Turn the CH2 audio level dial just to the right of the switch to adjust the audio up or down. To return to automatic audio settings, changes the CH2 AUTO/MAN switch at the bottom back to AUTO.
Line Feed from Audio Mixer
You can connect a line feed from an audio mixer via an XLR cable by plugging the cable into the XLR INPUT2 jack on the XLR adapter mount secured to the top of the camera.
Then adjust the audio settings for the line feed using the set of switches and dials on the left side of the XLR adapter mount (the opposite side from the XLR input jacks). The main settings are:
-
the INPUT2 switch at the top toward the right should be set to LINE
-
The ATT attenuation switch at the top left, which adjusts the audio input level, can be ignored because the input is pre-set at a fixed level when the audio is a line feed.
-
the REC CH SELECT switch to the far left must be set to CH1 in order to record audio from both INPUT1 and INPUT2.
If you want to be able to manually adjust the audio level, make sure the AUTO/MAN switch next to the CH2 dial is set to MAN for manual. Turn the CH2 audio level dial just to the right of the switch to adjust the audio up or down.
To return to automatic audio settings, changes the CH2 AUTO/MAN switch at the bottom back to AUTO.
Adjusting Audio Levels
Once the inputs and channels are properly configured, click the switches from AUTO to MAN, and use the wheels to manually adjust the audio levels.
Except in situations where you are moving about from place to place and quickly need to capture varying degrees of audio volume (like covering a breaking news situation) you should always manually set your audio levels by doing a sound check. For proper sound check, ask the subject a question like “what did you eat for breakfast,” rather than having them say “check, check 1, 2, 3″ which often doesn’t result in an accurate representation of voice volume.
Camera Settings
Below are camera settings we are recommending to be used with the Sony X70.
| AGC Limit | Off |
|---|---|
| Spot Focus | OFF |
| Focus | AUTO |
| AE Shift | OFF |
| White Balance Shift | OFF |
| Low Lux | OFF |
| Intelligent Auto | ON |
| Cinematone | OFF |
| TeleMacro | OFF |
| SteadyShot | ACTIVE |
| Zoom Speed | LOW |
| Digital Zoom | OFF |
| Conversion Lens | OFF |
| Auto Back Light | ON |
| NightShot Light | OFF |
| Color Bar | OFF |
| Face Detection | AUTO |
| Audio Format | Linear PCM |
| Zebra | OFF |
| Histogram | OFF |
| Peaking | OFF |
| Audio Level Display | ON |
This tutorial was written by Lauren Schwartzman. Copyright Graduate School of Journalism 2017.
Copyright UC Berkeley Graduate School of Journalism . Any code samples in these tutorials are provided under the MIT License
The above copyright notice and this permission notice shall be included in all copies or substantial portions of the Software.
THIS PAGE IS PROVIDED "AS IS", WITHOUT WARRANTY OF ANY KIND, EXPRESS OR IMPLIED, INCLUDING BUT NOT LIMITED TO THE WARRANTIES OF MERCHANTABILITY, FITNESS FOR A PARTICULAR PURPOSE AND NONINFRINGEMENT. IN NO EVENT SHALL THE AUTHORS OR COPYRIGHT HOLDERS BE LIABLE FOR ANY CLAIM, DAMAGES OR OTHER LIABILITY, WHETHER IN AN ACTION OF CONTRACT, TORT OR OTHERWISE, ARISING FROM, OUT OF OR IN CONNECTION WITH THE INFORMATION IN THIS PAGE OR THE USE OR OTHER DEALINGS IN THIS INFORMATION.