Set Keyboard shortcuts in Premiere Pro CC
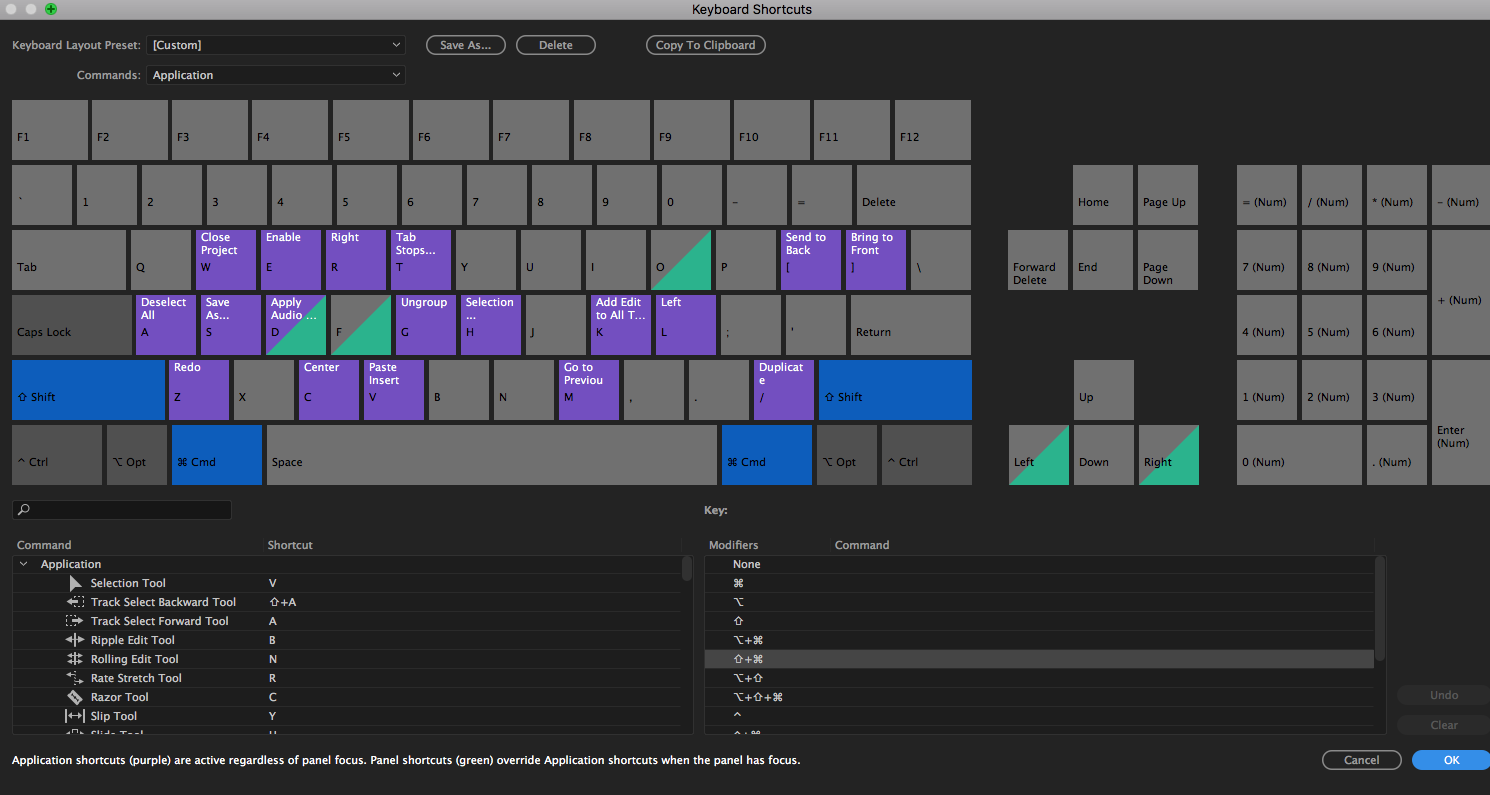
You can use the keyboard GUI to see which keys have been assigned and which are available for assignment. A tool tip reveals the full command name when you hover over a key in the Keyboard layout. When you select a modifier key on the keyboard layout, the keyboard displays all the shortcuts which require that modifier. You can also press the modifier key on the hardware keyboard to achieve this result.
When you select a key on the Keyboard Layout, you can view all the commands that are assigned to that unmodified key and all other modifier combinations.
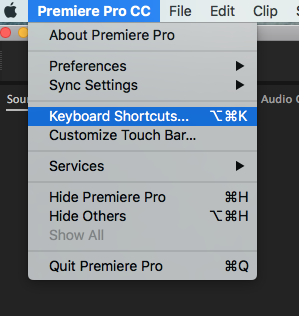
From the Premiere CC menu, select “Keyboard Shortcuts.”
In the search bar in the lower left type ripple trim (see below)
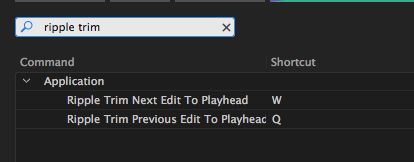
Then select each option (ripple trim next…) an in the grey area click your mouse and hit W on the keyboard to map this key to the shortcut and repeat for (ripple trim previous…) except choose Q on the keyboard.
For more, watch the video below:
Create Multiple Bins
A good way to keep you footage organized is to create nested or multiple Bins inside other bins.
Create a bin called footage, import your footage.After importing your footage and previewing the clips, create new bins inside the footage bin to help you keep organized.
To create a bin inside another bin, make sure the bin is selected by clicking on it, then hit the bin icon in the lower right of your project window.
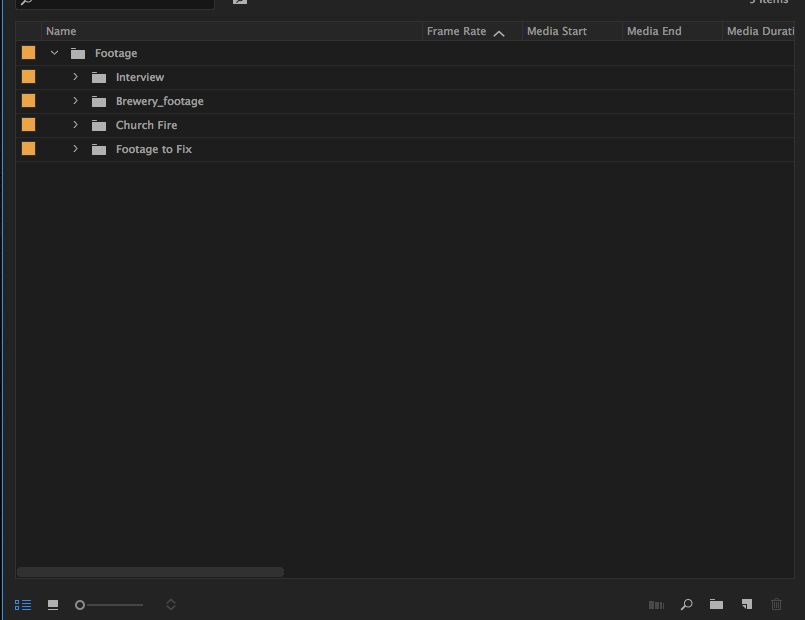
Above is a sample of nested bins inside the footage bin.
Bin tips
- To move an item into a bin, drag the item to the Bin icon. You can move bins into other bins to nest them. Dropping an item into a bin does not automatically open the bin.
- To display the contents of a bin, in List view, click the triangle beside the Bin icon to expand it, or double-click the bin.
- To show the contents of an enclosing (parent) bin when you’re viewing only the contents of a nested bin, click the Parent Bin button in the Project panel. You can continue to click this button until the top-level contents of the Project panel appear.
- To open or close more than one bin at a time, Alt-click (Windows) or Option-click (Mac OS) multiple selected bins.
Organize your Metadata Display
You can choose the info you want to show in your project menu bar. Since it’s not recommend to change clips names, another way to organize a label clips is to set up your metadata display to show the Description panel.

Step 1
Right Click on the grey area in the project panel just to the right of the name icon until you see the Metadata Display icon, then select it. Once selected you will see the below window.
Open the Premiere Pro Project Metadata by clicking the icon to the left of the name.

Step 2
Choose the items you want to show and deselect the items that you choose to hide. As a starting point choose the options below. You can always add or subtract options as needed.
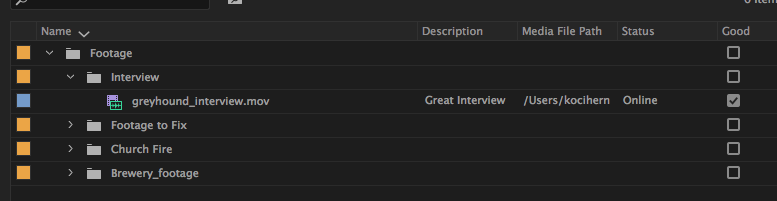
See above for a good beginner option is to choose, Description, Media File Path, Status and Good.
Multiple Sequences or Sequence Versioning
This is an optional workflow, but highly recommended for projects beyond 3 minutes in length.
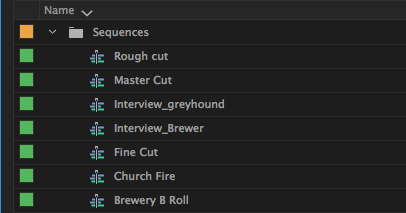
After creating a Sequence Bin , it is a good practice to create multiple sequences that contain— interviews, broll, stills or rough cuts. This helps in organization of footage, especially in large projects. Instead of working from a single sequence which can get messy and complicated, you can have multiple sequences then just copy and paste clips between sequences. You can also right click a sequence and duplicate it in order to tweak or version the sequence.
Subclips
(Resource https://helpx.adobe.com/premiere-pro/how-to/premierepro-soft-subclips-cc.html)
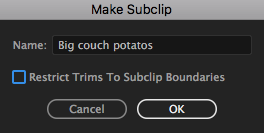
Create a subclip from the Project panel
You can create a subclip from source clips or other subclips that are made up from a single media file.
- Double-click a clip in the Project panel to open it in the Source Monitor.
- In the Source Monitor, set In and Out points for the subclip. Either or both the In point and Out point must differ from the source clip In point and Out point.
- Do one of the following:
- Choose Clip > Make Subclip, enter a name for the subclip, and click OK. CMD+U is the short cut.
- Deselect the Restrict Trims. You can also rename subclips!
- The subclip appears in the Project panel with a Subclip icon
 ,
,  ,
,  ,
,  . The icon varies depending on the media type.
Note: Some editors find creating subclips as an alternative way to organize an edit.
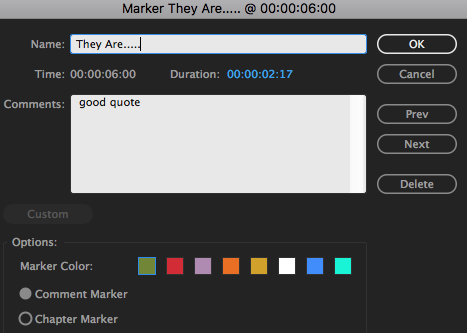
Add markers
You can add markers on the Source monitor, Program monitor, or on the Timeline. Markers added to Program monitor are reflected in the Timeline. Similarly, markers added to the Timeline are reflected on the Program Monitor.
In Premiere Pro, multiple markers can be added, allowing a user to add multiple notes and comment on clips on the same location in the Timeline.
- Move the playhead to the point where you want to add a marker.
- Select Marker > Add Marker, or press the M key.
- To edit the marker, double-click the marker icon to open the Marker dialog box.
NOTE: It’s important to add a name, description, color label and duration to the marker.
What is Morph Cut?
Morph Cut is a video transition in Premiere Pro that helps you create more polished interviews by smoothing out jump cuts between sound bites.
A common challenge that comes with editing footage with a “talking head” is that the subject can stutter, make frequent use of “umms”, “uhs”, or unwanted pauses. All of which keep you from having a clean, continuous sequence without the use of jump cuts or cross dissolves.
Now, you can effectively clean interview dialog by removing unwanted portions of a clip and then apply the Morph Cut video transition to smooth out distracting jump cuts. You can also use Morph Cut to effectively rearrange clips in your interview footage to ensure a smooth flow without any jumps in visual continuity.
Morph Cut uses an advanced combination of face tracking and optical flow interpolation to create a seamless transition between clips. When used effectively, a Morph Cut transition can be so seamless that it looks as natural as shooting the video without unwanted pauses or words that can break the narrative flow.
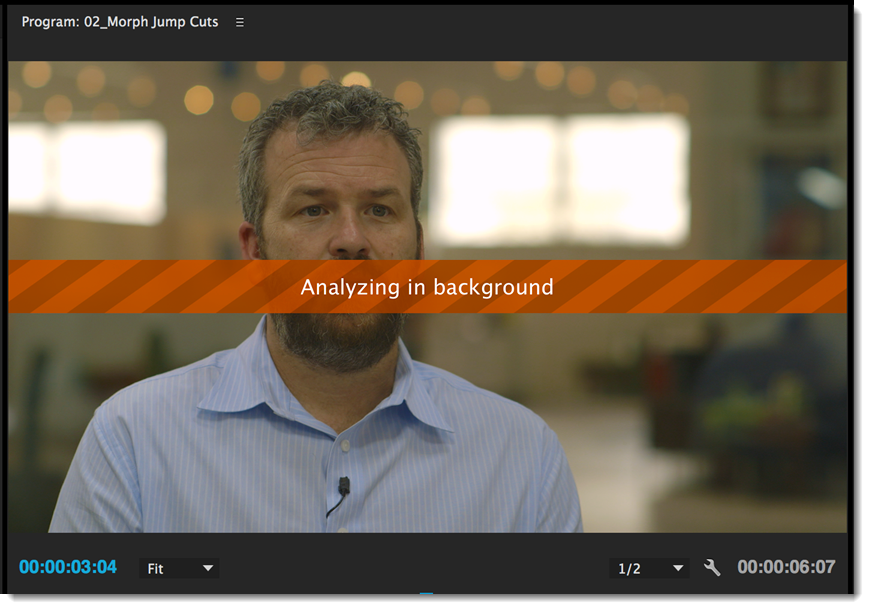
In the Effects panel, choose Video Transitions > Dissolve > Morph Cut and drag the effect to the edit point between clips in the Timeline.
After you apply the Morph Cut effect, analysis of the clip begins immediately in the background. As analysis begins, an “Analyzing in background” banner displays within the Program Monitor indicating that analysis is occurring.
You are free to work with the footage or elsewhere in the project while the analysis occurs.
After analysis is complete, a symmetrical transition is created, centered at the edit point. The transition duration matches the default of 30 frames specified for Video Transition Default Duration. You can change the default duration using the Preferences dialog.
If the lip movements and voice are not exactly in sync or the results are not satisfactory, change the In and Out points or adjust the duration of the transition.
Stabilize with the Warp Stabilizer effect
(More: https://helpx.adobe.com/premiere-pro/using/stabilize-motion-warp-stabilizer-effect.html)
To stabilize motion using the Warp Stabilizer effect, do the following:
- Select the clip you want to stabilize.
- In the Effects panel, choose Distort > Warp Stabilizer, and then apply the effect by double-clicking, or by dragging the effect to the clip in the Timeline or the Effect Controls panel.
After the effect is added, analysis of the clip begins immediately in the background. As analysis begins, the first of two banners displays in the Project panel indicating that analysis is occurring. When analysis is complete, the second banner displays a message that stabilization is occurring. You are free to work with the footage or elsewhere in the project while these steps are occurring.
Replace clip from Source Monitor
You can replace the source footage for clips in the Available Media. Replacing the source footage for a clip links it to a new source file. When you replace footage:
- Instances of the clip are retained in the Project Assets panel and the Expert view timeline, with the corresponding In and Out points.
- All the applied effects are intact.
However, the clip is linked to the replacement footage instead of its original footage. For example, you can replace footage with a soundtrack in one language with identical footage with a different-language soundtrack. All the edits that were made to the original footage are retained, although the source footage is replaced.
- In the Project Assets panel, select the clip for which you want new source footage.
- Select Clip > Replace Footage, or right-click/ctrl-click the clip and select Replace Footage.
- In the Replace Footage dialog box, select the new file and click Open.
The new footage replaces the old footage. All instances of the old footage are linked to the new footage.
More:
Roll Edit to create Split Edits (L-cut or J-cut)
Spit edits are great ways to smoothly transition between clips.
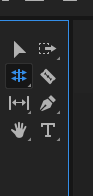
Step 1.
From the tool bar, select the rolling edit tool, see below, you may need to click and hold if the tool is not selected.
Step 2.
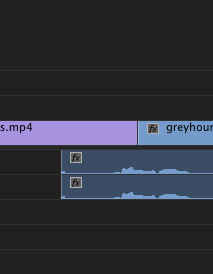
Delink the the Linked selection Tool as you are only going to Roll the Video, not the audio, it will be left in place under the previous clip.
Step 3.
Now place your cursor — which should now be the rolling edit tool — between the clips.
Step 4.
Slide the clip to the right or left depending the cut L or J you are trying to create. You now have a split edit, See below.

Basic Color Correction*
Step 1.
Choose the Color Workspace from the top menu, pictured below. Or you Can choose > Window>workspaces>color
Step 2.
Select the clip on the timeline that needs correcting. You will now see a new Color Editing window on the right of your workspace. Double click the grey area next to basic color correction if it is not already open, See Below:
Step 3.
Select the Auto Button and preview the auto changes. If these look good, then you are done. You can make adjustments using the sliders if the auto selection doesn’t look good.
Note: Please only make minor changes that don’t standout from the rest of the video, If you are in need of major correcting please ask a Fellow or Prof. For help. Or Even better find another clip to use.
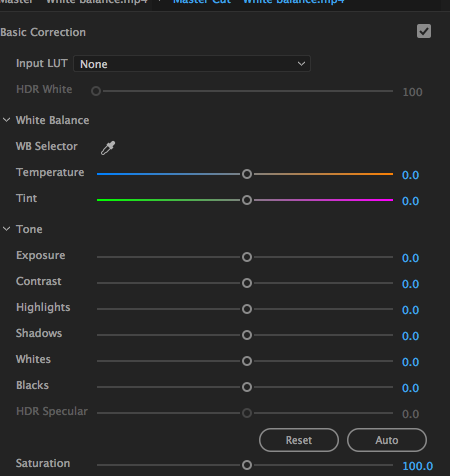
White Balance Correction
If you are in need of some basic white balance correction, click the eye dropper next to the WB Selector text in the basic color correction tab, then use the eye dropper to click on an area of your clip in the source monitor that should be white. Once clicked, the change will be made to correct the color. It does a good job with clips that are slightly in need of correction. If the clip is overly blue or orange, it will not save it. It would be time to find another clip if you can’t get a good white balance that feels natural to the rest of the clips in your timeline.
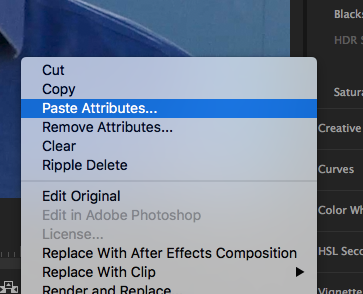
Copy/Paste Attributes
After applying color correction and or WB effects to your clip you can select the clip in the timeline, hit the CMD+C to copy the clip and then select others clip(s) that you would like to paste the changes to. After copying the clip, select the clips you would like to paste the correction onto and then right click the selected clip and choose paste attributes from the pulldown menu. Premiere will then ask which attributes you would like to paste.
This tutorial was written by Jeremy Rue with help from Richard Koci Hernandez.
Copyright UC Berkeley Graduate School of Journalism . Any code samples in these tutorials are provided under the MIT License
The above copyright notice and this permission notice shall be included in all copies or substantial portions of the Software.
THIS PAGE IS PROVIDED "AS IS", WITHOUT WARRANTY OF ANY KIND, EXPRESS OR IMPLIED, INCLUDING BUT NOT LIMITED TO THE WARRANTIES OF MERCHANTABILITY, FITNESS FOR A PARTICULAR PURPOSE AND NONINFRINGEMENT. IN NO EVENT SHALL THE AUTHORS OR COPYRIGHT HOLDERS BE LIABLE FOR ANY CLAIM, DAMAGES OR OTHER LIABILITY, WHETHER IN AN ACTION OF CONTRACT, TORT OR OTHERWISE, ARISING FROM, OUT OF OR IN CONNECTION WITH THE INFORMATION IN THIS PAGE OR THE USE OR OTHER DEALINGS IN THIS INFORMATION.