Introduction
Premiere is a popular video editing program made by Adobe that works on both Windows and Apple computers. It is comparable to Apple’s Final Cut Pro video editing program.
Creating a New Project
Each video you create in Premiere should start by creating a new project.
The project file will contain references to the different media files you use to build your movie and the timeline sequence on which you arrange your video clips, add audio tracks, transitions, titles, etc.
To create a new project, in the welcome box that appears when you launch Adobe select New Project.
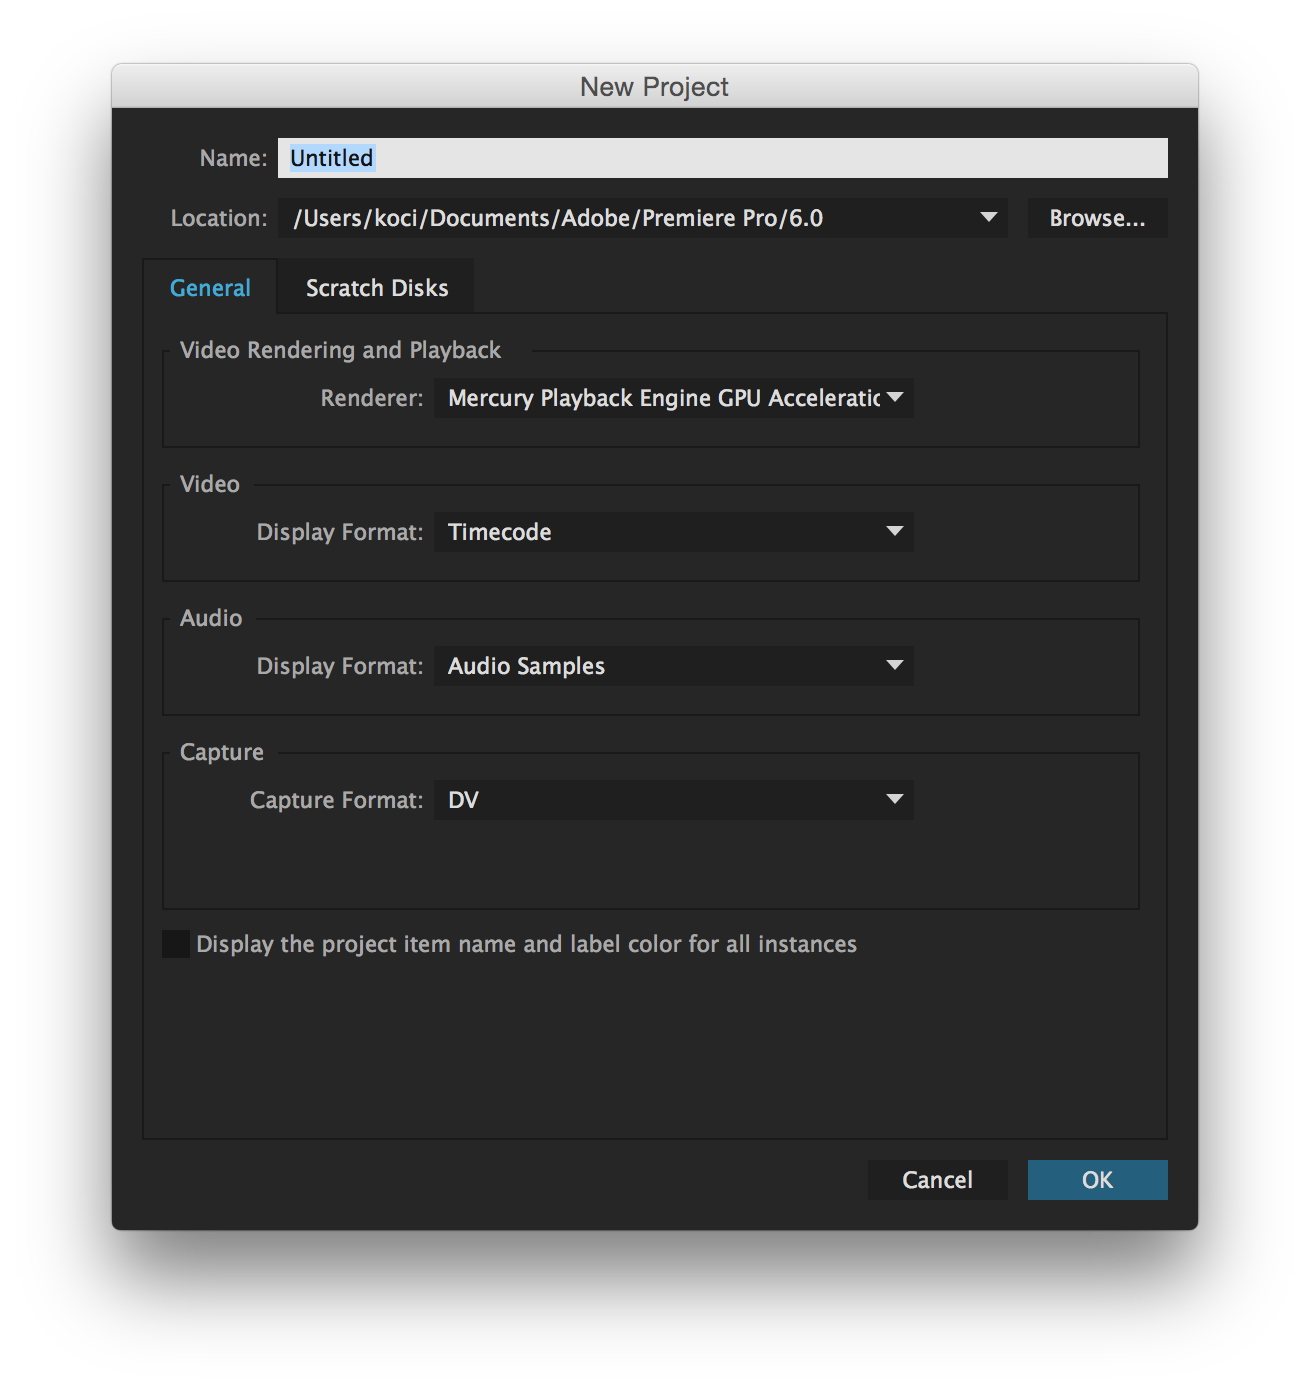
In the New Project dialog box, you can leave the default settings and just type in a Name for your project and a Location, such as a folder on a portable firewire drive you use to store your video projects.
Before you click OK, you should check the Scratch Disk settings.
Setting the Scratch Disks
Click on the Scratch Disks tab at the top of the New Project dialog box.
The scratch disk is the location on your computer where Premiere will store media and other files related to your project.
By default the Scratch Disk will be set to the same folder that you set as the location for your new project, which is what we recommend.
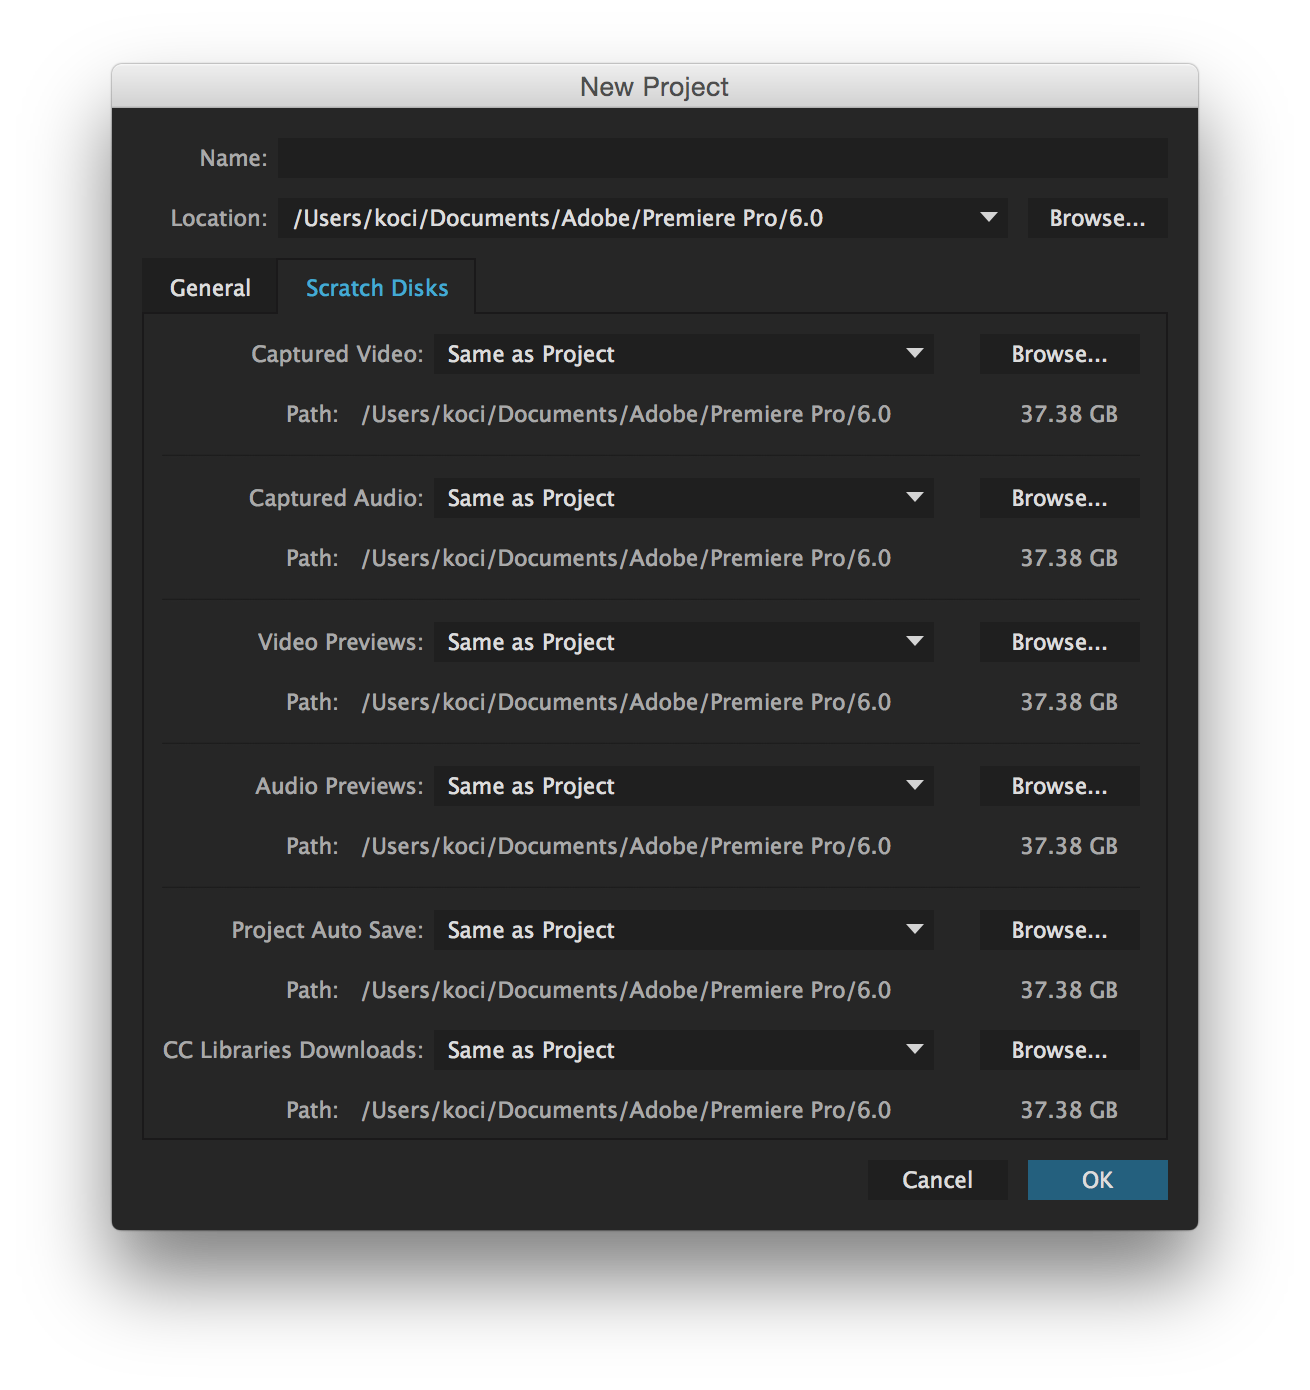
So after verifying the Scratch Disk settings, click on OK.
Preferences
You can change a number of setting preferences in Premiere, such as doing more frequent automatic saves of your project or changing the default settings for how audio from your camera is converted into different types of audio tracks in Premiere.
To change the preferences, in the menu at the top select Premiere Pro…Preferences and then select one of the listings in the drop-down menu for the kind of settings you want to change.
Auto Save
We recommend selecting the Auto Save item on the drop-down menu and changing the frequency of saves setting to Automatically Save Every 5 minute(s).
Then change the number of saves setting to Maxiumum Project Versions: 10.
This will auto save your project more frequently and keep a longer record of old auto saves.
Audio
We recommend selecting the Audio item on the drop-down menu and under Default Audio Tracks making these choices:
Mono Media: Stereo
Stereo Media: Mono
The Mono to Stereo selection means that if you recorded only one source of audio (such as a microphone plugged into a single input on a camera), the audio will be converted into two paired tracks of audio in Premiere.
The Stereo to Mono selection means if you recorded two sources of audio (such as a microphone plugged into one input on a camera and a different mic plugged into a second input on the camera), the audio will be kept on two separate tracks, one for each of the two mics you used.
Finally click on OK to save your changed preferences.
Workspace
After you create a new project or re-open an existing project, the main workspace for Adobe Premiere will open on your screen. It is divided into four sections or panes:
- Project pane – This is where your project files are listed (and in it is the Media Browser for finding your video files on your computer). The default position is in the lower left of the screen.
- Source pane – This is where clips you click on in the project pane are displayed for playing. The default position is the upper left of the screen.
- Timeline – This is where you assemble your clips in a sequence, along with transitions, text boxes, audio tracks, etc. The default position is the lower right of the screen.
- Program pane – This is where you can display for playing the sequence of clips and other elements in your Timeline. The default position is the upper right of the screen.
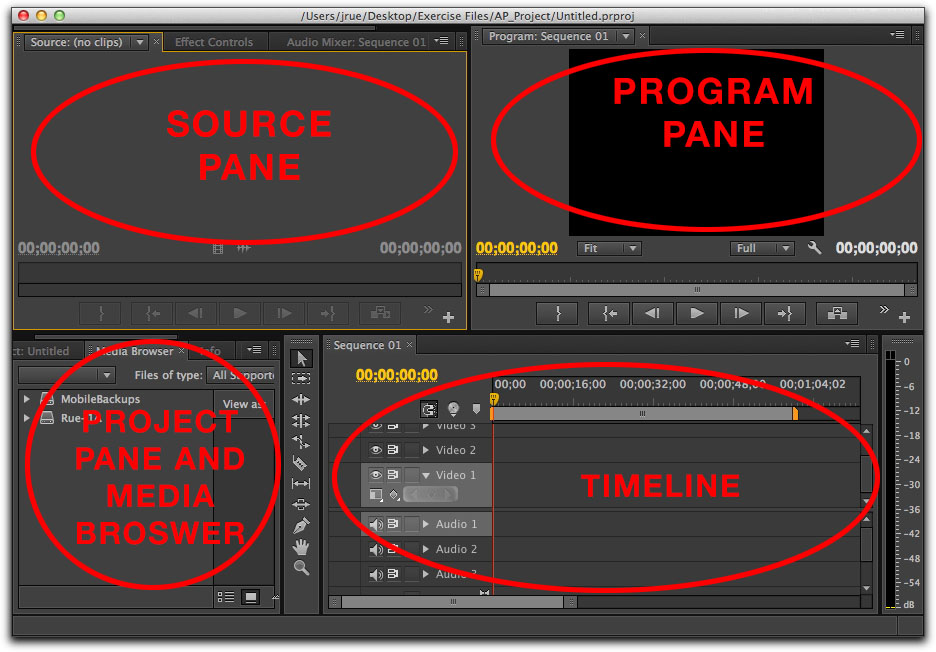
You can change the layout of the workspace panes by selecting in the menu at the top Window…Workspace, and then selecting a different layout.
We recommend the Editing (CS 5.5) layout for ease of use (such as putting the Project and Media Browser in separate panes, with the Media Browser in a bottom left pane and the Project area in a top left pane).
Copying Video Camera Files
You should first copy your video files from your camera’s memory card to a folder on your computer or a portable hard drive that you use to store your video files.
-
Connect your external hard drive to your computer using a card reader.
-
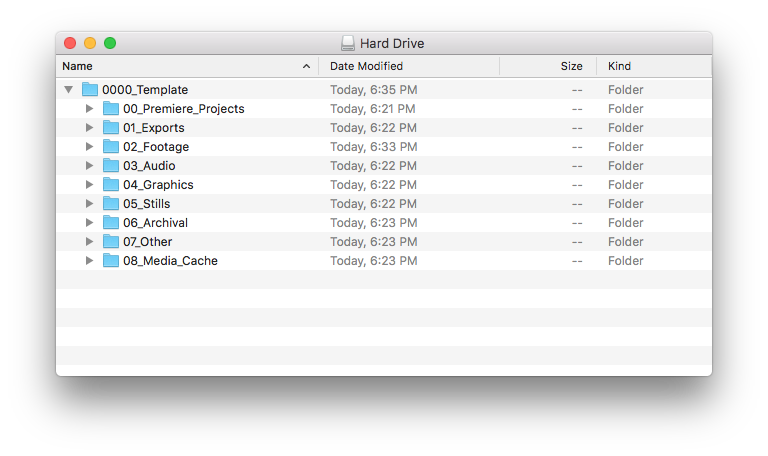
On your external hard drive, make the following folder structure (this is the folder structure used at the UC Berkeley Graduate School of Journalism).
-
Make a copy of the contents of the 0000_Template folder by holding down the option key (using a Mac) and dragging it to your class’ J282 folder.
-
Rename the 0000_Template folder, with the Project name, for example your folder structure should look like this:
Hard Drive > J282 > WaterCopz -
Insert the camera’s media card into the card reader
- Within the “02_Footage” folder in your project drive, create a subfolder titled as
follows:
YYYYMMDD_Camera_Format_FrameRate_CardNumber.- YYYYMMDD refers to shoot date.
- Camera will probably be the Sony NX70 or Sony X70.
- Frame rate will be 23.976 or 59.94 (written as 23976 or 5994)
- CardNumber refers to the order in which you filled the cards. If you shot two cards of footage, call the first card “1”, the second card “2”, etc.
- Example of a properly named folder:
20160917_NX70_1080P_23976_01
-
Drag the entire contents of the card to your newly named folder. DO NOT CHANGE THE FOLDER STRUCTURE OF THE CARD WHEN YOU COPY IT
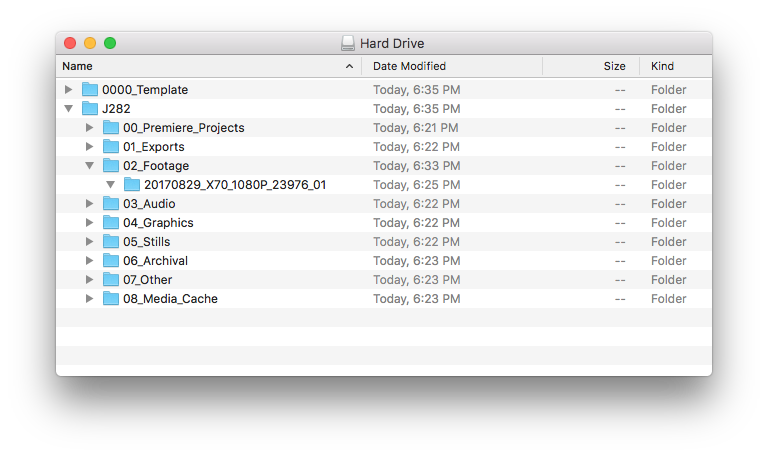
- Copy each of your new footage folders (i.e. each folder inside “02_Footage”) from your external hard drive to your backup hard drive. Congrats! You now have two copies of your media in case of a crash.
Important note: Don’t try to drag individual video files onto your computer. You need to drag the entire folder for the video files, because it also contains related files such as meta data files that Premiere will need to open the videos. You should not edit the AVCHD folder or any files within this folder, or risk corrupting your video footage.
Importing
There are several ways to import files, including video you shot on a camera, into Premiere.
The easiest is to use Premiere’s Media Browser to navigate to the files on your computer that you want to import and then just drag and drop them into Premiere’s Project pane area.
To do this, in the Project pane in the lower left of the Premiere screen, click on the tab labeled Media Browser.
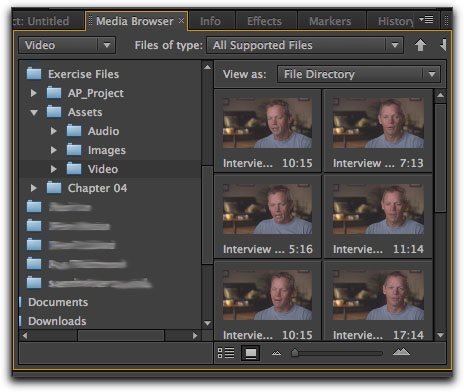
You’ll see the file directory for your hard drive displayed on the left. Navigate to the folder that has a file you want to use in your movie, and you’ll see the file displayed on the right. Video files will appear as icons showing the first scene from the clip.
Make sure you click the icon view button at the bottom of the media browser to display your video and photos as icons. You can also adjust the slider at the bottom to increase the size of the icons.
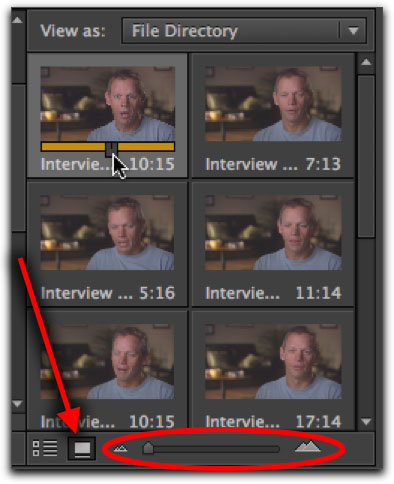
You can preview a clip to make sure it’s one you want to import by hovering your mouse over it and moving the mouse to the right or left to scrub back and forth through the clip. Don’t click down on the clip, just hover your mouse over it to do the scrubbing. If you do click on the clip, then you can use the small scrubber bar to move through the clip.
Press the tilde key ( ~ ) on the keyboard while the media browser is selected to view this project pane in fullscreen view. This, in conjuction with zooming on thumbnail view, offers an easy way to scrub through your videos and preview your clips.
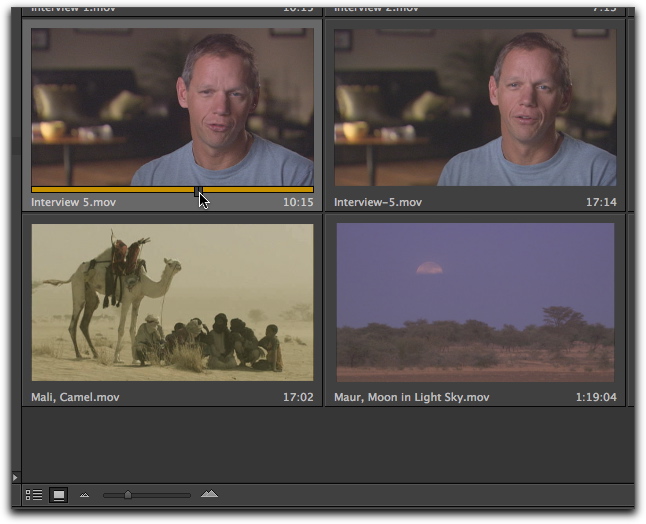
To import a file you can click on it in the Media Browser, hold down your mouse button and drag the file to the left until it hovers over the Project tab. That will open up the project files area below the project tab. Drag the file down to the project files area and release. If you have the Project area open as a separate pane, just drag a file from the Media Browser to the Project pane area and release to import it.
Or you can right click on a file and select import from the drop-down menu.
In any of these methods, Premiere imports the file and the file will appear in the Project files area (click on the Project tab or Project pane to see the file).
Importing Video Files Shot on a Camera
Use the same process when importing video files you shot on a camera and copied to you computer from the camera’s memory card.
Premiere knows how to decode all the standard formats used to record video, so the video files from a camera can be displayed in the Media Browser.
The video files will appear as icons showing the first scene of the clip, and you can preview them and then drag and drop the ones you want into project files area.
Undoing changes
Before we start describing how to edit clips, you should know how to undo any editing changes you make that aren’t what you intended or about which you change your mind.
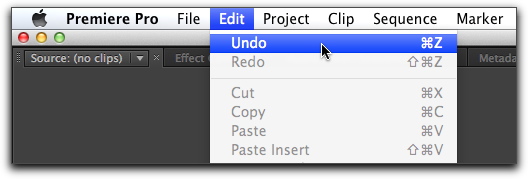
To undo any change either click on Edit…Undo in the menu at the top or simultaneously press the Command and Z keys on the Mac keyboard.
Editing Clips with In and Out Points
A clip you have in the Project pane can be displayed in the Source pane so you edit it and only move to your Timeline sequence the part of a clip you want to use in your movie. So you can edit out any bad or unnecessary footage and not have it cluttering up your sequence.
In the Project pane, double click on the clip you want to edit to display it in the Source pane.
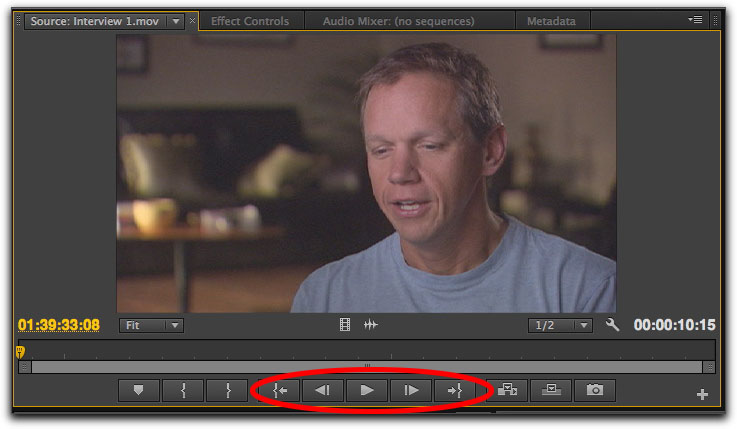
Play the clip using the play controls at the bottom of the Source pane, or by pressing the spacebar on your keyboard (press the spacebar once to play and then again to pause the clip).
You also can use the jkl keys on your keyboard to play the clip – l to play, j to rewind, k to pause.
Or you can scrub through a clip by clicking on the yellow playhead just under the clip and dragging that to the right or left.
You select the part of the clip you want to move to the Timeline by setting in and out points in the clip.
At the point where you want your clip to start playing press the I key on your keyboard to set the In point. Then at the point where you want your clip to end press the O key to set the Out point.
You will see a green area appear in the scrubber bar below the clip designating the area between your in and out points.
The In and Out points also can be moved by clicking and dragging on either edge of the green section of the scrub bar.
Once you’ve set the section of the clip you want in the In and Out points, you’re ready to copy the clip to the Timeline.
Moving Clips to the Timeline
You move a clip to a sequence in the Timeline by clicking on the clip in the Source pane and dragging it down to the Timeline pane on the lower right.
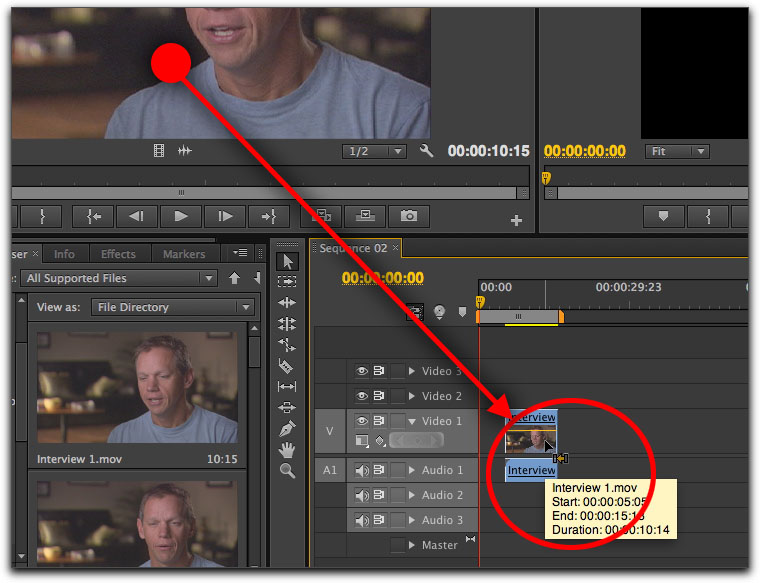
Drag the clip to one of the video tracks such as Video 1 and release and the clip will be placed in the Timeline.
When you move the first clip to the Timeline, you usually will get a “Clip Mismatch Warning” message box. This is asking you if you want to preserve whatever settings you made for the sequence in the Timeline when you first created this project, or if you want the sequence settings changed to match those of the clip you’re importing.

Usually you’ll want to select Change Sequence Settings so the sequence matches the settings of the clip you’re importing, such as the footage you shot on a video camera that will be used consistently in the movie you’re creating.
If there is audio with the clip you’re moving to the Timeline, that will automatically be added as one or two new tracks of audio below the video track.
It is possible to drag only the audio portion of a clip to the timeline. Drag the icon that looks like an audio waveform, which appears just below the preview on the Source pane, to the audio tracks in the timeline.
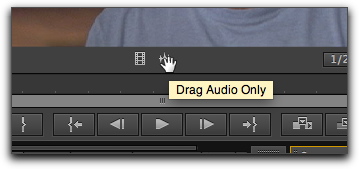
You can also drag only the video portion (without audio) to the timeline. Grab the icons just below the preview on the Source pane that appears like an old film strip, and drag it to the video track of the timeline.
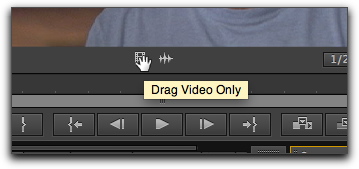
Then you can move additional clips to any point after the first clip in the Timeline by repeating the process – double clicking on a clip in the Project pane to load it in the Source pane, selecting In and Out points and then dragging the clip to a point in the Timeline to the right of the original clip.
Overwrite and Insert Edits
If want to put a new clip at a point in the Timeline where it will overlap with the existing clip, you have two choices:
– an Overwrite Edit, in which the portion of the new clip that overlaps the old clip will replace the contents of the old clip. Thus you might have part of a video interview with someone that you want to overwrite with some “b-roll” footage of what the person is talking about.
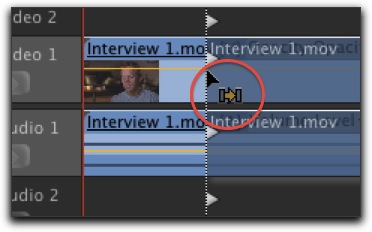
– an Insert Edit, in which the old clip will be split at the insertion point for the new clip and part of the old clip will be moved to the right on the Timeline to make room for the new clip. Thus you might to split up a video clip of a scene by inserting a new scene in the middle of it.
You can do Overwrite or Insert edits by moving a new clip to the same track in the Timeline as the existing clip or by putting the new clip on a new video track above the existing clip.
If you do an Insert edit on a new track, it will still split the original clip on the track below. If you do an Overwrite edit on a new track, it will not change the original clip on the track below, but you won’t see that video because the new video is on a track above it.
The Overwrite edit is the default edit in Premiere, so simply drag a clip to the Timeline and Premiere will automatically overwrite the overlapping portion of the existing clip with the new clip. This will be indicated by an arrow pointing down.
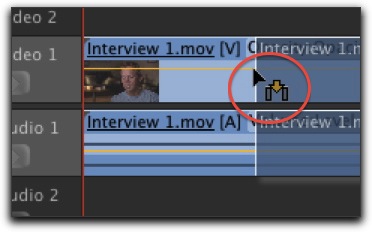
To do an Insert edit, press and hold down the Command key on the Mac keyboard and then click and drag the clip to the Timeline. That will split the existing clip on the Timeline and shove the right portion further out on the Timeline to make room for the new clip. This will be indicated by an arrow pointing to the right.
Working with Multiple Tracks
By default, Premiere provides three tracks of video and six tracks of audio in the Timeline.
If you need additional video or audio tracks, in the menu at the top click on Sequence…Add Tracks.
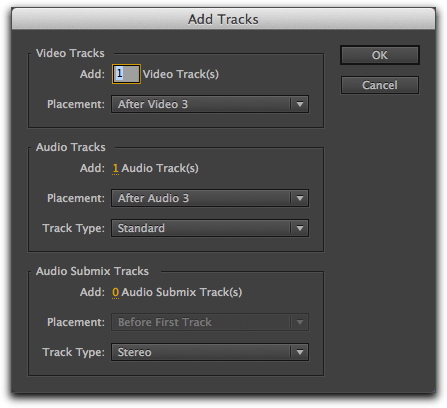
If you have multiple tracks of video, whatever video is on the top track in the Timeline will be shown when the sequence is played, and any other video clips underneath will not be seen.
If you have multiple audio tracks then all the audio will play simultaneously no matter which is above or below the others on the Timeline.
If you want to hide the video from playing on the top track (or any track) you can:
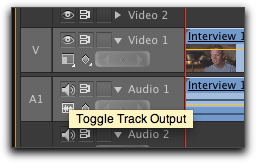
- Turn off the video for a particular track in the Timeline by clicking on the eye icon button to the far left of the track to hide it.
If you want to stop the audio from playing on a particular audio track you can:
- Turn off the audio for a particular track in the Timeline by clicking on the speaker icon button to the far left of the track to mute it.
Editing Clips in the Timeline
Once you have a clips in the Timeline, you can move them to the left or right by just clicking and dragging them.
You also can shorten clips in the Timeline by clicking on the edge of a clip and dragging it in.
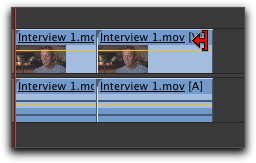
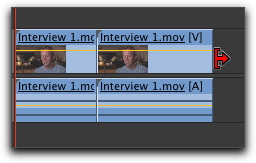
Similarly, if you have a clip you shortened in the Source pane before putting it in the Timeline, you can lengthen it in the Timeline by clicking on the edge of the clip and dragging it out.
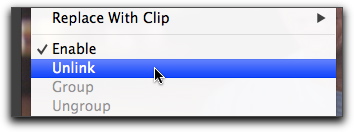
If you have a clip with both video and audio tracks, and you want to change one track without affecting the other (such as deleting the audio track), right click on the clip and select Unlink in the drop-down menu. You now can move the video and audio track clips independently of each other.
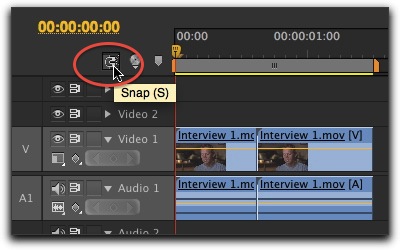
By default, the Timeline is set up so that adjacent clips “snap” to each other, which makes it easy to align them without having one clip accidentally overlap the other or having an empty space between the clips.
But if needed, you can turn off snapping by clicking on the Snap icon, which is in the top left of the Timeline, above the labels for the video tracks. If you pass your mouse cursor over the icon the word Snap will appear.
If you want to delete a clip on the Timeline, just select it and press the delete key on your keyboard.
Razor Tool for Splitting or Deleting Part of a Clip
If you want to split a video or audio clip in two or remove a segment in the middle of a clip (such as eliminating a sound gap in your audio), you can use the Razor tool to split or slice out a segment of a clip.
It’s called a razor because in the traditional film editing process a tape was literally sliced with a razor blade to remove unwanted pieces of the film or rearrange segments of a film.
To do these cuts in Premiere, in the Tool palette click on the Razor tool, which is an icon that looks like a little razor blade (or press the C key on your keyboard). Your cursor will change to a small razor icon.
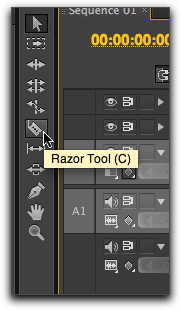
Then just click on a clip at the point where you want to cut it. Or cut the clip multiple times to create a segment in the middle that you can remove.
Then click on the Selection or arrow tool in the Tool palette (the keyboard shortcut is the V key) so you can select one of the segments to move it or to delete it (by pressing the delete key).
Markers
You can set a marker on clips in the Source, Timeline or Program panes to help you do more precise video and audio editing.
The marker creates a snap-point on a clip or the Timeline that the playhead will lock onto.
This can be helpful when you’re editing audio and you want a video track to begin exactly at the downbeat of a song. You can set a marker during audio editing at the downbeat so you then can position a video clip to begin at precisely that point.
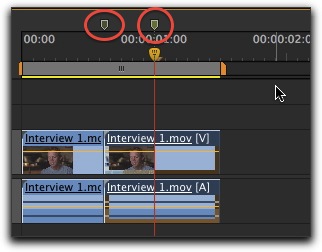
You create a marker in a clip in the Source, Timeline or Sequence panes by moving the playhead to the desired point on the clip and pressing the M Key. The marker will appear as a tiny green icon just above the playhead.
To delete a marker right click on it and select Clear Current Marker in the drop-down menu.
Audio
Audio tracks, either those associated with your video or tracks that are just audio, are displayed below the video tracks toward the bottom of your Timeline.
If you want to stop the audio from playing on a particular audio track you can turn off the audio in the Timeline by selecting the speaker icon button to the far left.

You also can adjust the overall audio level for a track or for an individual clip.
First click on the tiny disclosure triangle just to the left of the name of the audio track (such as Audio 1) to expand the track.
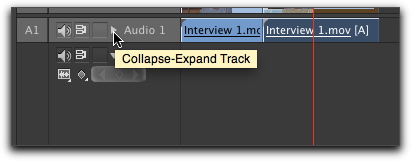
If the waveform is not present, you may need to click the small waveform icon to make sure it’s set to display the waveform.
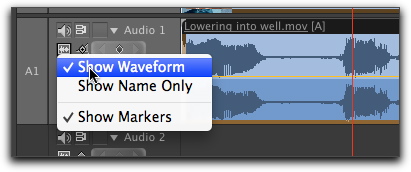
A waveform is a visual representation of the audio that shows when the audio peaks – along with a yellow horizontal line through the waveform that represents the audio level. You’ll also see several buttons to the left that you can use to adjust the audio.
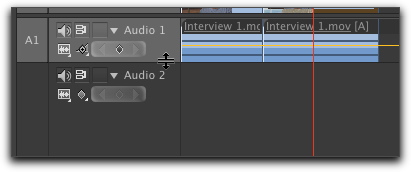
To make more room to work, you can also pull open the track manually with your cursor, by placing the cursor exactly between two tracks and dragging the above track open. You can also press the tilde key ( ~ ) on the keyboard to show the timeline in fullscreen mode.
Adjusting Volume for an Entire Track
To adjust the volume for the entire track, on the left click on the tiny diamond Show button and select Show Track Volume.
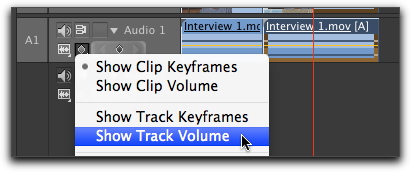
Then click on the yellow audio level line and drag it up or down to change the audio level for the entire track.
Adjusting Volume for an Individual Clip
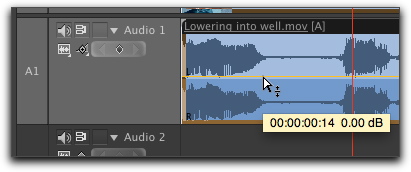
To change the volume for an individual clip, on the left click on the tiny diamond Show button and select Show Clip Volume.
Then click on the yellow audio level line on a clip and drag it up or down to change the audio level for that clip.
Adjusting Volume at Multiple Points in a Clip
You also can raise or lower the audio at multiple points in a clip to create fade ins and fade outs in your audio. To do this you need to add keyframes to the audio level line for a clip.
First on the left click on the tiny diamond Show button and select Show Clip Keyframes.
You create keyframes by holding down the Command key on the Mac keyboard and then clicking on the yellow audio level line at the points where you want the audio to change (you also can select the Pen tool in the tool palette to add keyframes).
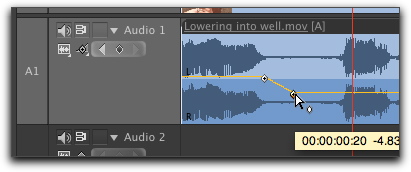
When you then move your mouse cursor back over a keyframe you’ll notice a little diamond icon appear to the lower right of the cursor arrow. This indicates you can change the audio level at this point by clicking, holding down your mouse button and dragging the keyframe point higher to increase the audio or lower to decrease the audio.
The yellow audio level line will change accordingly. If the audio level line slopes up from one keyframe to the next, the audio will fade in. If the audio level line slopes down from one keyframe to the next, the audio will fade out.
You also can move a keyframe to the left or right to change the point for the change in audio volume by clicking on the keyframe with the cursor and dragging it.
To delete a keyframe, right click on it and select Delete.
Transitions
To add a transition between clips, such as a cross dissolve so the first clip gradually fades out as a second clip fades in, go to the Project pane and click on the tab for Effects. Then select Video Transitions to see a set of folders that have all the different transitions that are available.
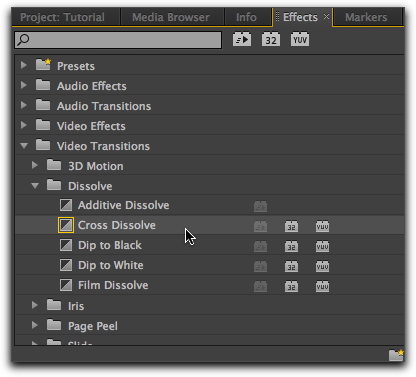
One of the most commonly used transitions is the cross dissolve. Open the Dissolve folder and you’ll see the Cross Dissolve transition listed there.
To add the transition between two clips in your Timeline sequence, position your playhead between two clips, then click on a transition like the cross dissolve, hold down your mouse button, drag the transition to the Timeline and release it when positioned between the two clips.
You’ll see a gray area added between the clips, which is the transition.
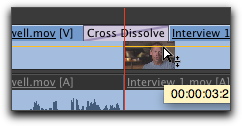
A quicker way to add a cross dissolve between two clips is to use a keyboard shortcut: position the playhead between the two clips and press the D key on your keyboard. A transition will be added at that point.
By default transitions are one second long. If you want to change the duration or move the transition slightly to the left or right, first click on the tiny disclosure triangle at the far left next to the title of the track you’re working on (such as Video 1). This will expand the height of the track so the transition can be selected.
Then double click on the gray transition area between the two clips. This will open up a box in the Source pane with settings for the transition.
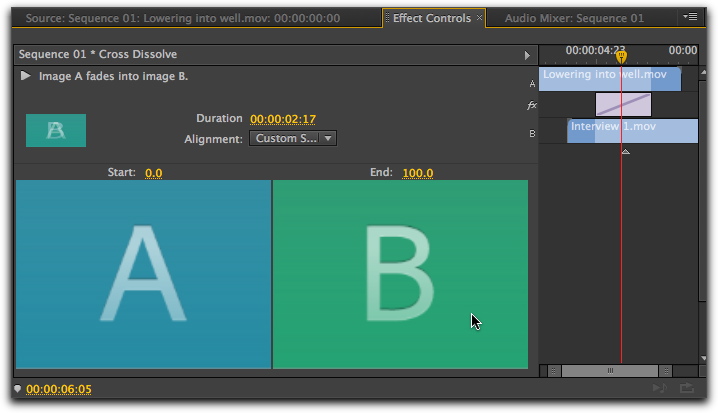
The existing Duration is displayed in the middle of the box and you can change it by typing in a new number (the time is displayed in hours:minutes:seconds:frames).
You can shift the position of the transition so the first clip fades out earlier or later by manipulating the display in the upper right of the three thick colored horizontal lines. Click on the gray line in the middle and move it left or right to change the position of the transition relative to the two clips.
If you want to get rid of the transition, click on it in the Timeline and press the Delete key on your keyboard.
Titles and Text
You can add titles and text to your sequence, such as a box with explanatory text or a “lower third” toward the bottom of a clip to identify the person in the clip.
First position your playhead over the approximate area in your Timeline sequence where you want the title to start.
Then in the menu at the top, click on File…New…Legacy Title. Type in a file name for your title and click OK.
You’ll get a box with a lot of settings you can adjust when you create your title. Your title will be displayed over the frame of your video clip where you positioned your playhead, so you can see how changes you make to the title settings will look against the appropriate background.
To create the title click on the Type tool in the tools palette to the upper left, then click on the main screen and type the text for your title.
Then use the settings menus above and to the right to change the size, font, color, etc. of the title text. You also can add a drop shadow, a stroke around the letters in the text or a gradient.
To change the position of the title on the screen click on the selection/arrow tool in the tool palette (the keyboard shortcut is the V key) and click on the title to drag it around the screen.
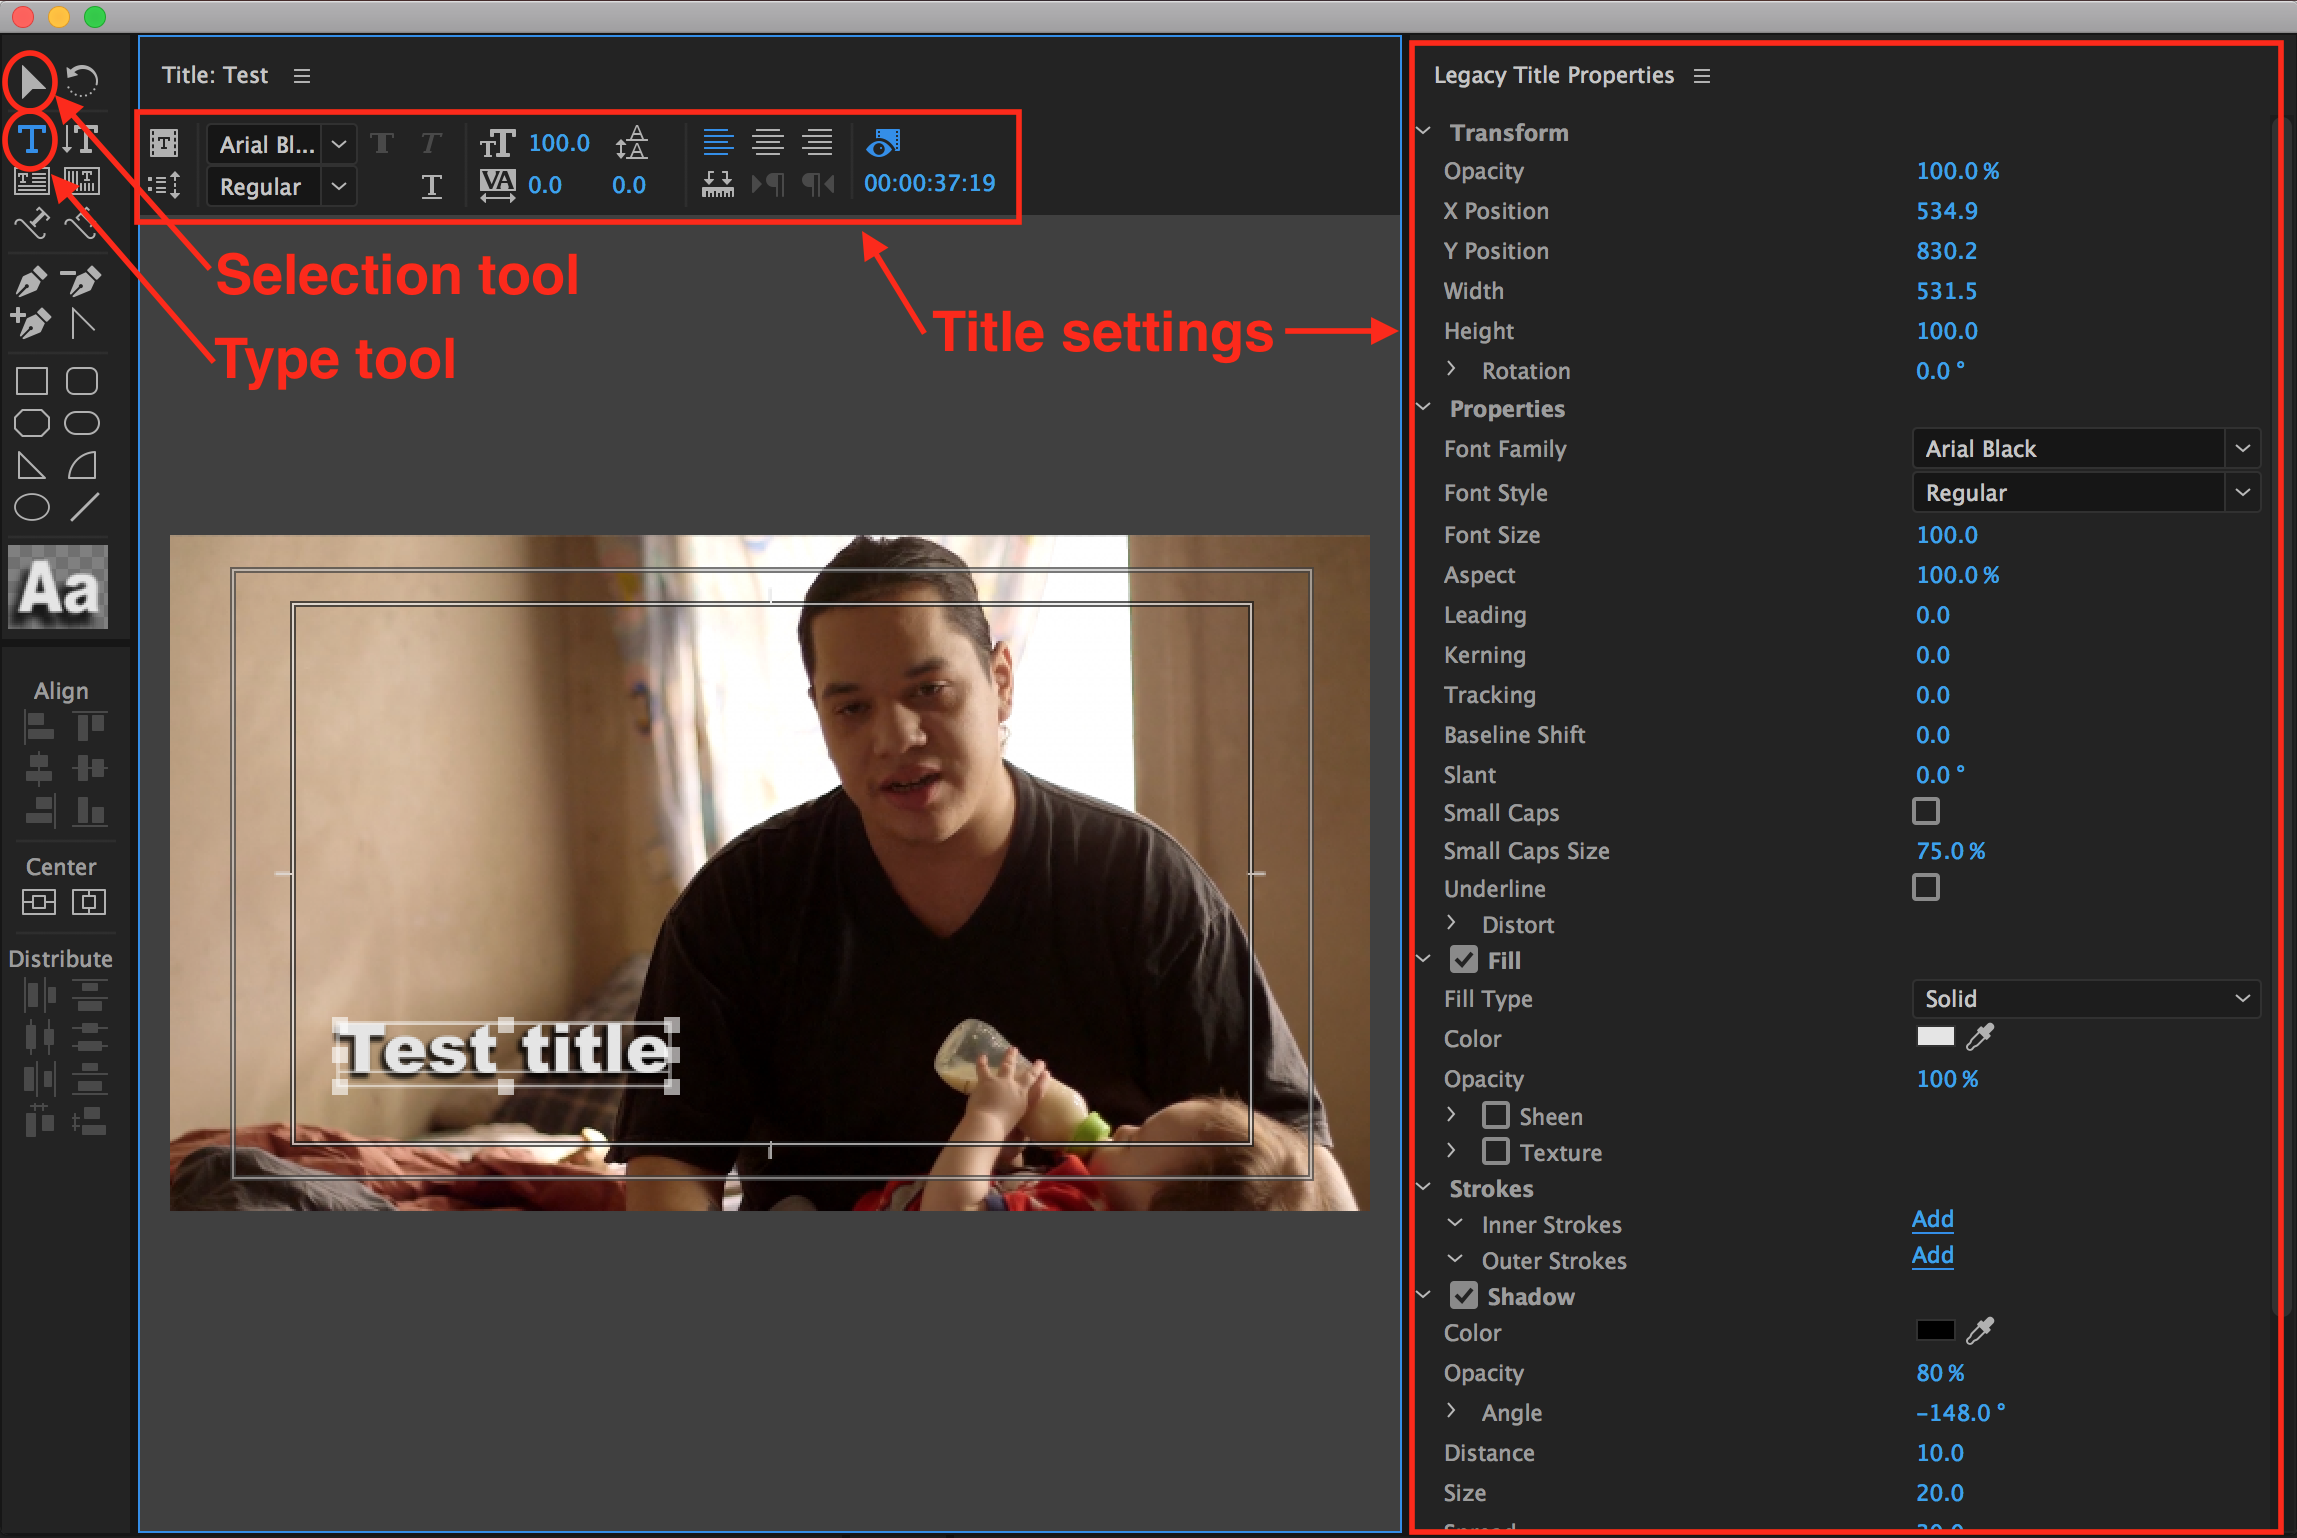
When you’re done fine tuning how your title looks, close the title creation box.
Go to the Project pane and you’ll see the title you just created listed as a file there. Click on it, hold down your mouse button and drag the title to a video track at the position on the Timeline where you want the title to appear. Release and the title you created will be displayed on the Timeline.
If you need to change the title, double click on it in the Timeline and the title creation box will reappear with all the settings controls.
Rendering
When you add an effect like a transition or a title to your sequence, it may need to be “rendered” so it displays properly on your computer screen.
Rendering means having the effect processed by the computer so it is permanently added it to your sequence of clips. If you see red or yellow lines above your Timeline, those are areas of your sequence that need to be rendered, usually because you added effects there.
To render all the effects in your entire sequence, in the menu at the top select Sequence…Render Entire Work Area.
The work area is the gray bar with the orange end points that’s above all the tracks in your sequence. You can reposition the work area, and hence the portion of your sequence being rendered, by dragging the orange end points left or right.
It will take some time for the rendering to be completed depending on how complex the effects were that you added to your sequence.
Transferring Projects
When working in a collaborative situation, you can transfer an entire Premiere project from one team member to another.
This would allow one person to work on a rough cut of a sequence, and then transfer the project to a second person to do the final edits.
Or one person could work on the beginning of a sequence, another person could work on the end of a sequence, and then they could be merged into a single sequence.
To transfer a project, in the menu at the top click on Project…Project Manager.
In the dialog box that appears make these selections:
- Select the sequences in your project that you want to share
- Make sure to select the option Collect Files and Copy to New Location
- Select the Exclude Unused Clips option (optional but recommended). This will only transfer the clips that are in a sequence, and any movie file or clip that you have not used will NOT be transfered. This is reccommend to reduce the overall file size of the project you are sharing. If you want to include EVERY CLIP that you have imported into you project folder then uncheck this box and everything will be transfered.
- Check the 3 boxes labeled Include Preview Files, Include Audio Conform Files and Rename Media Files to Match Clip Names.
- Choose a destination to which this project and all its files will be copied. In most situations it will be an external hard drive of the person with whom you are sharing the project.
Then click OK to do the transfer of the project and its files.
The person receiving the files then connects the external drive to their computer and opens the project. All the relevant media files will be in that new project.
If two people want to merge two sequences into one (such as the beginning portion of a sequence and the end), the person receiving the files again connects the external drive to their computer.
They then open their existing project, select File…Import, navigate to the project your transferred from your other team member and click on Import. In the dialog box check Import Selected Sequences.
A folder will appear in your Project pane with the name of the project you imported. Open that folder, click on the sequence inside and copy the clips in the Timeline.
Finally, open the sequence in their existing project and copy the clips from the imported sequence into the Timeline.
Exporting
To export a sequence in Premiere for viewing on the web, in the menu at the top click on File…Export…Media.
That will bring up an Export Settings box where you can select what in your sequence you want to export and to adjust the settings for your exported movie, such as the Format and Preset settings.
First review the Source Range selection in the lower left to make sure you’re exporting all of the sequence that you want, such as Entire Sequence to export everything on your Timeline.
Also check to make sure you didn’t leave any “orphan” clips out on the end of your timeline that you don’t want included in your movie.
Then here are settings we recommend for exporting a video you can upload to YouTube and then embed on a web page for a news site.
Click on the Format drop-down menu and select H.264
Click on the Preset drop-down menu and select YouTube HD 1080p 24
Click Output Name to type in a name for your video file and to select a destination folder on your computer to which the video file will be exported (such as to an exports folder on your computer).
Finally click on the Export button at the bottom right.
This tutorial was written by Paul Grabowicz with help from Jeremy Rue and Richard Koci Hernandez.
Copyright UC Berkeley Graduate School of Journalism . Any code samples in these tutorials are provided under the MIT License
The above copyright notice and this permission notice shall be included in all copies or substantial portions of the Software.
THIS PAGE IS PROVIDED "AS IS", WITHOUT WARRANTY OF ANY KIND, EXPRESS OR IMPLIED, INCLUDING BUT NOT LIMITED TO THE WARRANTIES OF MERCHANTABILITY, FITNESS FOR A PARTICULAR PURPOSE AND NONINFRINGEMENT. IN NO EVENT SHALL THE AUTHORS OR COPYRIGHT HOLDERS BE LIABLE FOR ANY CLAIM, DAMAGES OR OTHER LIABILITY, WHETHER IN AN ACTION OF CONTRACT, TORT OR OTHERWISE, ARISING FROM, OUT OF OR IN CONNECTION WITH THE INFORMATION IN THIS PAGE OR THE USE OR OTHER DEALINGS IN THIS INFORMATION.