Web Hosting
Below is an overview of registering a domain with a hosting service from the previous class.
Options for Hosting Your Website
In order to view your HTML file on the web, you need to host it on a web server. You have multiple options for purchasing a hosting service. There are two parts to getting a website:
- web hosting — this refers to the actual web server where your website is stored. You will need to access this server to upload your files.
- domain name — this is the URL address that people will type in to find your website.
Many companies will offer both services in one package, or you can buy them separately from two different companies even — hosting from one, and domain registration from another. Or, if you have an existing domain name, you can connect it to any other server.
We don’t have any specific recommendations for a hosting provider. Some of the big ones are GoDaddy and Bluehost. Costs vary, and are by monthly or yearly subscriptions, typically with big discounts when buying many years upfront.
Finding a Good Domain Name
A domain name (URL) represents the brand of your website. Finding a good one that hasn’t been taken can be tricky. A good place to check if a domain name has been taken is Instant Domain Search; there are many others as well.
If you have a unique enough name, you might want to try getting yourname.com. If it has already been taken, there are tricks to getting a similar name, like appending qualities of your work to the name, such as yourname-reporter.com, or yourname-media.com.
New Generic Top Level Domains (gTLD)
A number of new generic “Top Level Domains” (gTLD) have been added recently. A top-level domain is the abbreviation that comes after the dot in a URL, such as .com in www.example.com.
This means, even if you can’t get the .com version of your website, you might be able to get the .report or .media version.
List of new generic Top Level Domain names
Connecting You Domain Name to a Hosting Provider
If you are purchasing a domain name and hosting together from the same company as a packaged deal, you can skip this section. They usually automatically connect the two for you with no additional work.
But if you already have a domain name (URL) and you want to connect it to a different host, then you will need to find out the nameservers addresses for your hosting provider. A good way to find this is to look at the hosting provider’s documentation page, sometimes referred to as a “knowledge base.” Another way is to search Google for the name of your hosting provider and the word “nameservers.” For example, if Bluehost was my hosting provider, I would Google Bluehost nameservers and the first several links take me to pages with their name servers.
Name servers addresses typically (but not always) start with ns1, ns2, etc. Here are Bluehost’s nameserver addresses:
ns1.bluehost.com
ns2.bluehost.com
In the settings for your domain registrar (ex. GoDaddy, Bluehost, Namecheap), look for somewhere it says “nameserver” to set the appropriate nameservers for your hosting provider.
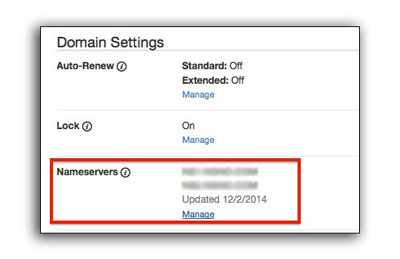
Then, you would log into the site or service where you registered your domain name, and enter in these nameserver addresses.
Connecting to Your Hosting Provider via FTP
Most hosting providers will give you access to your web sever via an online form or through a service called FTP. You should try to get FTP access to your server, as this is an easier way to upload multiple files quickly.
In order to connect to an FTP server, you will need the following information from your hosting provider. They may send this in an e-mail, or you might have to log into the hosting provider’s website and setup a new FTP account. The following information is typically what you will receive:
- Server Address — This a URL that connects to the server. It might look something like
ftp.example.com - Username — This might be your own username, domain name, or in the form of an email address like
user@example.com - Password — They typically choose a password for you. If not, make sure you create a strong password.
- Port — This is typically
21, but in some instance might be different.
Downloading an FTP Client
In order to connect to an FTP server, you need to download a piece of software called a “client.” The two for Mac we recommend are:
- CyberDuck (free) — A quick an easy way to connect to a server and upload files.
- Transmit (~$35) — A more featured FTP client, with some features if you are working with FTP servers often.
This tutorial will show screenshots for CyberDuck, but the setup is similar with other FTP clients.
Setting up a Connection
After downloading CyberDuck, copy it over to your Applications Folder. You may wish to also drag a copy to your Dock for quick access later. Launch CyberDuck.
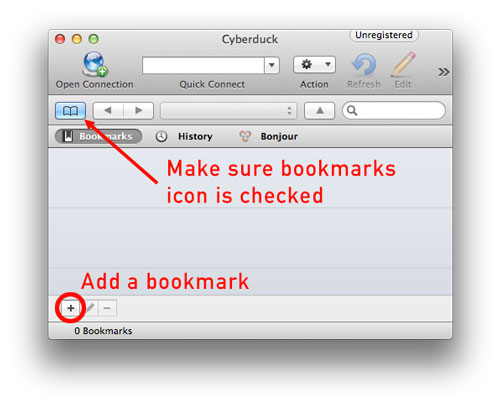
It’s best to add a bookmark so you can connect to your server later without re-entering your information.
Next, enter in the credentials you get from your hosting provider. Note that the “Nickname” field is arbitrary, and only for your own reference.
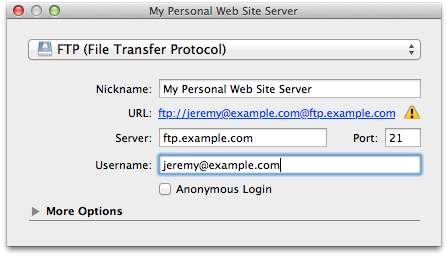
In some rare instances, your server may require only secured connections. In this situation, you want to change the drop-down menu at the top of this window from “FTP (File Transfer Protocol)” to either FTP-SSL or SFTP.
When you first connect, it will ask you for a password. You can check “save to keychain” at that time, so you don’t have to re-enter your password each time.
Uploading Content
Once you’ve established a connection to your webserver, you can begin uploading content. If you see any of the following folders, you should upload content there, as this is the document root of your website:
- public_html
- www
If you don’t see either of these folders, then you can upload files directly to where you logged in. It’s best to upload a sample index.html file with some unique content, then visit your website to see if it shows up to make sure the connection was property established.