Introduction to HTML
Assignment: Build a basic web page
This page describes the homework for the first class. Your assignment is to construct a basic web page, fill it with content, and then connect it to some CSS files provided in the last section below. This is due before next class.
Note: Do not e-mail your HTML file to the instructors. Rather, bring it with you to the next class as we will be using it for the next lesson on CSS.
Download a Plain Text Editor
In order to code HTML pages, you will need to have a “plain text”. editor. You cannot code HTML in programs like Microsoft Word, Google Docs, or any other word processors. (They add formatting and other meta data to documents.)
We recommend you use one of the two plain text editing programs below code your web page:
- TextMate — Free from UC Berkeley, however it’s a bit outdated. Fine for this class though.
- Sublime Text 3 — The software costs money but has no restrictions, which means it’s free to use but will annoy you to purchase the software from time to time. You will need to buy a license to upgrade to future versions. A license is $70. It’s recommended you try the software first to evaluated it.
Creating your first HTML document
Using either Sublime 3 or TextMate, create a new blank document and save it to a new empty folder on your computer that you can easily locate. Name this file index.html.
Note: The index.html filename has a special meaning on web servers. When you name a file index.html, it's becomes the first web page people will see when accessing your website.
For example, these two web addresses point to the same file, the same web page:
http://example.com/http://example.com/index.html
In the first address example above, the web server looks for an index.html file. If it finds one, it will display this web page for the user without displaying "index.html" part of the address.
Anatomy of an HTML Tag

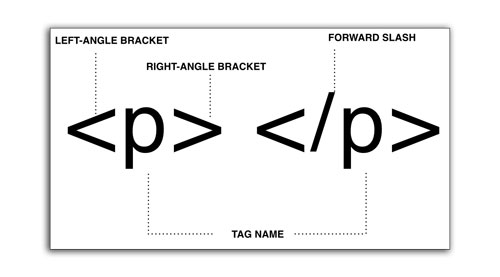
HTML tags generally come in pairs, and surround content they are identifying. A “p” tag, as seen above, establishes text which is a paragraph. In code, this would look like the following:
<p>Lorem ipsum dolor sit amet, consectetur adipisicing elit, sed do eiusmod
tempor incididunt ut labore et dolore magna aliqua. Ut enim ad minim veniam,
quis nostrud exercitation ullamco laboris nisi ut aliquip ex ea commodo
consequat. Duis aute irure dolor in reprehenderit in voluptate velit esse
cillum dolore eu fugiat nulla pariatur. Excepteur sint occaecat cupidatat non
proident, sunt in culpa qui officia deserunt mollit anim id est laborum.</p>
Notice the opening and closing “p” tags surround the content they denote as a tag.
Setting the DOCTYPE
Whenever you create a web page, you should always specify a doctype at the top. This tells the browser which version of HTML you’re using, and how to render the page. We will use HTML version 5, known as HTML5.
The DOCTYPE for HTML5 is:
<!DOCTYPE html>
Any time you are building a web page for anything, this will always be the very first line in your code. Add this as the first line in your index.html document then save.
Creating opening and closing <html> tags
With the exception of the doctype, the rest of your web page should be housed in a matching pair of <html> tags. Everything we type from here on goes between these tags.
<!DOCTYPE html>
<html>

</html>
Add these now to your index.html, below your doctype, and then save.
Adding <head> tag and content
The <head> tag (not to be confused with <header> tag) contains meta data, or information about your page.
Here is a description of some of the tags it contains:
<meta charset="utf-8">This tag will specify the “character set” to the latest, most universal range of characters for many different languages.<meta http-equiv="X-UA-Compatible" content="IE=edge">This tag that will tell Internet Explorer browser to use only the very latest technologies on your page. This will ensure the widest level of compatibility.<meta name="viewport" content="width=device-width, initial-scale=1">This tag will set your page up for mobile compatibility so that the initial scale is equivalent to the resolution of the phone/tablet/device. By changing the initial-scale to a different number (1 is the same as 100%) may make your web page appear zoomed in.<title></title>Between these tags should be the title of your web page. This won’t appear on the page itself, but rather at the top of the browser, and when people bookmark or link to the page. (And in some Google search results.)<meta name="description" content="">This tag is an optional description you can add to the page that Google and other vendors use to knowing more about the page’s purpose and function. Be clear, descriptive and concise.<link rel="stylesheet" href="main.css">This tag optionally includes a separate CSS file that will style your page.
We will use some of the above tags in our web page. Be sure to change the content to reflect your own page.
<head>
    <meta charset="utf-8">
    <meta http-equiv="X-UA-Compatible" content="IE=edge">
    <title>My First Webpage</title>
    <meta name="description" content="An example web page built in Web Skills class">
    <meta name="viewport" content="width=device-width, initial-scale=1">
</head>
Remember, this <head> tag should go between the opening <html> and closing </html> tags.
Adding the <body> tag
The body tag contains all of the visible content on your web page. Anything people will actually see on your page, must be in the <body> tag.
<body>


</body>
Make sure it goes after the <head> tag (and not in it).
The <header> tag (not to be confused with <head> tag)
The <header> tag typically refers to the “head,” or top, of your document which has information like the site name, a title or what this web page is about. In newspaper terms, this is often called the masthead. It can also serve as a grouping item for article headlines.
Inside the header tag, we will put an <h1> tag, which refers to a type of document heading, usually the most important. There are six levels of heading tags, h1-h6. They represent a hierarchy of content.
<header>
    <h1>Jeremy Rue</h1>
    <h2>My first web page</h2>
</header>
This header tags appears between the opening <body> and closing </body> tags.
The <nav> element
The <nav> element stands for “navigation” and surrounds the site navigational links. This often a series of links or a bulleted list of different parts of a website (think: about page, contact page, product page, etc.) These navigational elements are typically displayed along the top of the page or the side of a web page (using CSS) so people can jump around the site.
In our example, we will put a bulleted list of links to some fictitious parts of our website. A bulleted list is made by adding a <ul> tag (called unordered list), and several “list items” tags, denoted by <li>.
<nav>
    <ul>
        <li>Home</li>
        <li>Blog</li>
        <li>Portfolio</li>
        <li>Contact</li>
    </ul>
</nav>
This goes below your primary <header> tag (not in it). Feel free to change the navigational words from Home, Blog, Portfolio, Contact to anything you would like.
The <article> and <section> tags
There are two tags for building the structure of a web page.
- The
<article>tag describes a piece of syndicated content (where content changes on an interval, like a news website.) - The
<section>tag id designed more for structuring static content that doesn’t typically change much; think a “section” of a web page.
In our example web page, we will use the article tag to mimic a personal blog. Inside our article tag, we will put:
- an article headline,
- an image (and making it linkable),
- a paragraph of text.
For the headline, we will use an <h2> tag. The reason why we are using that instead of an h1 tag is to denote a hierarchy from our site’s title, which uses an h1. Headlines of articles are usually less important that the website’s title in terms of a document outline from the site’s title.
For the image, we will use an <img> tag, with the src= attribute to set the source of the image, and an alt= attribute, which sets some text that describes the photo for accessibility reasons. The width and height attributes can force the image from its native size to display any size on the page. However, most images lose quality when changing the size too much, especially when making an image larger from its native size.
We will also make the image linkable. To do this, we will place an <a href=""></a> tag around the image tag. The href attribute specifies where this link will go when we click on it.
For the paragraph, we will use the <p> tag.
<article>
    <h2>Photos from my last vacation</h2>

    <a href="https://www.flickr.com/photos/mandj98/13983804179">
        <img src="http://c2.staticflickr.com/6/5159/13983804179_a37a227ed1_z.jpg" width="500" height="auto" alt="Valley Of Fire State Park">
    </a>

    <p>Lorem ipsum dolor sit amet, consectetur adipisicing elit, sed do eiusmod tempor incididunt ut labore et dolore magna aliqua. Ut enim ad minim veniam, quis nostrud exercitation ullamco laboris nisi ut aliquip ex ea commodo consequat. Duis aute irure dolor in reprehenderit in voluptate velit esse cillum dolore eu fugiat nulla pariatur. Excepteur sint occaecat cupidatat non proident, sunt in culpa qui officia deserunt mollit anim id est laborum.</p>

</article>
Add multiple articles, like the one above, one after another. Make sure all of this is going between the <body> and </body> tags. You should also change the headline and image src values to other images.
Viewing the web page in the browser
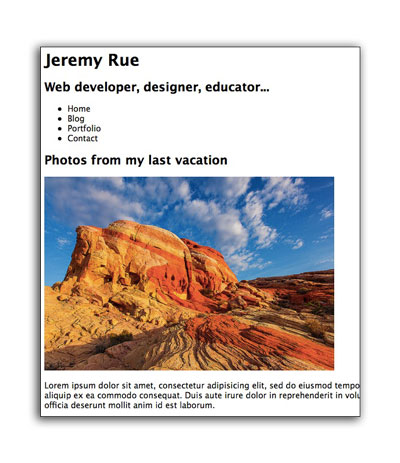
Make sure to save your document at this point. Next, you want to find the document in your Finder, and double-click on the file to open it in a browser. If the page doesn’t open in the browser, you can also try dragging the file over the browser icon in your dock.
You page should look similar to the following:

Connecting your page to some pre-built CSS files
So, your web page might be looking kind of bland. This is because we haven’t applied any CSS styling to it yet. We will learn about CSS in the next lesson. For now, let’s take a look at the power of CSS.
- Download this css.zip file, and save it to the same folder as your index.html
- Unzip the css.zip file (double-clicking it should work). You should now see a folder called “css”.
Next, add one of the following lines of code to the <head> tag (order doesn’t matter):
<!-- Pick one of the following to add -->
<link href="css/photo-blog.css" rel="stylesheet">
<link href="css/baby-blog.css" rel="stylesheet">
<link href="css/simple-blog.css" rel="stylesheet">
<link href="css/modern-blog.css" rel="stylesheet">
After adding the line of code, save your index.html, then refresh the page in your browser to see the results. When you’re done, try replacing the <link> tag with a different one above, and then save/refresh again.
Bring your index.html file to class next week. We will be decorating the site with some CSS.