Cleaning Data
Scraping Websites using Google Sheets
In the first part of this lesson, we’ll scrape a website that has a table of data using Google Spreadsheets. Google spreadsheets has a couple of formulas that we can use for importing data from other websites. They are:
- IMPORTXML - For importing structured data in XML format.
- IMPORTDATA - For importing a .csv or other spreadsheet file hosted online somewhere.
- IMPORTFEED - For importing an RSS or Atom feed, like from a website.
- IMPORTHTML - For importing tables of data on a website.
- IMPORTRANGE - For importing a range of data from another spreadsheet on your own Google Drive.
Let’s first scrape the website Richmond Confidential for stories, and import them into our spreadsheet. Richmond Confidential is a WordPress site, and every WordPress site automatically generates an RSS feed when you append /feed/ to the end of th URL.
In A1 of a new spreadsheet document, enter the following formula:
=IMPORTFEED("https://richmondconfidential.org/feed/", "items", TRUE, 20)
The ImportFeed function takes four arguments. The first is the URL of the feed. The second is which data it should import from the feed. The third is whether or not it should include headers. And the last argument is the number of items to import.
It’s important to note that after we import a feed, you cannot modify the data. The feed is a formula that you will need to copy and “paste values” in order to modify or run operations on the data.
Next, let’s import a table of data from Wikipedia:
=IMPORTHTML("https://en.wikipedia.org/wiki/Firearm_death_rates_in_the_United_States_by_state", "table", 6)
The second argument is what we’re scraping from the website (list or table) and the third argument is which table from the website we’ll scrape. This often takes trial-and-error to find the right table.
Extrating Data from PDFs
There are multiple tools to use for extracting data from PDF files. The first is Tabula, which requires PDFs that are text-based (not scans or images of tables).
Tabula
Tabula can be downloaded from its website. It is a free and open source software. To install, just draw the downloaded Tabula.app file to your Applications folder, or run from the downloaded folder.
In this lesson, we will use the following PDF example from the Air Force about B-52 bomber incidents.
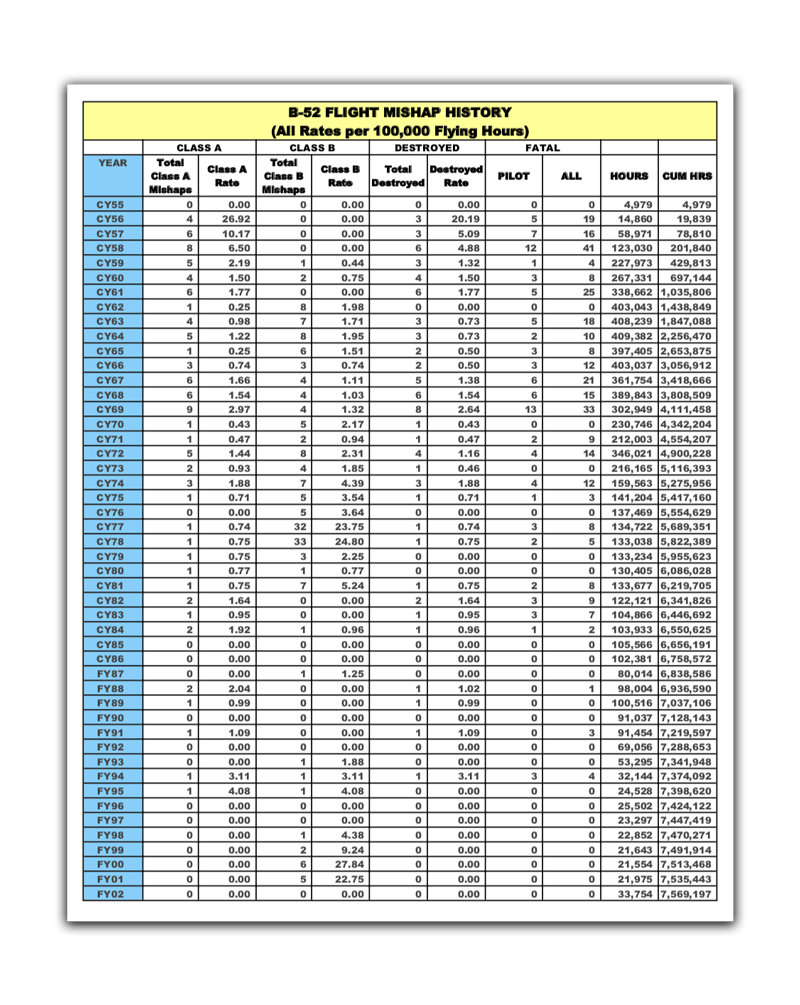
This is a PDF of a table of data. While copy-and-pasting might seem like an idea to extract data, it’s unlikely to work correctly, and introduce spacing issues. Launch Tabula and select the portion of the data you wish to extract:
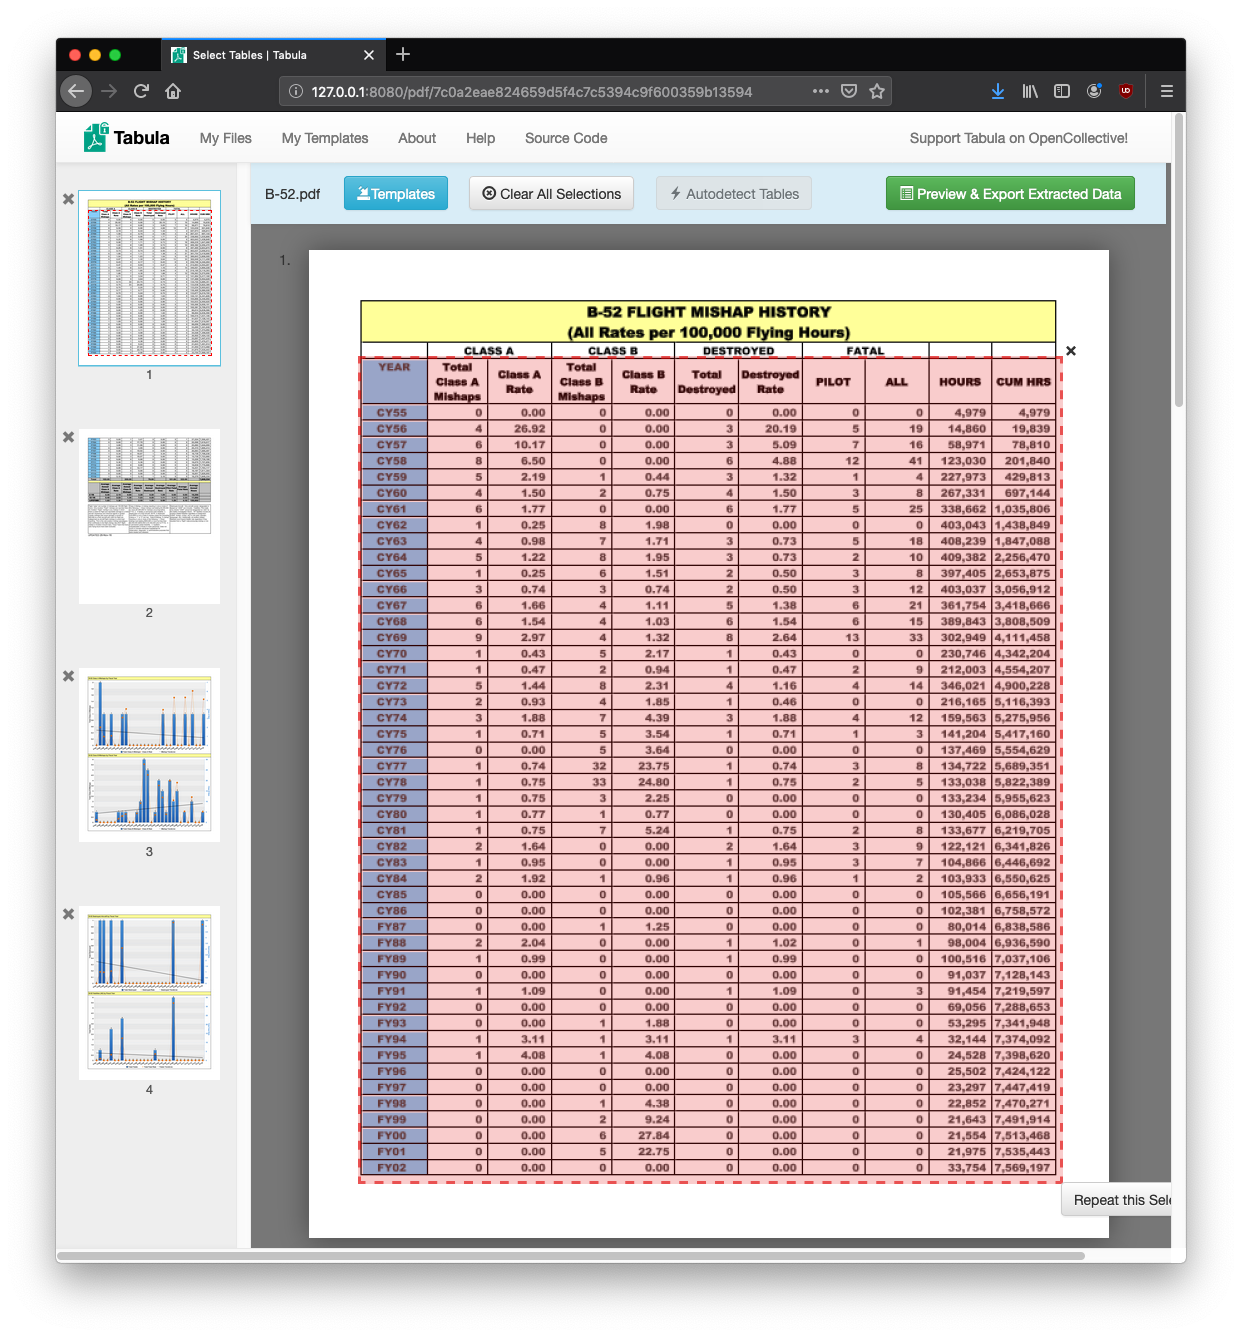
You can continue the selection in the following page. While the preview may show them as two separate tables, they will be conjoined when the final export takes place.
While not perfect, Tabula offers one method for extracting data from PDFs. Another more advanced tool is PDFPlumber, which require use of the Command Line Interface.
Below is a tutorial on how to use Open Refine.
Introduction
Almost every dataset you’ll encounter will be messy. Often, there are inconsistencies in the way the data is entered –– from misspellings to extra spaces –– that can make the data difficult to analyze later.
It’s super important to clean your data before trying to use it in any way. In this tutorial, we’ll learn how to clean up inconsistent data with a powerful program called OpenRefine. Although OpenRefine can do a myriad of cleaning tasks, this tutorial will just cover the basics of cleaning through an exercise dealing with inconsistently entered names.
Tutorial Files for this and other lessons:
sample-names.csv ucb_stanford_2014.csv defendents.csv
Installing and launching OpenRefine
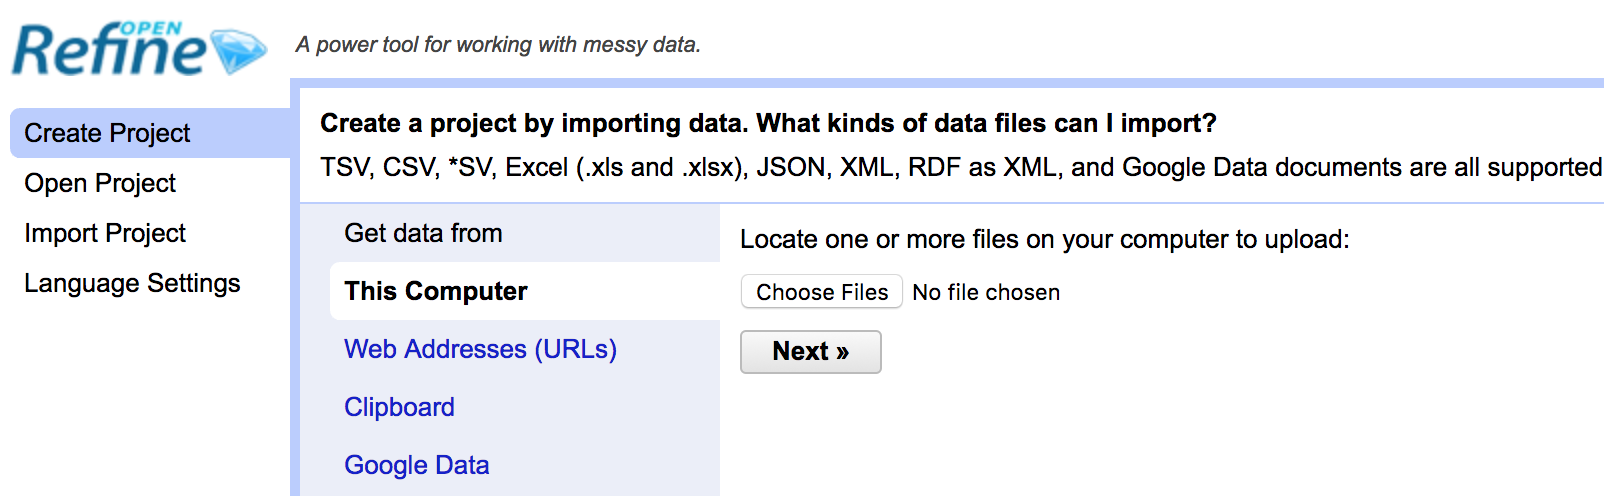
To start using OpenRefine, go to this page to download it and follow directions to install it.
Once you’ve installed it, launch OpenRefine.
When you launch OpenRefine, it should automatically open a new browser window.
(Note: OpenRefine doesn’t operate as a desktop application, but instead uses a browser window.)
If for some reason it doesn’t launch automatically, don’t panic – just open your preferred web browser and go to http://127.0.0.1:3333/.
Loading a file and creating a project
Now let’s practice cleaning some data. Download this dataset as a .csv file.
In OpenRefine, navigate to the menu on the left-hand side of the browser and select the “Create Project” tab. Choose the data file we just downloaded.
The next screen you’ll see is a preview screen. This shows you how OpenRefine sees and your data and allows you to change settings before you import it.
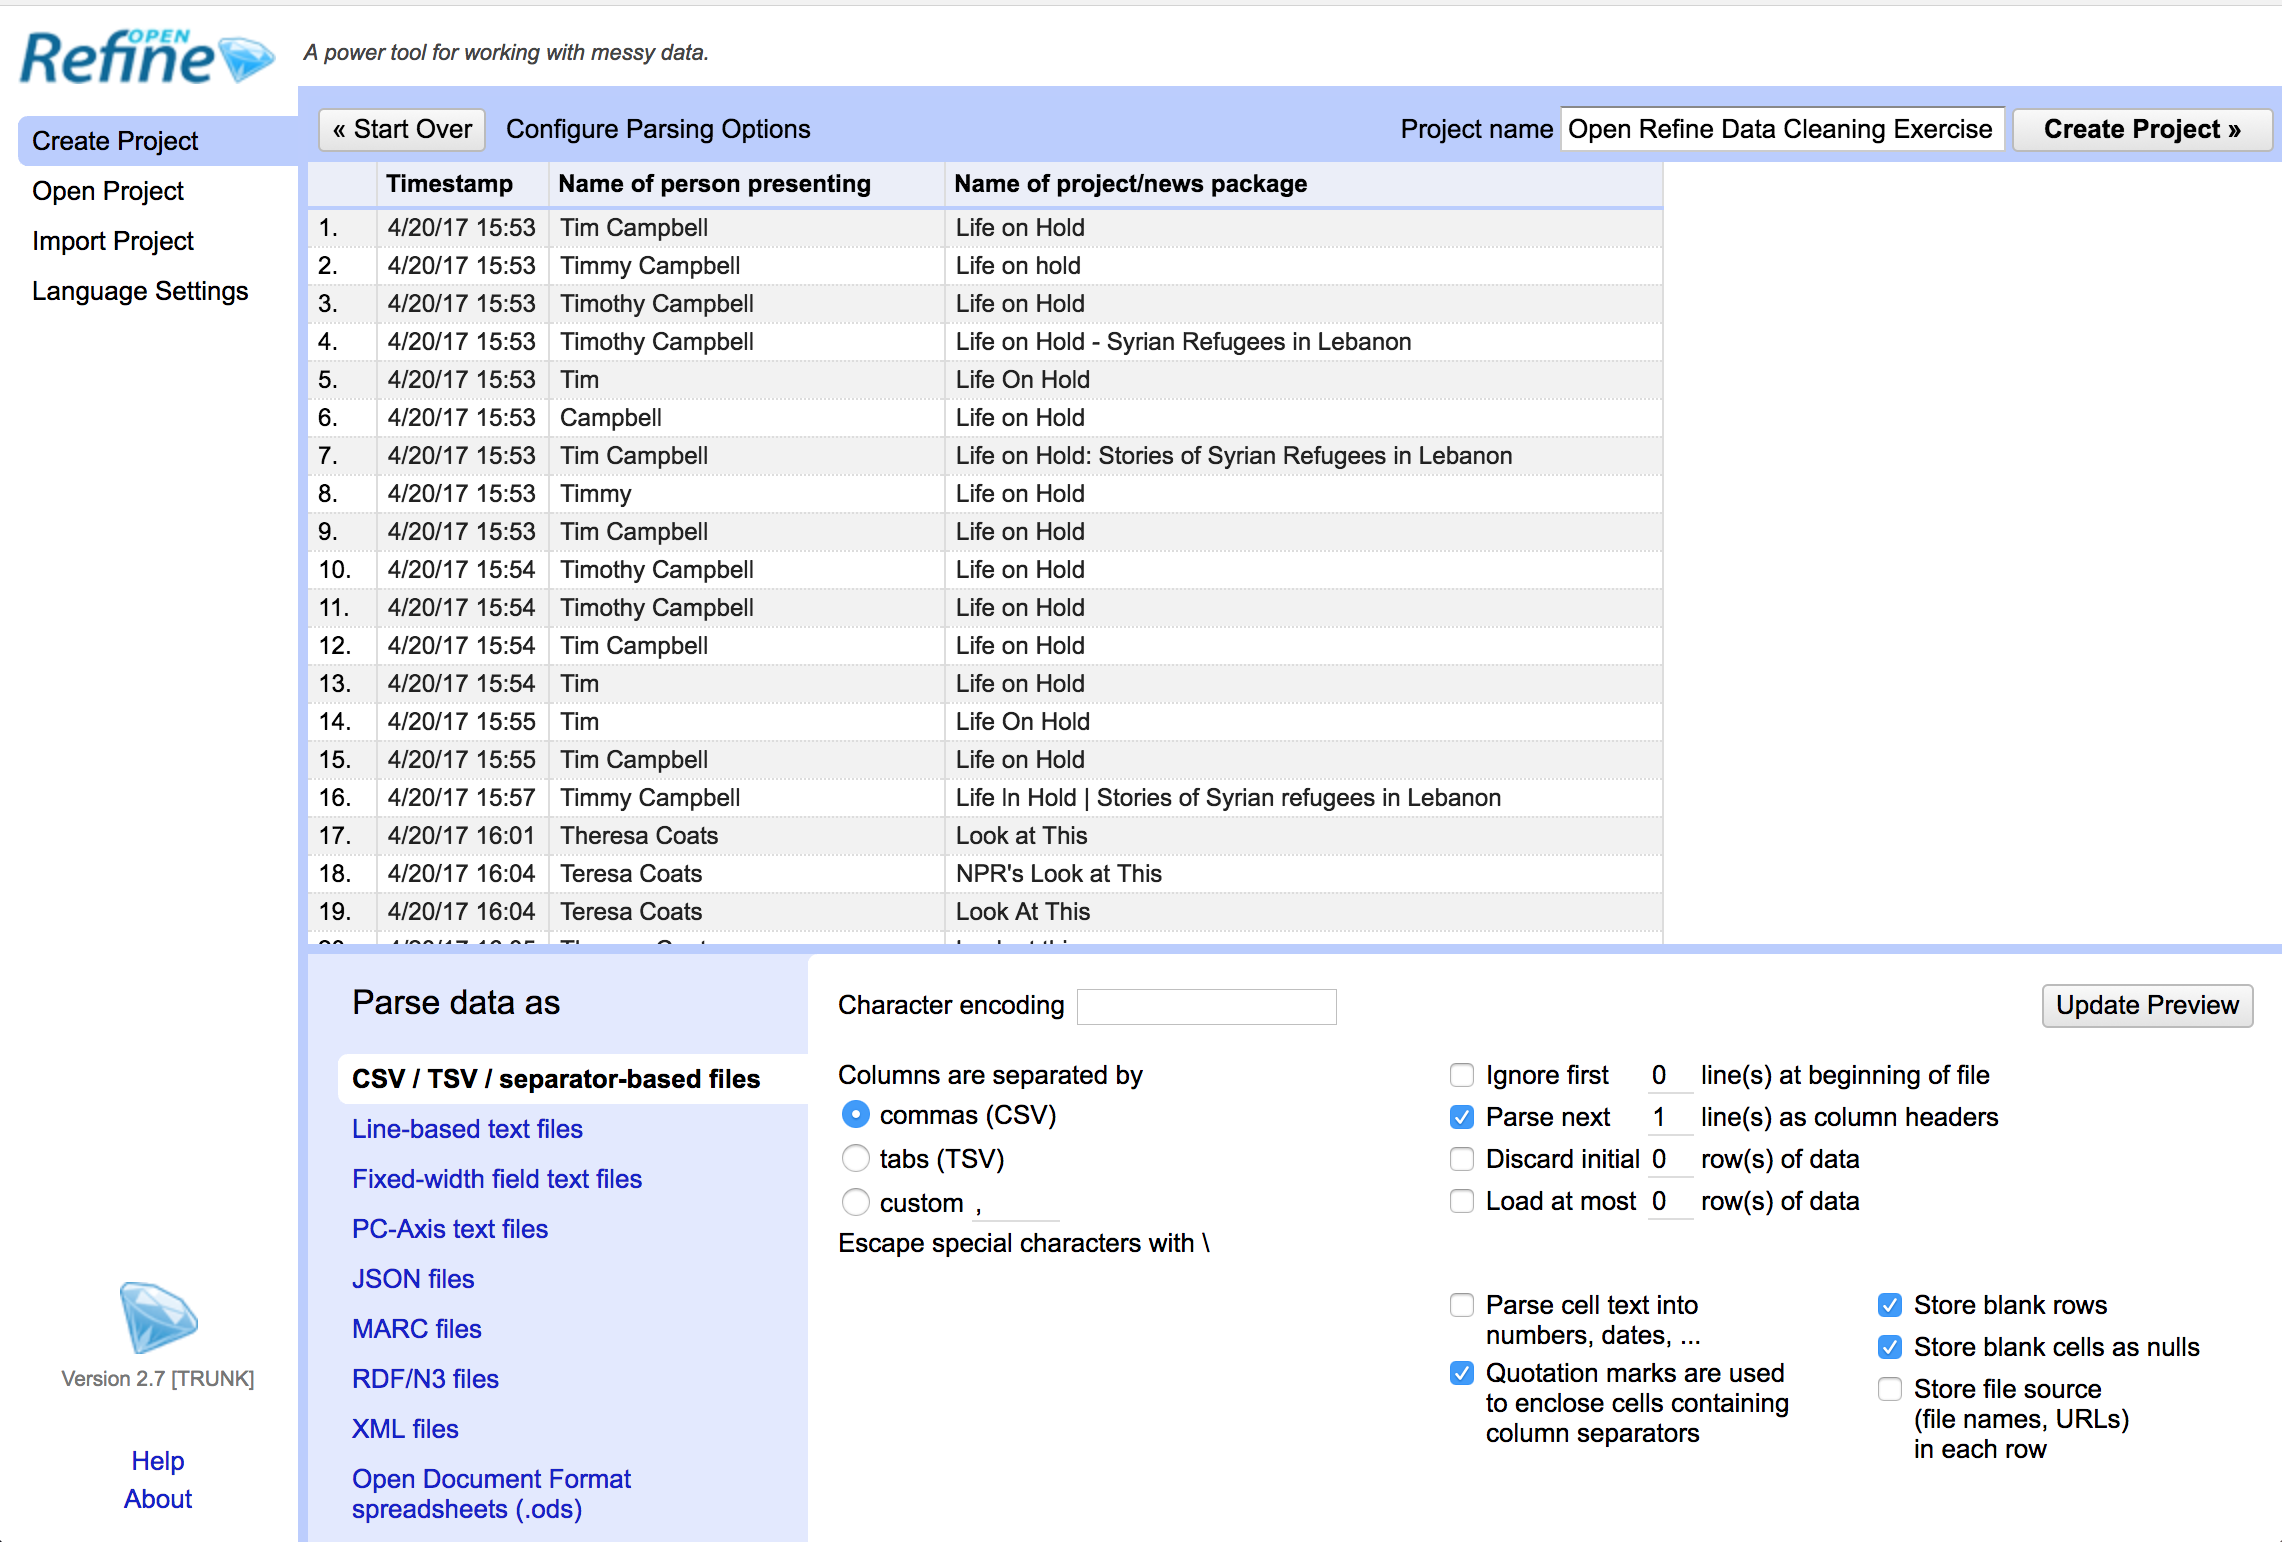
We’ll leave the settings as is for this tutorial, except for one small change. In the bottom part of the screen, be sure to check the box that says “Parse cell text into numbers, dates, …”.

This allows OpenRefine to categorize numbers in your data as numbers. This won’t matter too much in the example we’re using for this tutorial since we don’t have numerical data, but it’s a good habit to get into going forward.
Now hit the “Create Project” button on the top right hand side of the screen to finish importing. Here’s what you should see when you’re done:
To see more of the data, you can change the number of rows shown by changing the settings at the top of the screen to show 50 rows instead of the default 10.
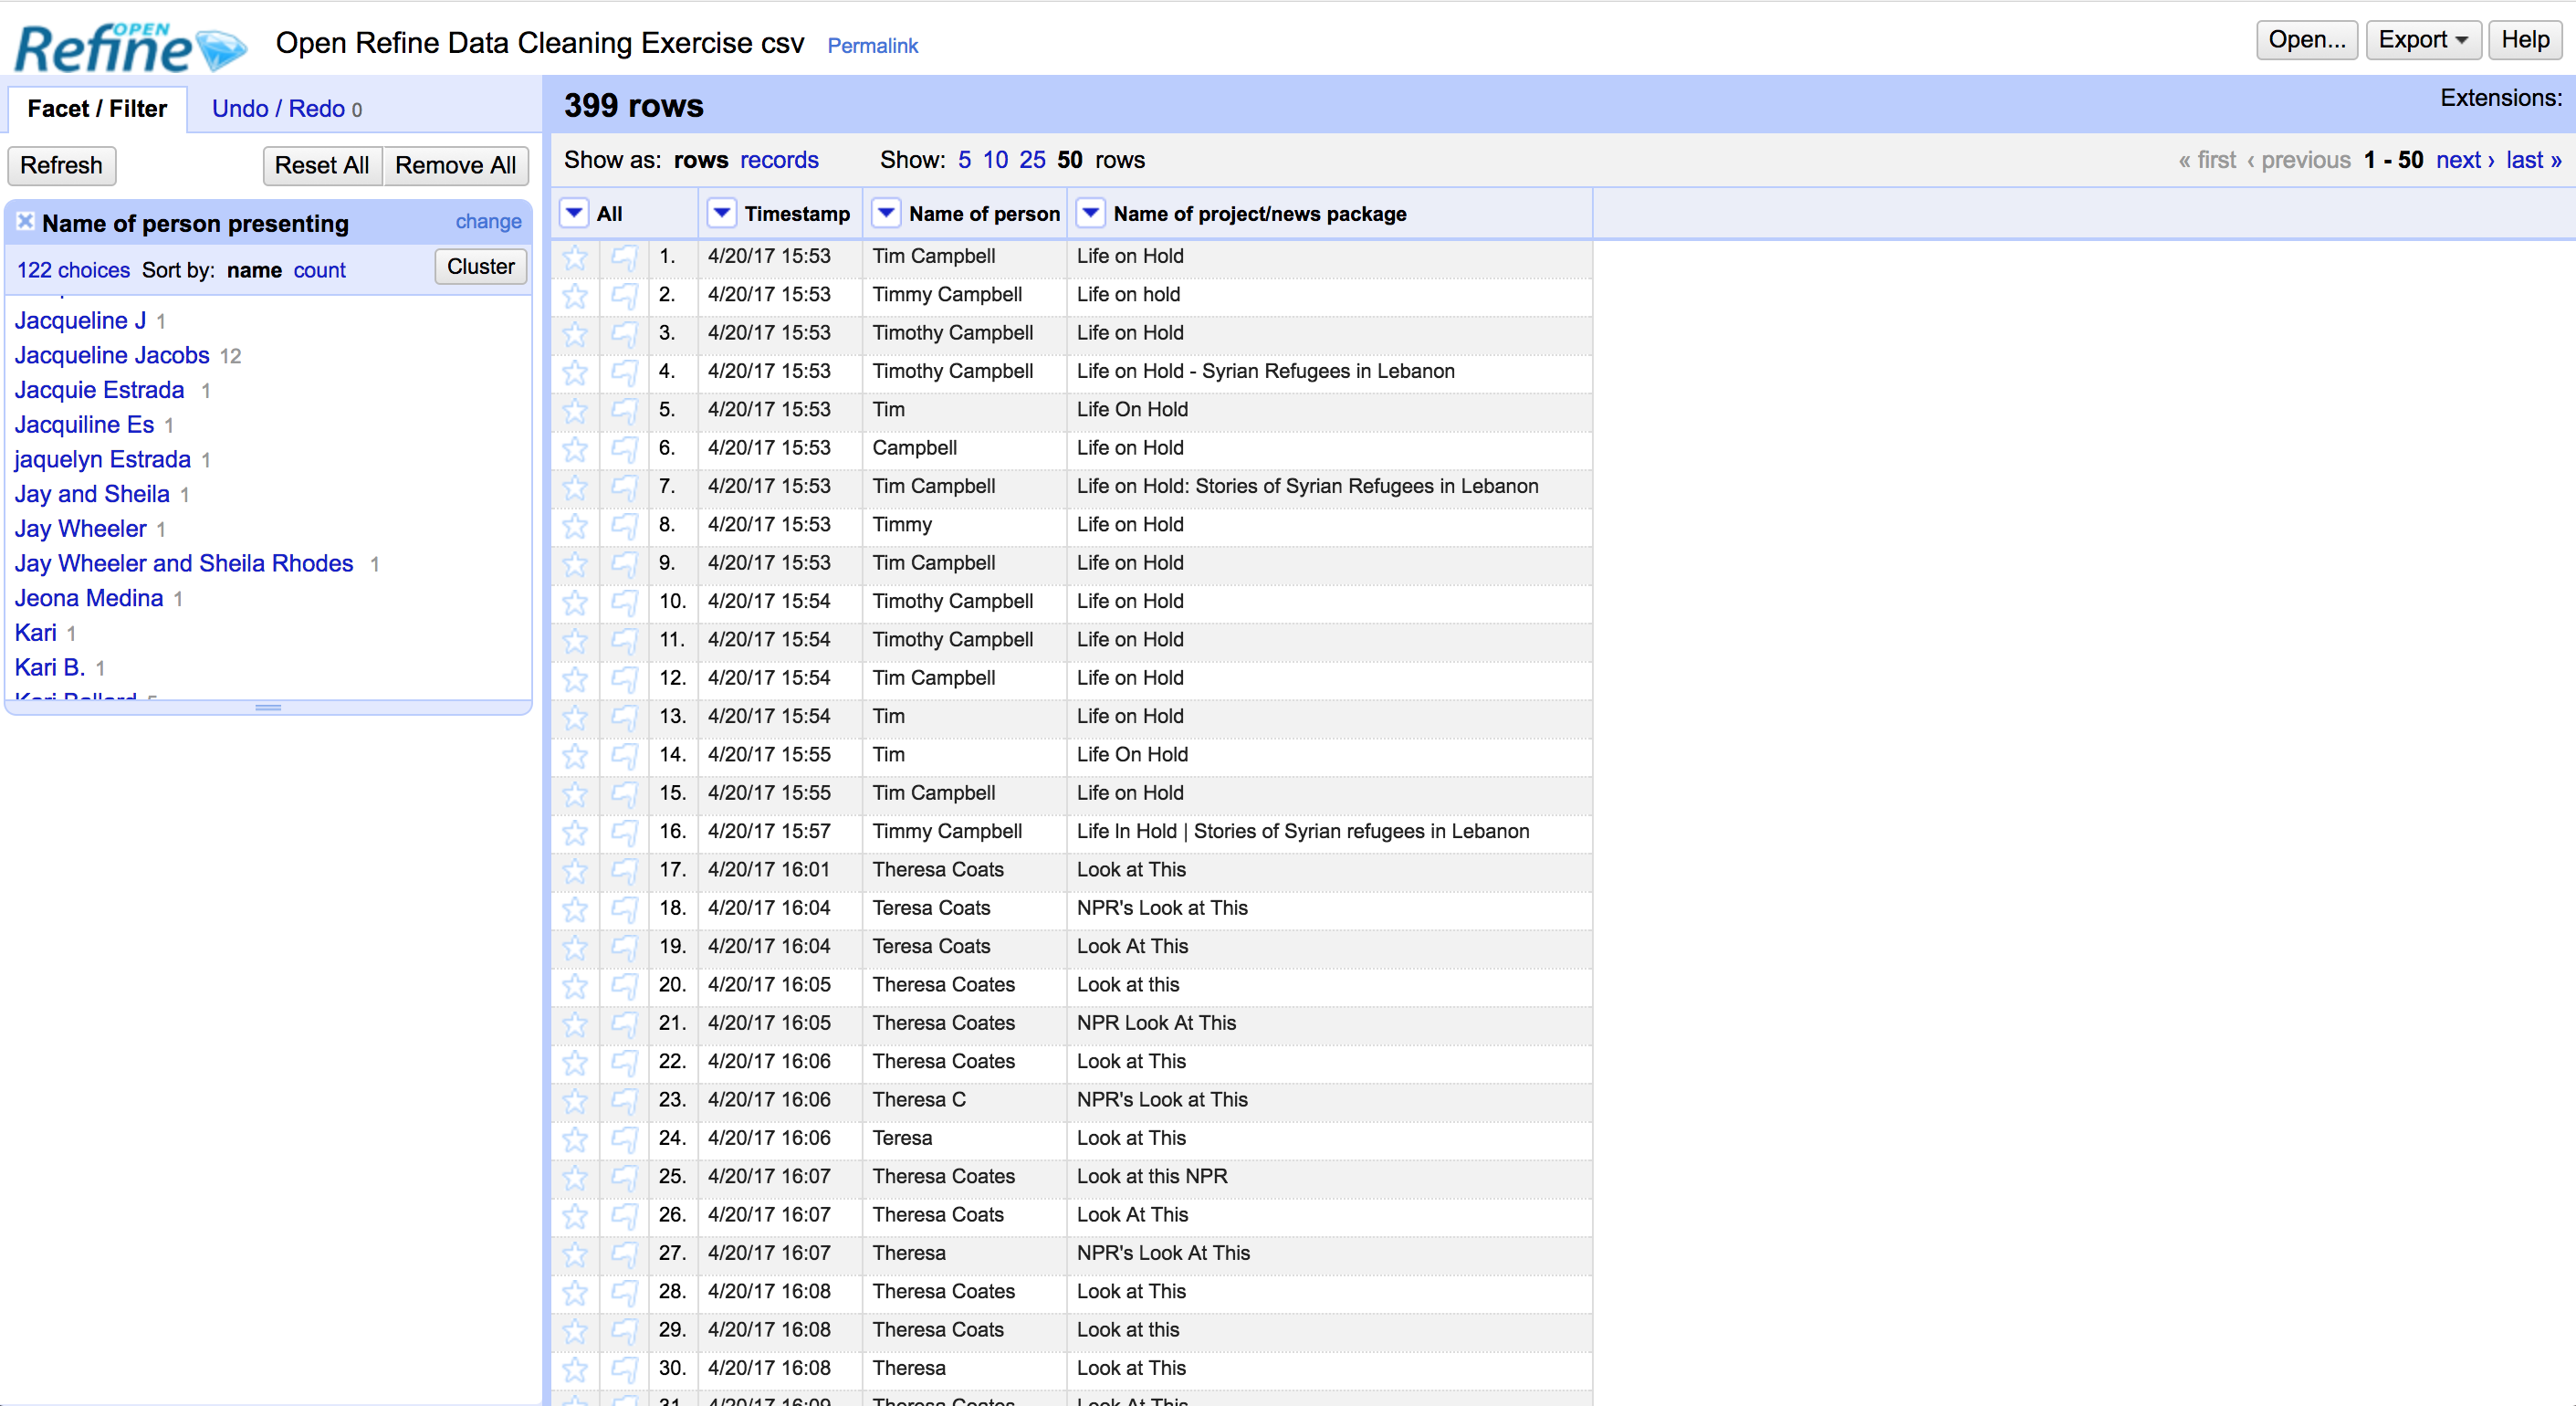
Examining our data
Let’s take a look at our data for a second.
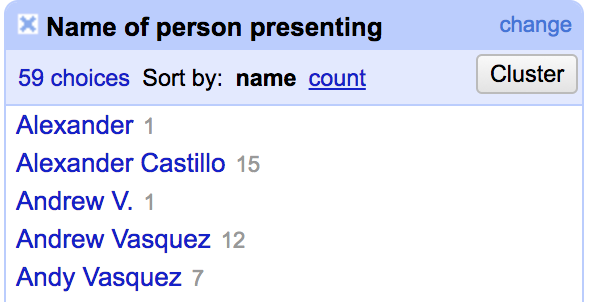
Click the arrow on the “Name of Person” column, and select “Facet, “Text Facet.”

You’ll see a window pop up on the left hand side of the screen. This gives us an overview of the values in that column – which, in this case, is student names.
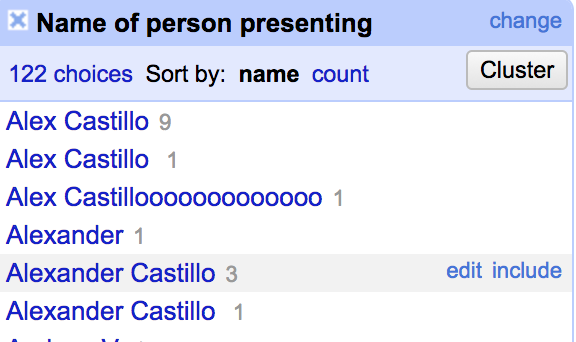
You’ll notice that a lot of data has been entered inconsistently. Alex Castillo, for example, is entered as Alexander, Alexander Castillo, Alex Castillooooooo. This inconsistency makes things tricky later down the line when you’re trying to analyze your data because your computer will treat Alex Castillo and Alex Castillooooooo as different people, even though we as humans know they’re the same person.
We need to help our computer along by formatting each name in the exact same way so that it only sees one entry per person. For the purposes of this exercise, our end goal will be to have everyone’s name formatted so that we see their full first and last name in title case. (By the end of this tutorial, for example, we should only see one entry for Alexander Castillo and it should be formatted as “Alexander Castillo” and not Alex Castillo or Alex or any other variation of that name.)
Removing whitespace
Take a look at the text facet window again.
You’ll notice that there are two entries listed for “Alex Castillo,” despite the fact that they appear to be spelled the same.

The reason we’re seeing two entries is because one entry has a space following it. Again, our computer reads this as two separate people, even though we as humans know better.
Removing this kind of unnecessary whitespace is an easy first step we can take in cleaning our data.
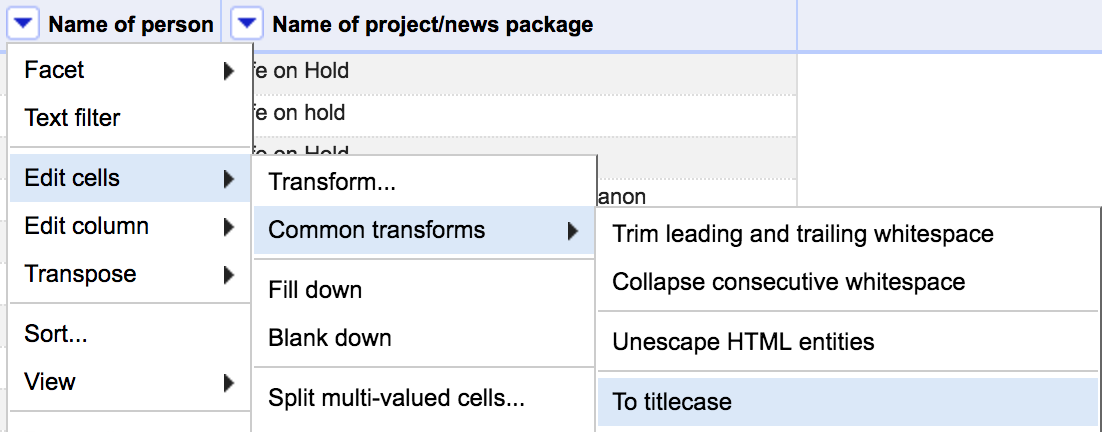
To do so, click the small arrow next to the “Name of person” column. In the menu, select “Edit Cells,” “Common Transformations,” “Trim leading and trailing whitespace.”

Now, notice that in the text facet window there is only one entry for that particular spelling of the student’s name.

Changing the case
Scroll down in the text facet window until you see the name Evelyn Wong. Note that there is one entry where her name is not capitalized (“evelyn wong”) and several where it is capitalized.

Just like removing whitespace, changing the case on a person’s name is another easy, global first step we can take to clean our data.
To do so, click the small arrow next to the “Name of person” column. In the menu, select “Edit Cells,” “Common Transformations,” “To Titlecase.” We’re choosing title case since that’s what we want for this tutorial, but note that there are options for changing to lowercase and uppercase too.
Take a look again at the text facet window and notice that the entry for “evelyn wong” has been changed to “Evelyn Wong.”

Cleaning through cluster and edit
Up until now, we’ve been making some easy, high-level changes to our data. But looking at the text facet window, there’s still a lot of work to be done to get our names spelled and formatted consistently.
A powerful tool to help with this work is OpenRefine’s Cluster and Edit. With this feature, OpenRefine goes through the data in the column you’ve selected and uses algorithms to try to recognize values that might be variations of the same thing. It then allows you to group or merge them together under one consistent name of your choosing.
Let’s see how this works.
Click on the small arrow next to the “Name of person” column and in the menu, select “Edit Cells,” then “Cluster and edit…’
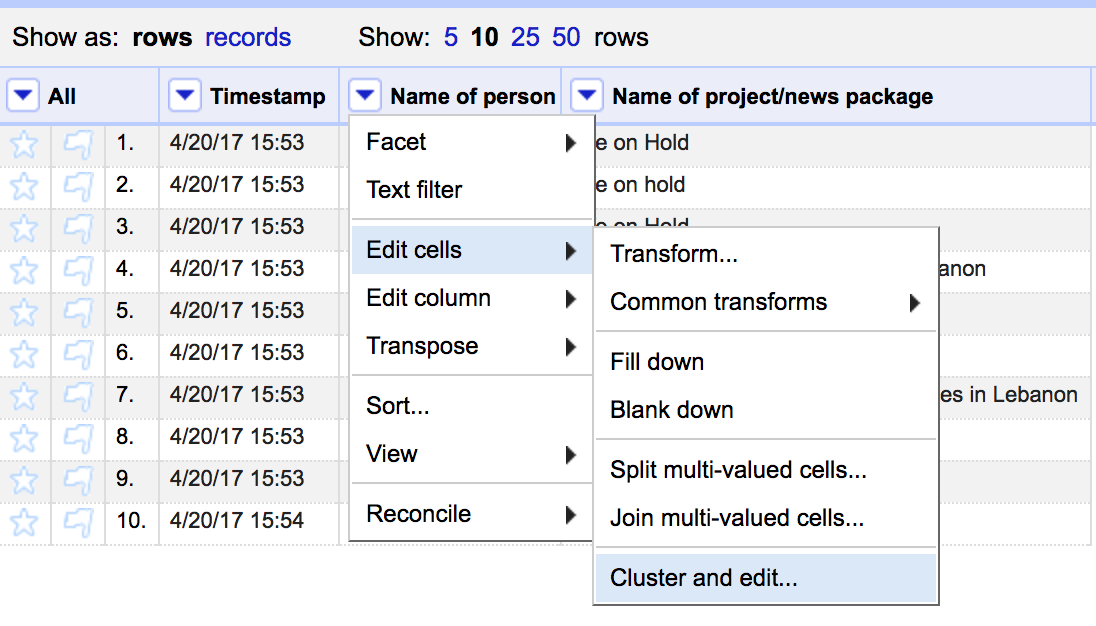
You’ll see this screen pop-up.
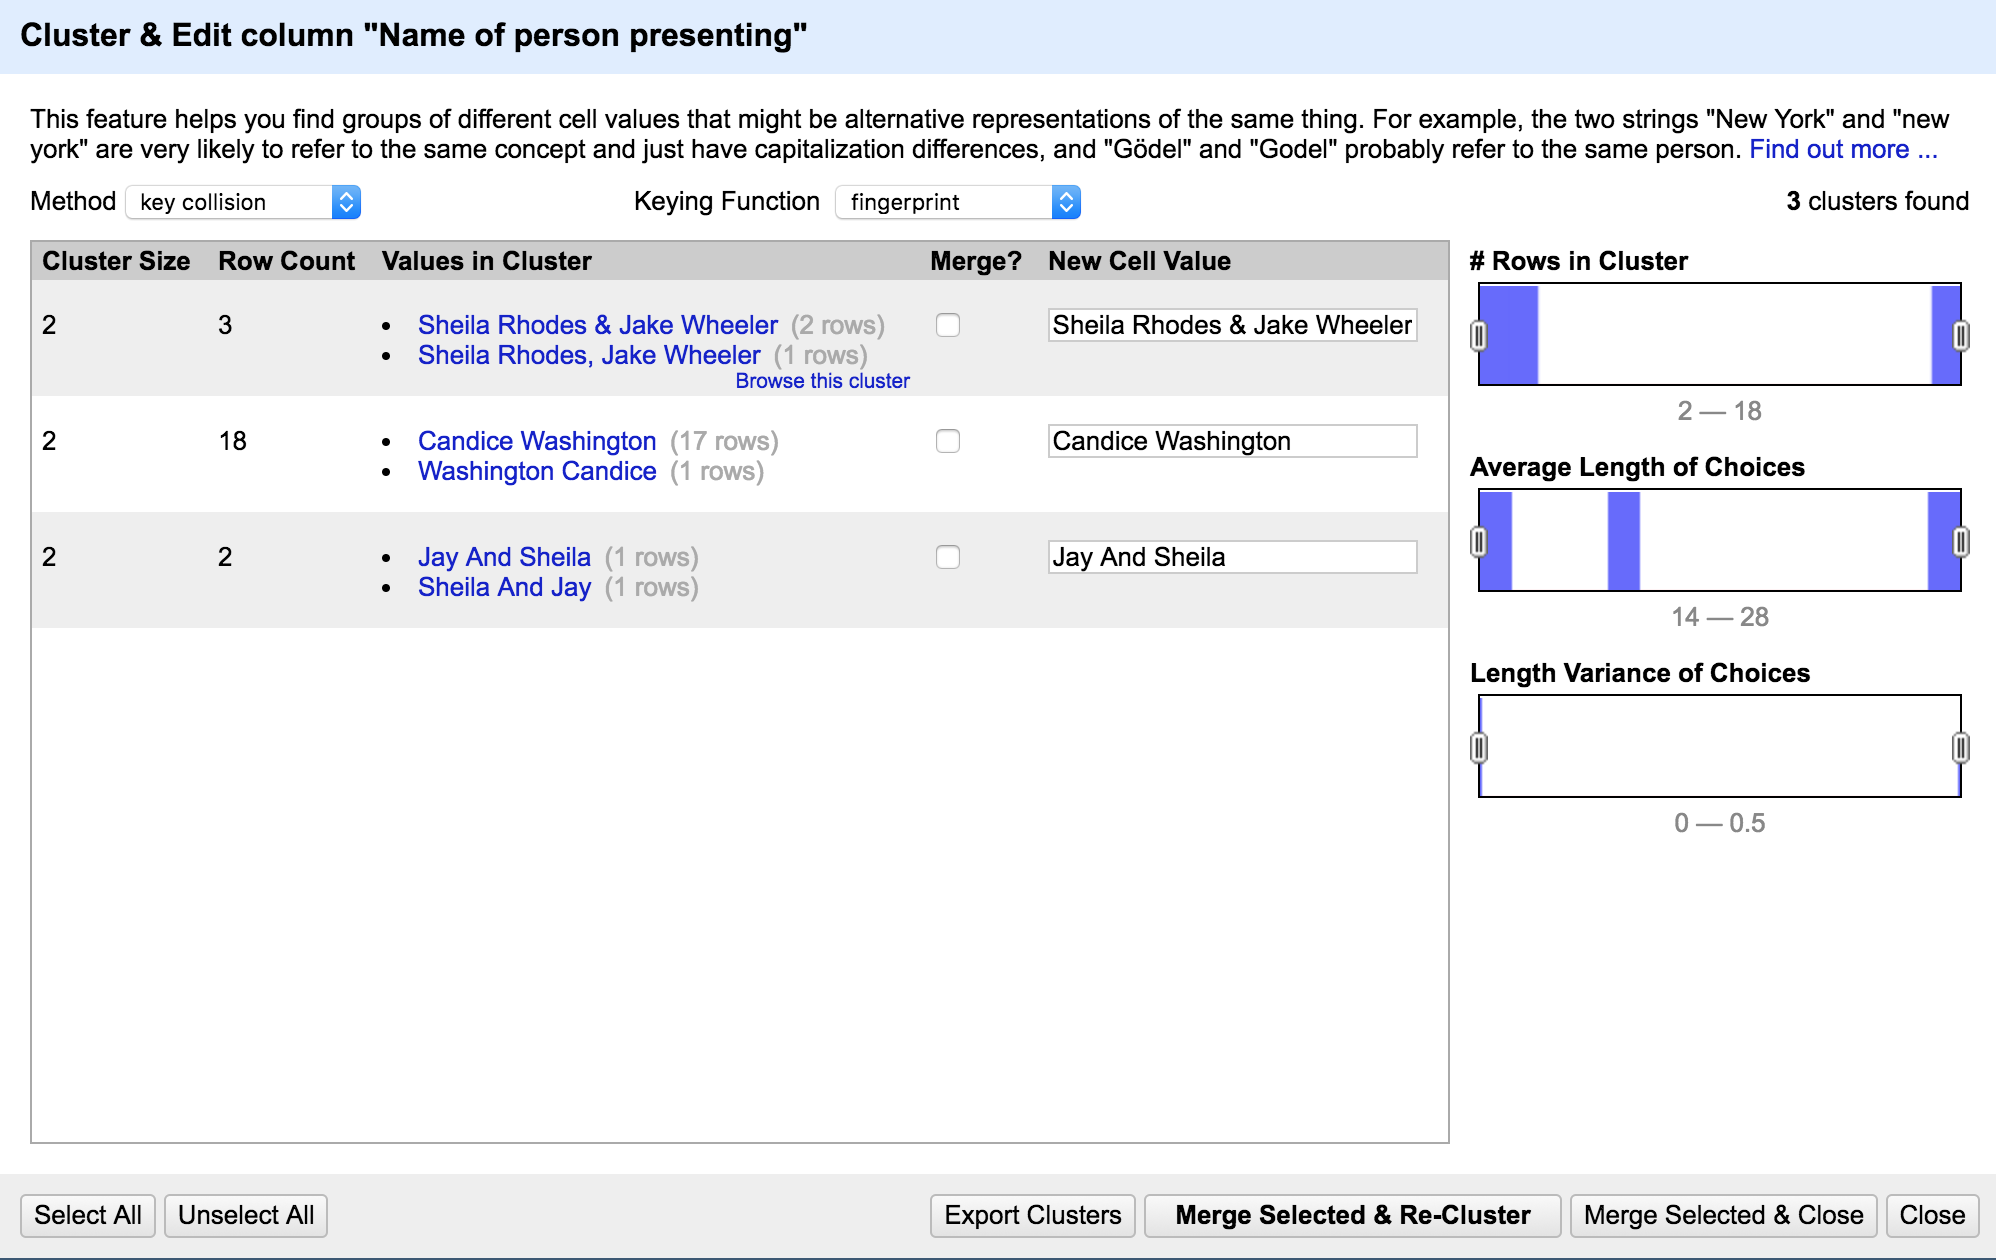
Understanding the Cluster and Edit window
Before we do any cleaning, let’s make sure we understand what we’re looking at in the Cluster and Edit window.
Let’s look at the Values in Cluster column. Here we can see all the variations of the name that the selected algorithm is picking up.
Now let’s look at the New Cell Value column. This contains a textbox with OpenRefine’s suggestion for a consistent name of the data. It’s important to always take a look at this suggestion and edit it, if need be, to get the data in the format you want.
To clean any given name, all we have to do is check the box under the Merge? column and click the Merge Selected & Recluster button. Once we do, the variations of the name in the Values in Cluster Column will merge under the new name we’ve chosen in the New Cell Value column.
Another aspect of the Cluster and Edit window to understand are the algorithm settings. At the top of the window, you’ll notice two dropdown menus called Method and Keying Function.

Don’t worry too much about what these terms mean, but do know that the settings in this menu define the algorithm that OpenRefine uses to recognize variations among your data.
Some algorithms are more conservative – meaning, in our case, that OpenRefine still recognizes small differences between the names in our data, just in case they might be different people. Others are less conservative, meaning OpenRefine makes broader guesses about what name variations it thinks belong to the same person.
In general, it’s best to clean data in order of most to least conservative algorithms so that we can be sure not to accidentally group the wrong data together. We’ll learn more about this further along in the tutorial. For now, we’ll leave these settings as is.
Cleaning our first names
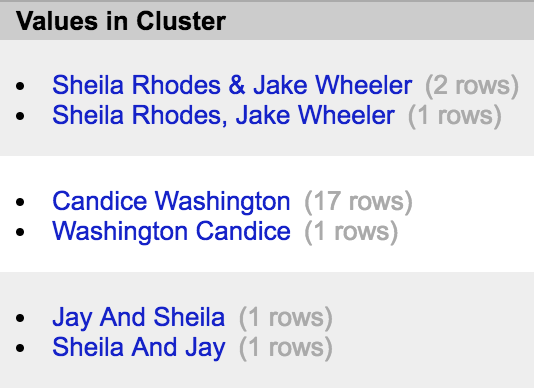
Let’s look at our first name – or in this case, names: Sheila Rhodes & Jake Wheeler.
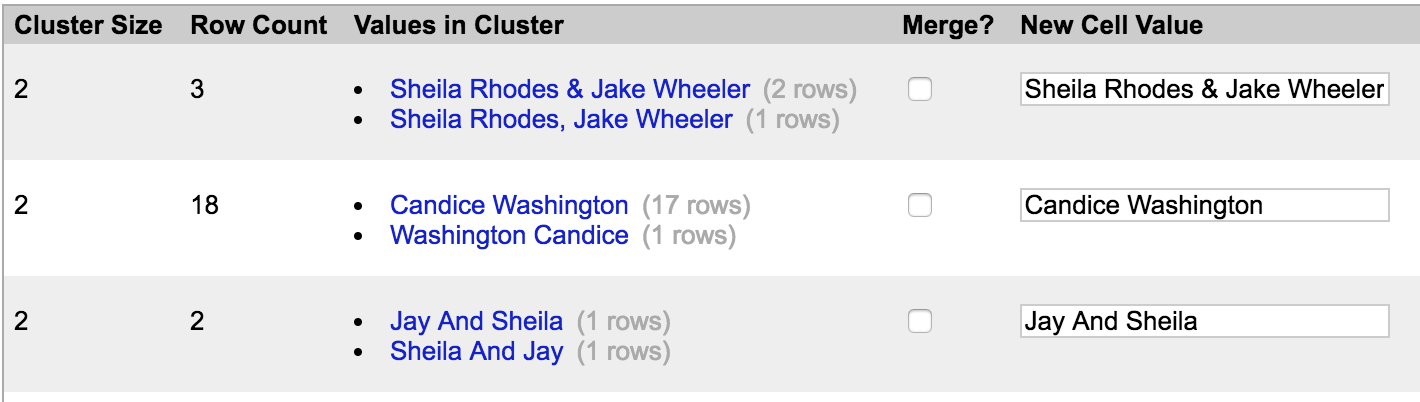
We can see there are two variations of this name in the Values in Cluster column and a suggestion for how we can format the name going forward in the New Cell Value column.
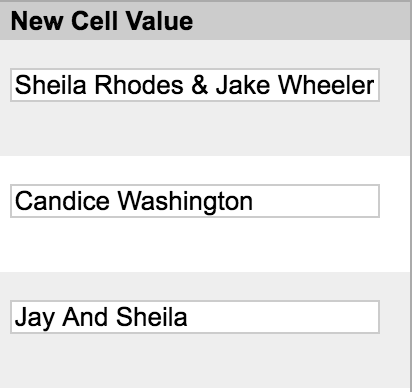
Let’s change the text in the New Cell Value column to read “Sheila Rhodes, Jacob Wheeler,” since our end goal is to show full names. Now let’s check the box next to Merge. Your screen should now look like this:

Now click Merge Selected & Recluster.
You’ll notice that the names have disappeared from our window. That’s because OpenRefine just renamed variations we saw on the left to the new cell value we chose on the right – that is, we’ve just cleaned the data!
Let’s do the same thing for our next name, Candice Washington. The text in the New Cell Value column should read “Candice Washington.” Click Merge Selected & Recluster.

Now let’s look at our next names: Jay and Sheila. You’ll notice that these are very similar names as the first two we did: Sheila Rhodes, Jacob Wheeler.

This is because we’re using the default algorithm, which is the most conservative. With this algorithm, OpenRefine wasn’t entirely sure if “Jay and Sheila” and “Sheila Rhodes, Jacob Wheeler” were referring to the same people.
This is where your judgement comes in. Are these actually the same people?
In this case, it’s pretty reasonable to assume that yes, these are indeed the same people. But as you clean data, there will be cases where the answer to that question is not always clear and it can be pretty easy to accidentally merge data that actually should be considered distinct. So it’s important to ask yourself these questions throughout the cleaning process, fact check whenever possible, and use your best judgment along the way.
Let’s go ahead and merge these names, making sure that the text box in the New Cell Value column reads “Sheila Rhodes, Jacob Wheeler.” This way we’re ensuring that these entries are formatted consistently and are merged with the ones we cleaned earlier.
Algorithm settings
When you’ve finished with that set of names, you should see this screen:
The screen above means we’ve cleaned all the names that the selected algorithm picked up.
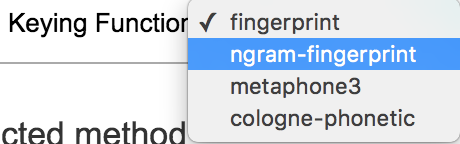
So let’s repeat the process using the next most conservative algorithm.
At the top of the screen, you’ll see two dropdown menus called Method and Keying Function. Under Keying Function, change the settings from fingerprint to ngram-fingerprint.
Notice that a few more names have popped up for us to clean:
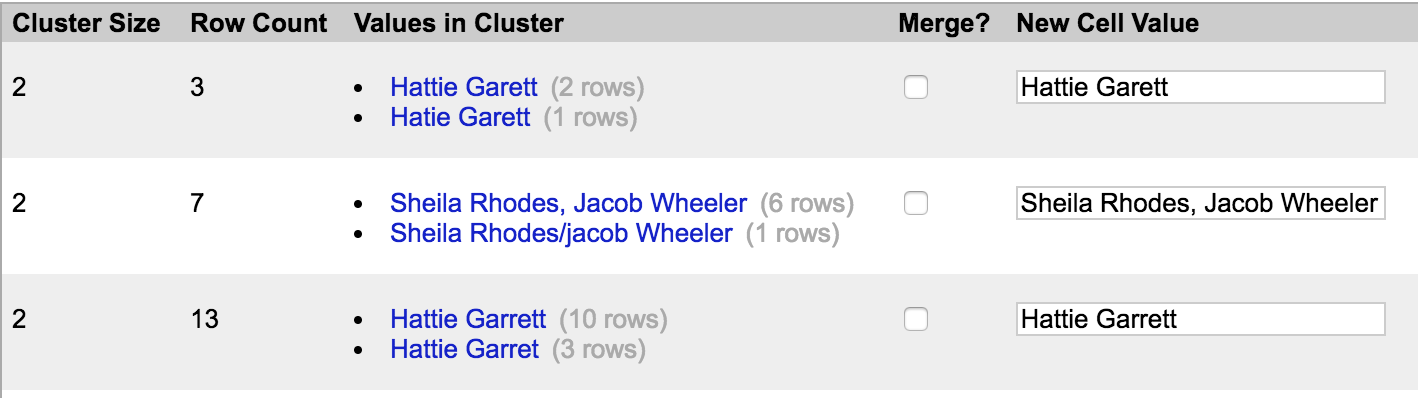
Go ahead and clean these names using your best judgment to determine whether and how to rename our inconsistent data. When in doubt, feel free to close out of the Cluster and Edit window and review the data in the text facet window to get a sense of what’s in it. (You can also click on names in the text facet window to view them in the spreadsheet, if needed.)
Also, as you go, ensure that you’re being consistent about how you’re renaming clusters – remember, we want full first and last names.
Once you’ve exhausted this algorithm, you’ll then want to repeat the process of cleaning the data by changing the settings in order of most to least conservative.
We’ve already done:
- Method: Key Collision; Keying Function: fingerprint (most
conservative)
- Method: Key Collision; Keying Function: ngram-fingerprint (next most
conservative)
Now let’s repeat the process with settings in the following order, from most to least conservative:
-
Method: Key Collision; Keying Function: metaphone3
-
Method: Key Collision; Keying Function: cologne-phonetic
-
Method: Nearest Neighbor; Distance Function: levenshtein
-
Method: Nearest Neighbor; Distance Function: PPM
Throughout the process of cleaning, be sure to review the Value in Cluster column and the New Cell Value column to ensure that you’re actually grouping and renaming entries in the way you want.
Cleaning individual entries
Once you’ve cleaned the data using all the algorithms above, let’s go back and look at our data to see how much more cleaning we have to do.
Take a look at the TextFacet window and notice that it’s got far fewer inconsistencies than it did when we started.
But we can see that there are still a few inconsistencies. We can clean those up manually by simply clicking edit next to the name in the text facet window and renaming the names we want to change.

Go ahead and manually clean the rest of the names until each name only has one entry associated with it. If you’d like more practice cleaning data, you can repeat the same process to clean the “Name of project/news package” column.
Exporting cleaned data
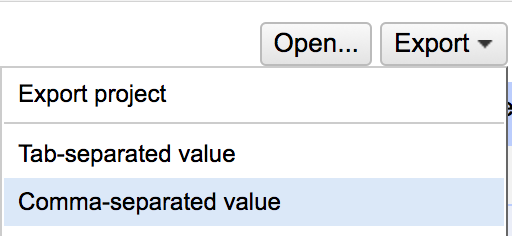
When you’re finished, you can export your cleaned dataset as a CSV by clicking “Export” at the top of your screen and selecting “Comma Separated Value.”
This tutorial was written by Jeremy Rue with help from Briana Flin.