Introduction to jQuery
What is jQuery?
JQuery is a JavaScript framework. It was written to make performing certain tasks in JavaScript easier to do. What would normally take dozens of lines of code can be done in just a few lines. Some of the advantages of jQuery are:
- It’s relatively easy to use.
- It aids in making websites more cross-browser compatible.
- It’s maintained by a large community, so there is lots of documentation and resources for finding help.
It should be noted that jQuery is also criticized in some circles. It’s main criticism are that because it’s easy to use, it doesn’t require the same level of discipline that a person would need to learn when using native JavaScript. This often results in inefficient coding patterns (code bloat), and overuse in many circumstances, and adding superfluous features when a simpler design would do.
How to include jQuery on your website
JQuery can be downloaded at https://jquery.com/download/ or you can link to the library directly in your page. This is called using their Content Delivery Netowrk (CDN). A CDN is when you use another server for linking to content, which may be faster or more reliable than your own.
All JavaScript (including jQuery) must go inside a <script> tag.

Linking to jQuery using a CDN
If you want to link directly to the jQuery library without downloading it to your computer, you would put the following code at the bottom of your page before the closing </body> tag.
<script src="//code.jquery.com/jquery.min.js"></script>
<script>

//your custom code goes here

</script>
Notice how we are using two script tags. The first one loads the jQuery library, and the second is your custom commands. You cannot combine both. When linking to an external JavaScipt file, it must be contained within its own script tag.
Including a jQuery file that was downloaded first
Download one of the compressed versions of jQuery from the jQuery downloads page (the most recent version is fine). You can right-click and save the file to a folder in your website. Traditionally, JavaScript files go in a js folder. Next, you would repeat the code block from the previous section, but instead link to the file in your own folder, like so:
<script src="js/jquery.min.js"></script>
<script>

//your custom code goes here

</script>
The name of the file, jquery.min.js may vary depending on the version you downloaded.
jQuery Ready
jQuery can’t do certain things like manipulate content until the entire webpage is fully loaded.
Because web pages run from the top to bottom, we need to place a trigger to prevent jQuery from running until the web page is fully loaded. We’ll explain the parts of this in the sections below. For now, its only important to know that we need to have this every time we want to run jQuery commands.
$( document ).ready(function() {
  // Page is ready
});
Understanding the basic jQuery syntax
JQuery follows a particular syntax pattern that is easy to learn once you know what everything means. It relies heavily on good working knowledge of CSS selectors.
The dollar sign means “jQuery”
When you see the dollar symbol $, it means “jQuery”. It is literally a reference to the entire jQuery library. In more technical terms, it’s a variable that holds the whole library. It’s one of the few symbols that are allowed to be used as a variable in JavaScript (most variable names cannot include symbols).
Making a selection with JQuery
To make a selection, use the dollar symbol first $ then follow it by parentheses. In quotes, specify the CSS selector of an element you want to affect in your document.
$(".someclass")
$("#some-id")
$("div")
Running a method on that selection
Once you’ve made a selection, the next part is to run a method (sometimes called a “command”). Methods are actions that you can perform on the element in your document you’ve selected. For example, if you wanted to make a box on your page fade out, you would first select the box’s HTML element, and then run the fadeOut() method. All methods in jQuery have a set of parentheses at the end.
$("#myBox").fadeOut();
Using a semi-colon at the end
All complete statements in JavaScript should have a semi-colon closing the statement. This is good practice to ensure everything is complete. Think of the semi-colon as the period at the end of a sentence.
Using Arguments in Your Methods
In the previous section we learned that methods are action items that you can perform on an HTML element, such as fadeOut() or slideUp(). The parenthesis at the end is important because it allows you to put a little bit of data called an argument inside the parenthesis. This can be a word surrounded by quotes, or a number. This information will tell the method how to run.
$("#myBox").fadeOut("slow");
$("#myBox").fadeIn(4000);
Multiple Arguments
You can include multiple arguments if yous separate them by a comma.
$(".container").css("background", "red");
Each item should follow the standard rules: if it’s text, it needs to have quotes. If it’s a number, it doesn’t need quotes. The commas should be outside the quote marks.

Common jQuery Methods
These examples will affect an HTML element with an id called “mybox.” Example: <div id="mybox"> </div>
FadeOut - The following command will fade out an element over a 1000 milliseconds (1 second).
$("#mybox").fadeOut(1000);
FadeTo - The following command will fade an element to a 50 percent opacity, (a number from 0 to 1) over one second.
$("#mybox").fadeTo(1000, 0.5);
Hide - The following command will simply make an element disappear.
$("#mybox").hide();
Show - The following command will display a hidden element.
$("#mybox").show();
Functions
Functions are simply blocks of code that are in a waiting queue to be run. Think of it as a way of saying “do the following…” but only when activated. Functions only run at certain times. In jQuery, a function is usually runs when a user clicks a button, or performs some type of action.
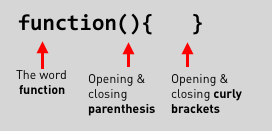
A function has the word “function” followed by a parenthesis and an open/closing curly bracket. This curly bracket will contain all of the code the the function stores until it is called to run.
Click, Mouseover and Mouseout, Hover methods
These are methods that allow the user to interact with elements like links or photos. They require the use of a function. Inside the function is the instructions that will be performed when the event is triggered.
Click - The following command will run a function when the HTML element mybox is clicked with a mouse.
$("#mybox").on("click", function(){ } );
Mouseover - The following command will run when the mouse is hovered over the element. Note: It will run every time the mouse goes over the element, so if you move the mouse off, and back over, it will run this function again.
$("#mybox").on("mouseover", function(){ } );
Mouseout - The following code runs when the mouse starts from on top of the element, then moving off the element. If the mouse starts out off the element, nothing will happen until the mouse goes over the element, then back off.
$("#mybox").on("mouseout", function(){ } );
Hover - The following is a a shortcut for allowing you to call a function when moving the mouse over an element, then having another function run when moving the mouse off the element. This takes TWO parameters in the form of functions. The first function runs when the move moves over, the second function runs when the mouse moves off the element.
$("#mybox").hover( function(){ }, function(){ });
Example of click in action
When using click or hover, always place the action code within the curly brackets. To make the code more readable, separate the brackets on new lines, and use indentation.
Make an element disappear when clicked: The following command will make an HTML element with id="close" disappear when clicked.
$("#close").on("click", function(){
    $("#close").hide();
});
Use of “this” keyword, and example of hover in action
When using click and hover commands, if you want to refer back to the object that triggered the hover, you can use this keyword, without quotes, which refers to the object that called the action. This is useful if you want to apply a hover to multiple objects at once (such as CSS class or Type selectors), using this keyword will affect only the object that triggered the event. NOTE: This keyword does NOT need quotes.
Fade a photo on hover: The following command will fade an HTML element with the class="pictures" when hovered. It will change the opacity to 100 percent when hovered, and return to 50% when the mouse leaves the photo.
$(".pictures").hover(function(){
    $(this).stop().fadeTo(400, 1);
}, function(){
    $(this).stop().fadeTo(400, 0.5);
});
Animation
It is possible to animation almost any numerical CSS value. This is particularly useful when you want to move things around on the screen using positioning.
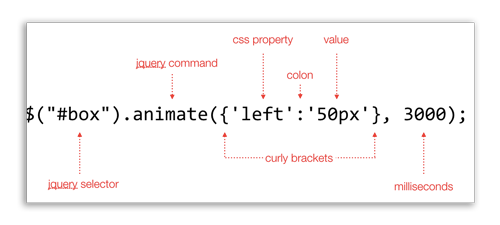
The code below would change an element with id box to left:50px from whatever its current value is.
$("#box").animate({'left':'50px'}, 3000);
Parts of a jQuery method
The jQuery method is a way to activate some kind of action (a function). You can also include bits of data inside the parenthesis to tell the method how to run.
Data Attribute
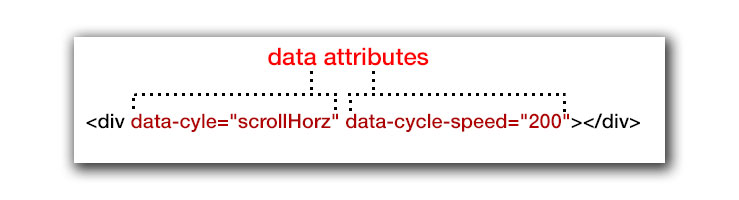
The data attribute will be important later when we do JavaScript. This attribute allows us to include some arbitrary data to HTML tags, which can be used by plugins or many other JavaScript utilities.
Data attributes always start with the word data and then end with a hyphen. The words that come after that depend on the plugin being used. There might be a plugin that wants the word “slideshow” as a data attribute. In your html tag, you might include: data-slideshow="true" The data keyword here is slideshow, and the value you assign it is true.
In this example below, a plugin called Cycle has some properties you can assign:
jQuery Plugins
It’s important to load jQuery plugins after you load the jQuery library. Below is an example of loading in the Fancybox, Event, and Twenty-Twenty plugins.
<script src="http://code.jquery.com/jquery.min.js"></script>
<!-- Plugins loaded below -->
<script src="jquery.fancybox.pack.js"></script>
<script src="js/jquery.event.move.js"></script>
<script src="js/jquery.twentytwenty.js"></script>
Plugins usually create new methods you can use in jQuery, and perform new actions.
//Methods built into jQueyr

$(".mybox").fadeOut();
$(".mybox").hide();
$(".mybox").css("color","#0000ff");

//new method included by jQuery
$(".mybox").twentytwenty();
Twenty-twenty plugin (before and after plugin)

The Twenty-Twenty plugin allows you to create features where you can slide over a photos to reveal another photo. The documentation on their website describes how this works:
<div id="before-and-after">
  <img src="sample-before.png">
  <img src="sample-after.png">
</div>
...
<script>
$("#before-and-after").twentytwenty();
</script>
Template for Exercises
<!DOCTYPE html>
<html>
<head>
    <meta charset="utf-8">
    <title>Intro to Coding Interactives</title>
    <style>
        #mybox{
            position: absolute;
            top: 0px;
            left: 0px;
            width: 200px;
            height: 200px;
            background-color: red;
            border:1px solid black;
        }
    </style>
</head>
<body>

    <div id="mybox"></div>


    <script src="//code.jquery.com/jquery.min.js"></script>
    <script>
    $(document).ready(function(){


    });
    </script>
</body>
</html>