Workflow and Github
Creating a GitHub Page
This lesson will take you through the process of creating a Github website that runs on the Jekyll site generator. For class, we’ll use this to host the projects you build throughout the semester. You’ll also use this as a way to turn in your assignments.
Some Git Terms Explained
- master - This is the main branch of your repository. It is the default branch if you don’t create any others.
- clone - This is a way to copy a repository from a remote location (i.e. GitHub.com) to your local computer.
- commit - To set a version (i.e. save point) for your project. You can review these commits, and see the changes that were made.
- push or sync - If you have a copy of the repository on your local computer, the sync process will sync it with the server.
- head - This is a reference to the node the repository currently points. Think of head as the latest node by default. You can change the head to previous revision, for example.
- branch - This allows you to create a new version of your repository separate from the master branch. As you switch back and forth, the files on your computer are automatically modified to reflect those changes.
- fork - A way to make a copy of a repository. You can fork anyone’s code on GitHub.com to make your own version of their code.
- pull request - This is when you make changes to someone else’s repository (after forking it), and you submit a request for them to incorporate your changes into their codebase.
- merge conflict - When the same area of a file differs, or is in conflict with another change. It will add some notations of where the conflicts are, and you have to resolve these before proceeding.
Setting up a GitHub repository and Page
Step 1
Create a GitHub account with your e-mail address. Make sure you confirm your e-mail address to complete the account setup. NOTE: The username you choose will be public and will be part of the URL of the website we’ll have you build.
Step 2
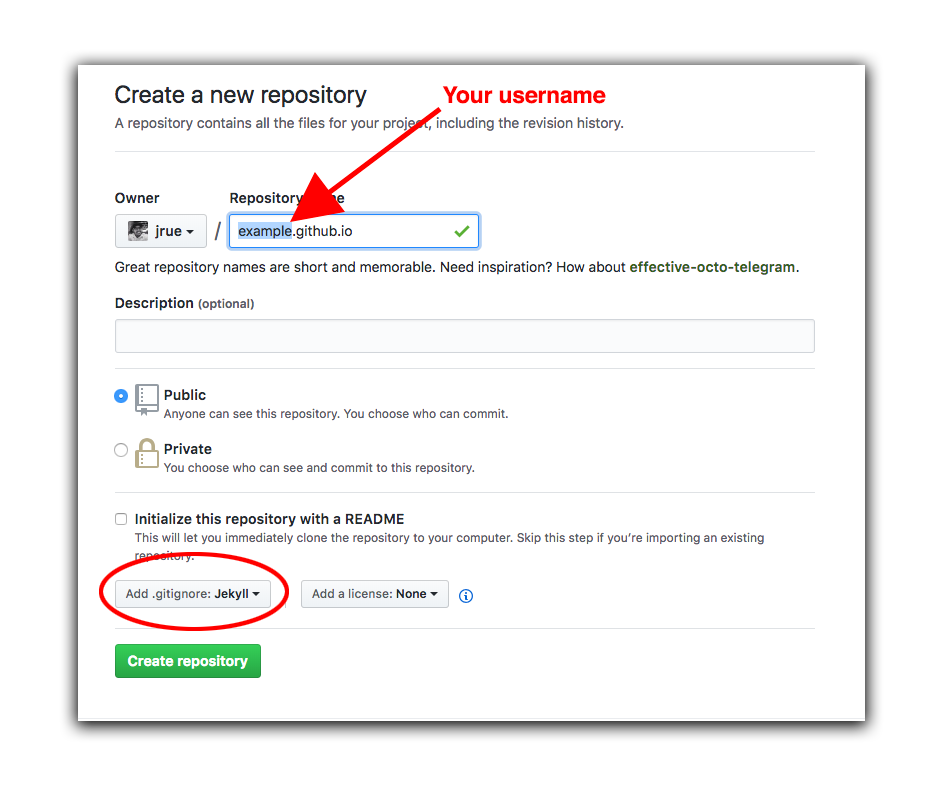
Create a new repository by clicking on the plus arrow at the right-hand top corner of the screen.
![]()
For the new repository, make sure to specify the repository name as yourusername.github.io. Under the “Add .gitignore” option, choose “Jekyll.”
Using a Jekyll on your local computer
NOTE: We won’t do this in class. I kept these notes here for more advanced uses, and for those who might want to run Jekyll locally on their machine.
You first have to install two programs: Jekyll and Bundler. These are easy, since Macs come with a package installer called RubyGem, or “gem” for short.
brew install rbenv ruby-builds
Once that completes, add a command so that rbenv launches every time you launch Terminal.
echo 'if which rbenv > /dev/null; then eval "$(rbenv init -)"; fi' >> ~/.bash_profile
source ~/.bash_profile
Next, update you local copy of Ruby:
rbenv install 2.4.1
rbenv global 2.4.1
Next Install Bundler.
gem install bundler
Navigate to where you want to setup your website. One potential location is ~/Sites directory.
git init your_name_portfolio
Next, you need to cd into the directory that was just created.
cd your_name_portfolio
Create a Gemfile with the appropriate Jekyll source.
nano Gemfile
Then copy the following text, and paste it into the editor. After that, press Control + X to exit, and it will ask you to save. Press Y for Yes, and it will then ask you to verify the filename. Press enter to confirm.
source 'https://rubygems.org'
gem 'github-pages', group: :jekyll_plugins