Introduction to D3
Introduction to D3
Data Driven Documents, or D3 for short, is a data visualization library written in JavaScript. You can download the library from the d3js.org website, or include a direct link to the library in the <head> of your webpage from D3’s content delievery network, or CDN.
<script src="http://d3js.org/d3.v3.min.js" charset="utf-8"></script>

<script>
//your d3 code will go in a separate script tag, AFTER you include the library above

</script>
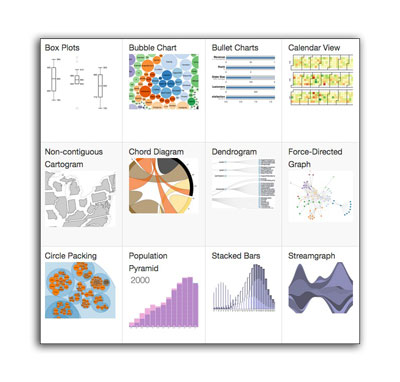
It is a good idea to check out some of the examples of charts, graphs and interactive elements on the examples page on the D3 website:
- D3 Examples: https://github.com/mbostock/d3/wiki/Gallery
Making a selection
Before you can start applying D3 functions, you first need to select an element in your document. The D3 select() function is used for this purpose. You need to provide an argument to this function (between the parenthesis of the select), of a CSS selector. This has to be a string in quotes. CSS selectors can be things like ids, classes or tag names.
<div id="mychart"></div>

<script src="http://d3js.org/d3.v3.min.js" charset="utf-8"></script>
<script>
    d3.select("#mychart")
    //now you can do things to the #mychart div
</script>
If you use a CSS selector that returns multiple elements, say for example you did select("div") which returned several divs, only the first one would be used. Here are some examples of selections:
d3.select("div")d3.select("#myuniqueid")d3.select(".multipleitems")
Chaining
D3 uses a convention called chaining where functions are called one-after-another, and are generally written on a new line. This makes for more readable code.
d3.select("body")
    .append("div")
    .attr("class", "mytext")
    .style("color", "red")
    .text("Hello World!");
It’s best to line-up the dots preceeding each function call. Each d3 function returns the object that is being selected. It’s important to keep track of what is being selected, and thus being affected by each function.
Some D3 Functions
There are many different D3 functions that can be called for all sorts of purposes. Here are a few essential functions to get started with:
- select(“#chart”) — This selects a single element in your document to start affecting in subsequent calls.
- selectAll(“.headlines”) — Much like the previous function, except this will select multiple elements and affect all of them together.
- append(“div”) — This adds a new element to the end. You need to provide the tag name, such as “div” or “p”, or any number of SVG tags.
- attr(“class”, “headlines”) — Add an attribute to a tag. You need to provide two arguments: the first is the attribute name, the second is the value of the attribute.
- style(“font-size”, “10px”) — Add some CSS styles to this tag. You can provide two arguments, or an object literal with multiple CSS styles.
- text(“Hello World”) — Add some text to the currently selected tag.
- html(“<p>Hello World!</p>”) Add some html to the currently selected tag.
Note: Whenever you use the append function, the selection is changed to the item appended, and subsequent calls are made to the item you appended.
Follow the process
In this example, let’s select the <body> of our html document, append a <div> tag, give it an attribute id=”mycooldiv”, then make the text inside this div orange with some CSS. Lastly, we’ll add some text to the div.
d3.select("body")           //select the body of webpage
  .append("div")            //append a div tag, and changing our selection
  .attr("id", "mycooldiv")  //give it an id attribute
  .style("color", "orange") //give it CSS color orange
  .text("Some orange colored text!");
The HTML generated by the code above would create this in your document:
<div id="mycooldiv" style="color:orange;">Some orange colored text!</div>
Storing Selections in Variables
Sometimes in D3, you make an initial selection, and you store it in a variable so that you can append multiple elements. Remember, whenever you append an element, it becomes the new selection for any subsequent calls. So if you wanted to append to sibling elements, you would need to store the main element in a variable.
var mydiv = d3.select("#parent"); //store initial selection in a variable

mydiv.append("div")          //appending div to the parent
     .text("My first div");

mydiv.append("div")          //appending div to the parent
     .text("My second div");
The above code would create two sibling divs next to each other, since they both appended from the parent variable. Here is what the html would look like after calling the code above:
<div id="#parent">
    <div>My first div</div>
    <div>My second div</div>
</div>
If we didn’t create a variable, the second div would have been appended to the inside of the first div!
Creating an SVG using D3
D3 is most often used for creating SVG elements, which can then be graphically manipulated or generated with datasets. Creating an SVG is similar to creating HTML elements.
First, lets take a look at a finished SVG element of a circle:
<svg width="150px" height="100px">
    <circle cx="75" cy="50" r="20" fill="red" stroke="black" stroke-width="3px"></circle>
</svg>
Now, lets generate the above code, but using D3:
d3.select("body")
  .append("svg")
  .attr("width", 150)  //numbers are fine, don't need the px
  .attr("height", 100) //numbers are fine, don't need the px
  .append("circle")    //changes the selection, subsequent calls now done to the circle
  .attr("cx", 75)
  .attr("cy", 50)
  .attr("r", 20)
  .attr("fill", "red")
  .attr("stroke", "black")
  .attr("stroke-width", "3px");
Note: You don’t have to worry about namespaces in D3, as it will take care of namespacing issues for each browser automatically.
Creating Elements Based on Data
The power of D3 is in something called the data joins. Data-joins may seem counter intuitive to beginners. The process is:
- Store some data as an array in a variable
- Call the
selectAll()function in D3 of a nonexistent element - Add the data using the
data()function - Call the
enter()function which will then run any subsequent code over-and-over again, based on elements in the data.
In the following code block, we store a three numbers inside an array, then use it to create three circles.
var ourdata = [32, 23, 12];  //some random data, stored in an array

d3.select("body")
  .append("svg")
  .attr("width", 100)
  .attr("height", 100)
  .selectAll("circle")      //selectAll on something that doesn't exist yet
  .data(ourdata)             //add the data
  .enter()                   //call enter, subsequent code will be repeated for each item in array
  .append("circle")
  .attr("cx", 10)
  .attr("cy", 10)
  .attr("r", 20)
  .attr("fill", "red");
The code block above would create three circles. If we added additional elements to our data array, it would create that many more circles.
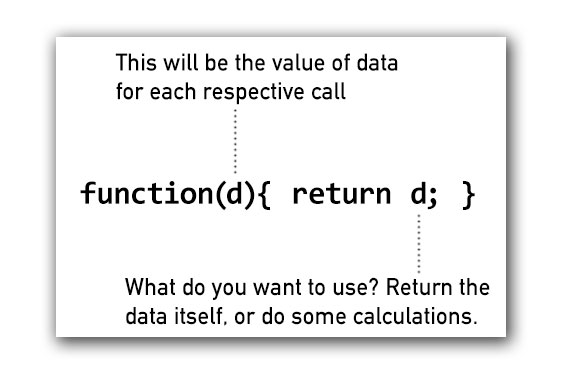
If we ran the code above, we wouldn’t be able to see these three circles because they all have the same cx and cy values (the are all on top of each other). So instead, we can modify our code to base the circles positions on the data element currently in question. To do this, we use an anonymous function for the value of each circle, and provide a placeholder “d” as the argument, which will be the respective piece of data in our array. We need to return the value we want to use.
.attr("cx", function(d){ return d; }) //use the data element from that current pass

For example: Let’s say we wanted to create three circles, and set the cx attribute to be 10, 50 and 100. (We’ll set both the cy and r attributes to a fixed 10.)
First, let’s create our data array.
var ourdata = [10, 50, 100];
Now, let’s create our SVG, and store it in a variable called “svg”.
var svg = d3.select("body")
            .append("svg")
            .attr("width", 200)
            .attr("height", 100);
Next, we will create our data-join. But this time, when we set the cx attribute, we return the piece of data from each element.
svg.selectAll("circle")
   .data(ourdata)
   .enter()
   .append("circle")
   .attr("cx", function(d){ return d; }) //use values from ourdata
   .attr("cy", 10)
   .attr("r", 10)
   .attr("fill", "red");
We can also do calculations within the anonymous function. Let’s do the same code from above, but this time, we will add 5 to each of the elements, so our cx positions will now be 15, 55, and 105.
svg.selectAll("circle")
   .data(ourdata)
   .enter()
   .append("circle")
   .attr("cx", function(d){ return d + 5; }) //This time, add five to the values!
   .attr("cy", 10)
   .attr("r", 10)
   .attr("fill", "red");
Using the i as an index in an Anonymous Function
The d in each anonymous function refers to the value in our array when the function is called. But if you wanted instead to know the index of the item in the array (the order), you can optionally add a second variable i which will count from zero to the end of the array.
var ourdata = [10, 50, 100];

//...

.attr("cx", function(d, i){ return i; }) //d is 10, then 50, then 100. i is 0, 1, 2.
Pulling Data From Objects
D3 wants an array for it’s data function. But you can also give it an array of objects. By using our anonymous functions, we can extract properties from each item in our array.
//now our data is an array of objects
var ourdata = [
    {x: 10, y: 20, radius: 15},
    {x: 20, y: 20, radius: 18},
    {x: 30, y: 20, radius: 20}
];

//create an svg element, store in variable "svg"
var svg = d3.select("body")
    .append("svg")
    .attr("width", 200)
    .attr("height", 200);

//create three circles (since there are three items in our array)
svg.selectAll("circle")
    .data(ourdata)
    .enter() //code after this will be called over-and-over based on items in ourdata array
    .append("circle")
    .attr("cx", function(d){ return d.x; }) //extract the x property
    .attr("cy", function(d){ return d.y; }) //extract the y property
    .attr("r",  function(d){ return d.r; }) //extract the r property
    .attr("fill", "red");
